Studio Application Guide


Abbreviations and Acronyms
| Term | Description |
|---|---|
| Admin | Administrator |
| ANI | Automatic Number Identification |
| CLID | Calling Line Identifier |
| IVR | Interactive Voice Response |
| QForMe | Queue For Me application |
| TTS | Text-to-speech |
Designing for better conversation
Create context for the user
Make an introduction
Inbound services should always establish context as quickly as possible that sets user (caller) expectations. A call steering application might begin “Welcome to our company. To best handle your call today…”. A transaction service might begin “To complete your request to XYZ today will usually take 2 minutes”. Outbound services should explain why the person is receiving a call for instance
“Hello, this is a call from ACME Inc. regarding your order feedback”✅
“Hello, we’re calling regarding your order feedback” ❌
Personal vs. Non-Personal Language
You should be consistent with the language you use throughout. Non-personal language, using “we” instead of “I”, will help establish the context that the user is being handled by a system not a live agent. It is becoming more common to hear systems use personal language. Personal - “Please hold the line while I transfer you.” Non - personal - “Please hold the line while we transfer you.”
Where am I
The user should know at all times where they are in the call and where that is in relation to where they wish to be. Use prompts like:
“Thanks for your billing number, next we will determine your eligibility, …”✅
“Next we will determine your eligibility” ❌
Consistency is vital to reducing confusion. If you use 0 to transfer to an operator on one menu, you should use 0 every time the caller has the option to transfer to operator. If you prompt. Wide or deep menu structures can also be disorienting for the user. Explain the category of choices clearly and avoid having more than 5 input options as most people will be unable to recall options. When using menus for call steering, do not have more options than receiving skill groups.
Informed Waiting
If the customer needs to wait for backend systems, then the delay should be explained and some indication of progress used.
“Please wait while your profile information is retrieved” ✅
(... long period of silence during integration node execution … ) ❌
The integration node will execute as soon as the prompt begins to be played. If the integration takes longer than the comfort prompt, music on hold can be configured on the integration node. For very long backend transactions, HTTP long-polling can be used to give Studio the opportunity to make periodic updates to the user, e.g. every thirty seconds. Try and cache the information from HTTP and API requests if possible to reduce information retrieval time during calls.
Meaningful Error Handling
When reporting error, consider your audience. Error messages should be written for the user to help them understand what they can do to proceed - what the system requires, not for the system designer to understand what went wrong. Announce the former, record the latter with a log node.
Leverage what you know
Don’t ask questions you already know the answer to
Don’t ask the customer again if the application or the enterprise’s systems already have the information. Instead, verify the caller (but perhaps just start with the ANI / CLID) and use integration nodes to discover the rest.
Don’t forget what the customer has said
If the customer provides incorrect or invalid input, then they should be able to return to a previous menu or be transferred to an agent with their contextual data intact, e.g. provided numbers. Inference script variables will remain populated, so check them to support users revisiting parts of the application.
Make it easier for the caller
Enable barge-in
Let your experienced users barge-in to accelerate their progress. For prompts within barge-able input nodes, use very brief prompts followed by a brief pause before going on to explain at greater length what input is sought.
Vary your prompts when the user makes an error
The first time a user makes an error it may be a simple “typo”. Consider a fast reprompt. The second time it may because they misunderstood the question and need more detail. Consider a more detailed explanation of what is required. In Studio that means using a different and shorter fallback prompt to the initial prompt, and an event handler limit of two with a menu specific event handler followed by goto’s to return control to the original form.
Helpful handover
If the service cannot help the customer reach their goal, then provide an option to transfer them directly to a service or person that can. It should be made clear that they have the option of, or are being transferred to, a live agent.
Offer voice and DTMF for input
Use the speech recognition capabilities of the platform to allow hands-free use. Maximize recognition rates by coaching the user on what to say with prompts like “Say sales or press 1”. If using this approach, use it uniformly in all menus.
However, avoid using speech recognition for impossible tasks
Even human operators will struggle to understand (or comprehend) a 12 character alphanumeric string accurately without re-prompting the caller to clarify particular character sequences. Consider integrating web or messaging channels to provide a more polished and accurate experience.
Consider the time it will take to respond
Vary the input form Interdigit Timeout if you know it will take the caller some moments to start data entry of an account number for instance.
Use hinting within text-to-speech (TTS) prompts
Use , and . punctuation to control pauses within TTS prompts to create more natural sounding dynamic prompts, or use SSML voices and annotations. Use phonetic and alternative spellings when the TTS engine is not pronouncing words as expected.
Consider your voice
The tone of messages should be brief and to the point, but not terse. For voice tasks, choose copy and text-to-speech or voice talent appropriate to the purpose of the service and the user audience. If voice talent is used, consider how you will use them again in the future when changes are required, understand what text-to-speech will be unavoidable in the application, and how that will sound in relation to the voice talent.
back to top
Designing for Analytics
Once the service is in operation you will want to have information on its performance to both measure results as well as support further refinement. The following design guidelines make it possible to understand business performance - service usage and automation levels external system performance - transaction delays end-user behaviour - user activity and usage paths Studio offers a system log as well as custom datastores. The system log automatically captures start and end of call including transfers, along with ANI, DNIS, SIP Call-ID and duration. The system log is not able to be retrieved by APIs, while custom datastores can be, allowing simple ETL of custom datastores to enterprise reporting platforms.
Logging guidelines
Log the interaction path
Studio already logs the start and end of the interaction. However each time the path of the user branches due to user input, integration node result, or distribution node, the path taken must be logged (along with the relevant input). Either use the node-logging feature, or insert explicit log nodes. Integration nodes to external services such as Google Measurement Protocol can also be used subject to their usage policies but will not benefit from default start and end of call logging. Logging occurs as a background activity, so can be logged after prompts are queued for playout and will be logged even if the caller hangs up during that prompt unless a pause node is used.
Log goal attainment
Identify the goals of the service and clearly log goal attainment events. For instance, if the service is a renewal service, log when the renewal is complete and also potentially when the renewal was rejected due to business rule beyond customer (and system) control and the customer was advised of that. Note that the goals of the service and the goal of the system may be different; for instance, the goal of the business owner of a survey application would be to achieve high scores; the goal of the system might be to gain high participation rates in the survey - so in this instance, log partial or full participation clearly and perhaps separately to scores.
Log transfer of control
Invoking a blind transfer will be captured by default call logging, but making a request to an integration node or another task also effectively transfers control to an external system for the duration of the request. Log these transfers on exit and re-entry to understand the service duration and also any returned results. Always log the integration result code. Each logging message is timestamped.
Log event handlers
Each Studio input node has event handlers. You should log whenever one fires as it indicates an area of possible customer interaction difficulty.
Log caller disconnect
Use the studio DISCONNECT handler that is defined for every task and ensure that you log caller initiated disconnect.
Write structured call tracking records to a datastore
For ease of in-Studio operational reporting and to capture each call as a record, rather than an event stream, consider a custom data store with a row per call. Collect key caller interaction state within Studio variables as the interaction proceeds. Use a single datastore node in each of the following places to ensure that all call records are captured
- Within the DISCONNECT handler. This is executed only for when the caller disconnects, not when studio hangs up. Note: for bridged or blind transfers with display name or ANI overwrite, if the caller disconnects while the transfer is in progress, the handler will execute.
- Within a common branch that is used for all hangup operations, e.g on a “Hangup” canvas and then use a Goto node to “Initiate_Hangup” in place of direct use of Hangup.
Set a business relevant retention period
With high volume systems, you will need to consider an appropriate account level and datastore specific retention periods to ensure you have high performance access to the log and datastore information.
Back to top
Design for maintainability
Use canvas to create modularity
Use separate canvas for each section of your task. Regularly clean up stray empty canvas created by the various Studio editing operations that create temporary canvas. Begin each Canvas with a comment node that describes the canvas named “START_CanvasName” to make it easy to target these canvas from Goto nodes. When naming a canvas, prefix with a number that (roughly) corresponds to the execution order. This will sort the canvases in a logical order and allow you to quickly identify canvases that are not an explicit part of the main application (to review for clean up or deletion).
Choose nodes wisely
Avoid deprecated nodes
There is always a better replacement node that will have greater longevity.
Use specialised nodes where possible
Using the specialised form, menu or complex prompt nodes will produce a simpler cleaner design compared with building the same functionality from individual input, decision and prompt nodes.
Use comment nodes and tooltips
Especially to help provide context to those other than the designer. Implement intent explicitly Always complete the event handlers nodes, even if it is just a hangup node. Terminate all dangling branches of the script with hangup nodes to be clear that is the expected behaviour.
Back to top
Deploy, Observe and Iterate
The agility of developing services with Studio enables real user feedback to be solicited early in the development process and incorporated. Have multiple callers use the service while you listen, either through double-jacking or simply having them make calls on speakerphone while you listen. Be aware however that echo canceling features on speaker phones may damage barge-in detection performance.
Get to production early
Use some of the following techniques to enter service as soon as possible while preserving customer experience.
- Targeted use. Engage the new IVA in a targeted way from any existing service based on requested application, customer segment or any other available dimension.
- Safe go-live. Build the overall application as well as individual modules behind feature toggles using the Studio distribute node.
- Opt-out and error-out. Offer exit to operator and track global and dialog error counts and use to transfer users to live agent. Initial applications can have very low error thresholds before transfer.
- Smooth handoff. Use the Studio screenpop transfer node to transfer the caller with as much context as possible, including all user input to date to minimise customer effort in a transfer.
Natural Language Specific Guidance
Train briefly with a friendly audience
Development of your own training phrases will only get you so far. Explain to other people what their goal should be with the system then let them find their own words to express it directly in interactions with the system. Incorporate the new utterances into the training material.
Then train continuously with real users only
Collecting training phrases from pretend users will also only get you so far. use the techniques above to get to production service as swiftly as possible, improve the depth of training, then expand the breadth of intents handled.
Fallback intents
The fallback intent should always itself have a fallback sub-intent. Users that reach this intent have hit two errors in a row and should be gracefully errored out to live operators.
Back to top
Advice for High Volume Applications
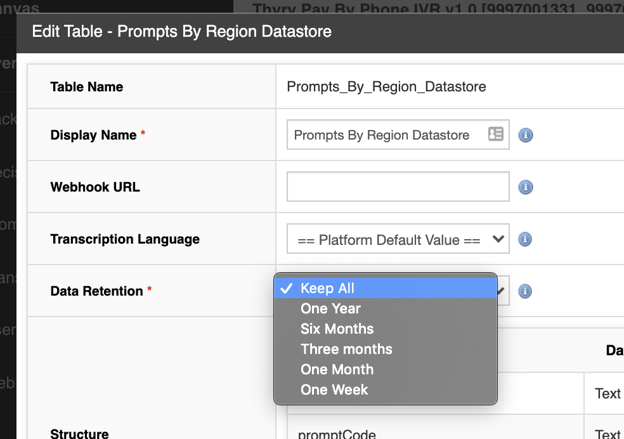
Data Retention
Studio offers system log and datastore retention settings. Configured so as to keep logs below 1M lines ensures optimal administrative experience while performing operational searches on these logs or exporting to file.
To configure data store retention, select menu Global -> Data Stores. From the list, click the Action menu of the Data Store and select “edit”. Configure Data Retention as required and then click save. This option can also be configured when the data store is created.
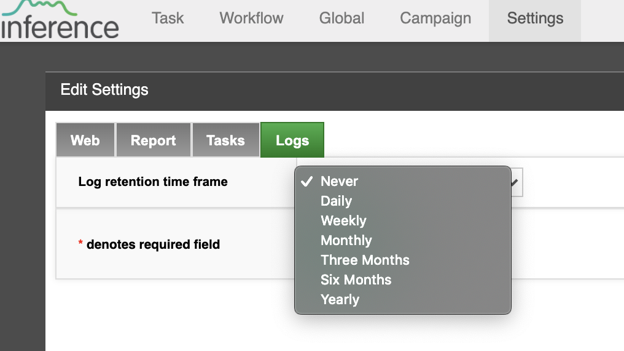
To configure task log retention from the top menu: Settings -> System Settings -> Logs Tab -> set required retention period:
Change Management
Studio offers several mechanisms for managing changes to tasks that can be used within your organization’s change management. Please contact your customer success representative for our best practice key application change control standard. Tools you can use include
- Tagging conventions on tasks such as prod, UAT, dev etc.
- Task naming conventions including use of versioning within the name
- Create new task “as copy”, as a mechanism to produce a new development branch from current production. Note: this reuses existing datastore linkages, but any records written to a datastore are identified by the new, task instance ID.
- Task versioning as a tool permitting rapid rollback
- Studio’s hitless number move operation as a means to cut from current production task to new production task while handling live traffic.
- Insertion of distribute nodes within live tasks to allow diversion of a configurable proportion of traffic to receive new behaviour prior to widespread deployment.
Filtering robo-diallers
Applications with large numbers of DNIS or widely advertised numbers may receive numerous robo-callers. The first input node no-input event handler should lead to a specific additional menu to filter out robo-diallers. An example prompt is “I could not hear anything. Press 1 or say operator to speak to an operator”. This follow-up menu should disconnect no-input calls.
Back to top
Tips and Tricks
Compare in order “constant” == variable
In decision nodes and keyword finder, Studio shows a snippet of the comparison expression in the canvas. Order your expression to make the most use of this by putting the “constant” you may have for comparison first.
Start new canvas with a START_Canvas_Name Comment
This makes it simple to find and target this canvas with Goto nodes
Use example and template canvas
For applications with integration, create an API example canvas that has a copy of each integration operation pre-populated with test data and test environment URLs. These can then be used to check API operations quickly. For applications with common module patterns (where direct re-use is not possible), create a templated module in a separate canvas. This can be then cloned with copy and “paste branch” as desired.
Naming Conventions
The goal of naming conventions is to provide clear, descriptive and uniform ways of referring to things, making re-use of names simpler and easier. At present within Studio there are varied requirements for validly naming entities, broadly limited to whether spaces are available or not. Our conventions are Full words or common abbreviations only Title Case for top level entities e.g. Scripts or Datastores or Title_Snake_Case where spaces not allowed except for application level variables in PascalCase snake_case for nodes and also script level prompts as an acknowledgement of their similarity to recording filenames camelCase for all script variables as an acknowledgement of their similarity to programming
Definitions
Title Caseseparates individual words by spaces with the first letter of each word capitalized.Title_Snake_Caseseparates individual words with an underscore with first letter of each word capitalized.snake_caseseparates individual words with an underscore with no capitalizationcamelCasedoes not separate words but with the first letter of each subsequent word capitalized.
Back to top
Naming Convention Quick Reference
Entities
| Type | Example | Convention |
|---|---|---|
| Scripts | Outbound Collections | Title Case |
| Workflow | Monthly Sales Report | Title Case |
| Campaigns | Customer Survey | Title Case |
Application Content Items
| Type | Example | Convention |
|---|---|---|
| Application Prompts | Welcome_general | Title_snake_case |
| Application Variable | CustomerCity | PascalCase |
| Form Types | Staff Department Form | Title Case |
| Table | Transfer_No_table | Title_Snake_case |
| Holiday Schedules | Standard Holiday Schedule | Title Case |
| Email Profiles | Support Email | Title Case |
| BW-XSI Subscriptions | None | None |
| Payment Gateway Profiles | Online Sales | Title Case |
| Log Gateway Profiles | Script Logging | Title Case |
| Data Stores | Transfer_No_Datastore | Title Case |
Back to top
Naming Considerations
Building upon the naming conventions above, there are a number of specific factors worth considering for various types of entities and items.
Entities
Scripts / Workflow Names
If the application is to be designed as a template, then the name should be followed by a hyphen, followed by the word “Template”. For e.g., an outbound collections template could be named as “Outbound Collections - Template”. Versions of scripts are best managed using versioning, in other words the version should not appear in the script / workflow name. However development and usage practices might clone the script through copying or exporting then importing. In this case, the version should be named, e.g. Outbound Collections - v2 - Template. Finally, the same mechanisms may be used for branching, e.g. for feature development. In this case, the branch should be named, e.g. Outbound Collections - Awesome Feature branch.
Application Content Items
Application Prompts
Most prompt nodes will contain multiple application (or script prompts). These prompts can be viewed and edited both from the context of the prompt node that leverages them, as well as the Script and Global menus. Some aspects to considering in naming are
- Application prompts are intended to be used in more than one location to avoid repeated copy. Use a globally relevant name.
- It may be appropriate to use the complex prompt name, e.g. Greet Known User as a prefix, e,g. greet_known_user_….
- You may want to use intro, mid1, … midn, end suffixes, e.g. greet_known_user_mid3 for the third stitching prompt between variables, or more explicitly declare the variable they reference.
Tables and Datastores
Tables and Datastores at present ask for both a name and a display name. Best practice is to use the same words but in PascalCase for the name but in Title Case for the display name.
Reports
A well constructed report will include X and Y axis labels, meaning that the dimensions of the report are available in the report list. The key remaining report facts that should be considered in naming is the measures or filters. The recommended naming then is Data Source - Measure[s] - [version]
Queues
Queue names should resemble their name listed in Broadworks.
Script Level Items
Node Names
The Studio canvas icons show clearly what the purpose of the node is, but you may wish to use a brief verb within the node name to describe its purpose. Preferred verbs are
- log_ - datastore or log nodes that are writing data
- set_ - variable nodes making calculations or integration nodes writing updates
- get_ - lookup or integration nodes retrieving data
- create_ - integration nodes creating transactions or entities
- play_ or _greet - standalone prompt nodes
- req_ - request user input
- beg_ - the start of a module, particularly on a new canvas that you expect to be the target of a goto node.
Script Prompts
See Application Prompts above.
When creating prompts with primary and fall back prompts, name them as “main” and “fall_back” respectively, to identify them easily. For e.g., “participate” prompt could be named as “participate_main” and “participate_fall_back”.
Event Handlers
Event handlers are wired to underlying VoiceXML event handlers, for which the VoiceXML standard specifies a number of predefined events in lowercase. Hence we follow this lead and also use lowercase by convention.
Comments
Comment nodes are very useful to give an idea about the call flow to any future maintainer - including the designer themselves. Use comments nodes to capture assumptions and communicate things that won’t be obvious from everything else that is already clearly labelled to this standard. Each canvas should begin with a comment node, preferably titled START_canvas_name.