Studio 6 Featured Tutorials
Creating your first Voice Task
In this tutorial we will get you up and running with Studio by creating a simple Voice Task.
TIP
Before you can create a task, please make sure you meet the following requirements:
- You have a Studio account with admin or read-write access.
- You have at least one phone number mapped to your account. If you don't have any phone numbers, please contact your service provider.
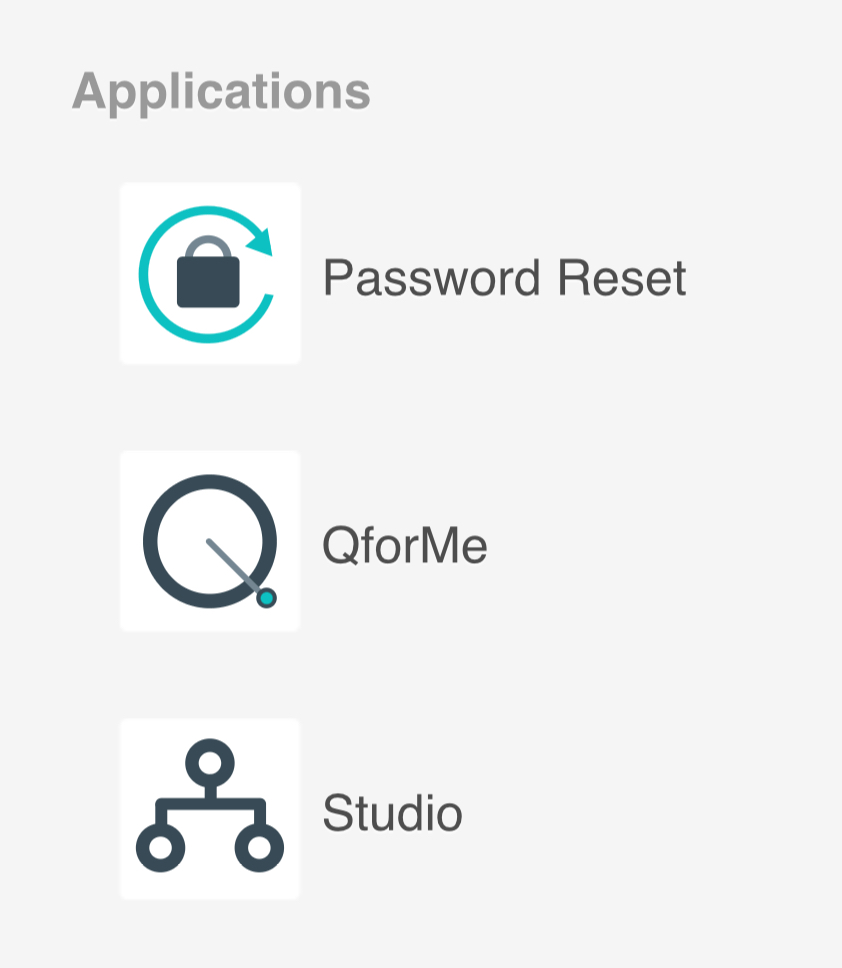
When you first login you will be presented with the main Portal screen where you can access all applications in your account.
- Click the Studio icon.
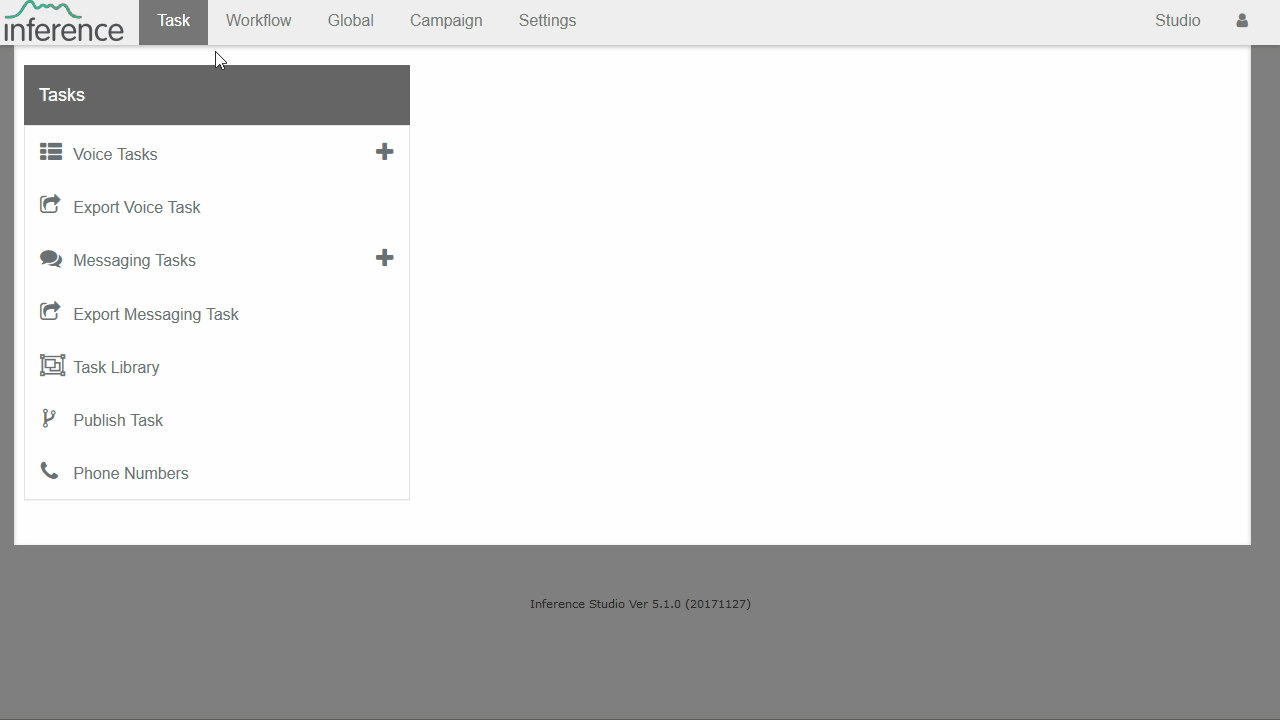
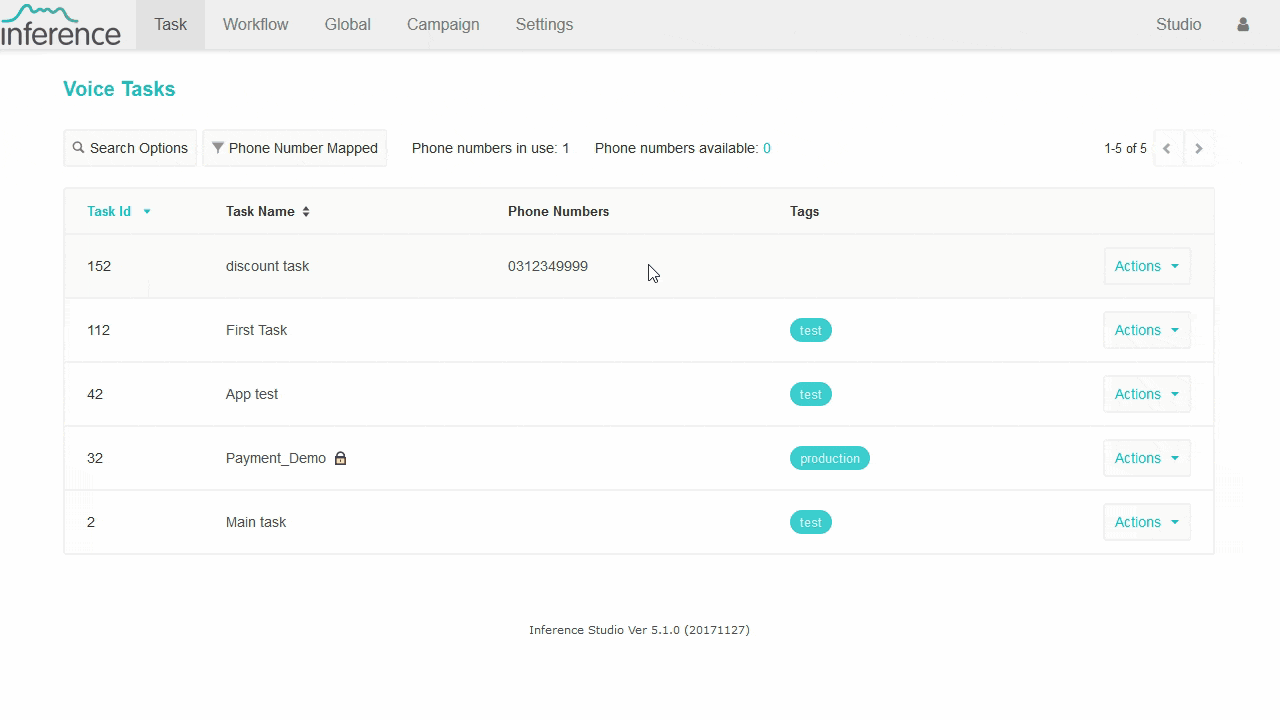
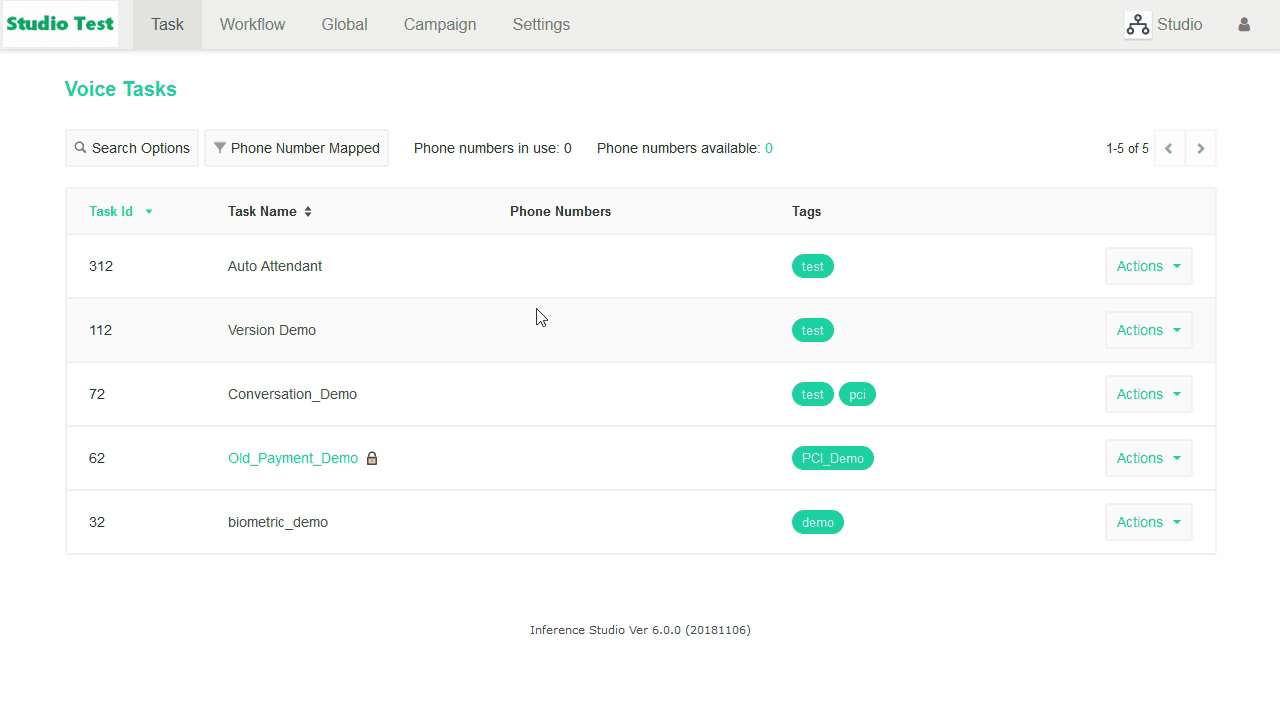
The Voice Taks page contains all Voice Tasks in your account. If this is a new account you will have no tasks at this point, so let's create one.
Navigate to Task in the top menu and select the Voice Tasks + icon.
Studio will ask how you would like to create the Task. Select the Blank Canvas option and click Next.
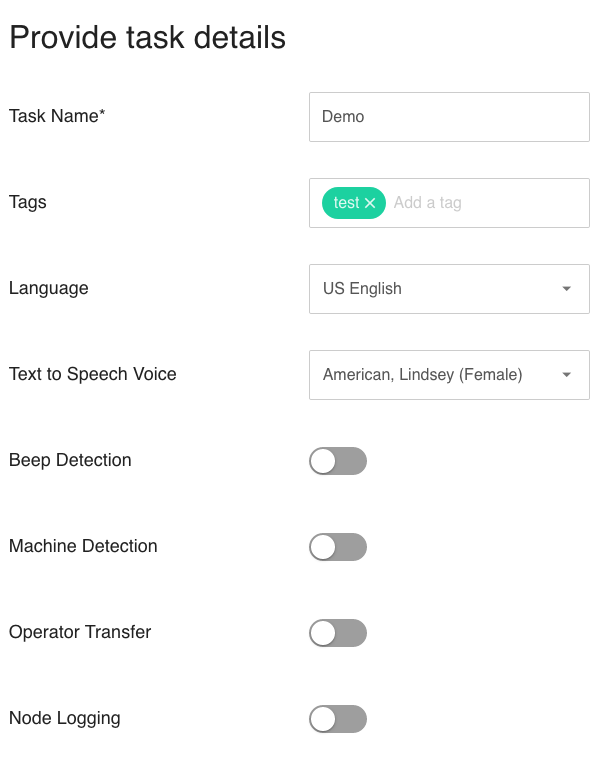
Provide a Task name.
Create some tags. Tags allow you to search and filter your tasks and are good way of keeping organized. e.g. for a test task use the tag 'test'.
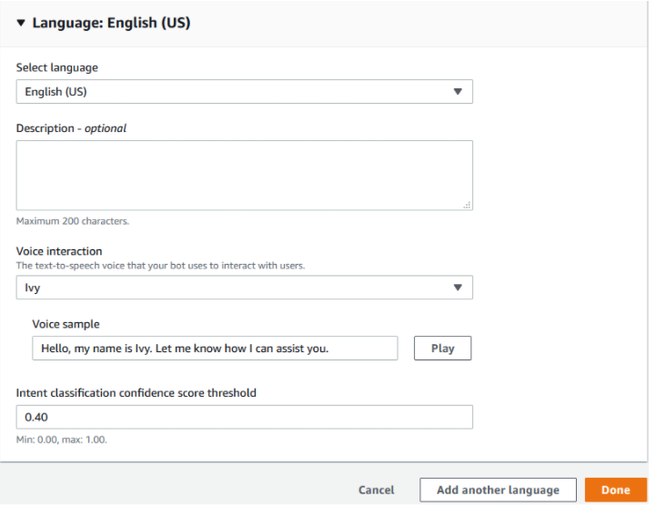
Select the Language. Depending on your geographic region and service provider agreement, multiple languages may be shown under Language.
Choose the TTS (Text To Speech) Voice.
Select whether your task should use Beep Detection. This is an advanced feature relevant for outbound calls. Leave the toggle set to disabled.
Select whether your task should use Answer Machine Detection. This is also an advanced feature relevant for outbound calls. Leave the toggle set to disabled.
Choose whether you would like to enable Operator Transfer. This is only relevant for outbound calls so leave the toggle set to disabled.
Select whether you would like to use Node logging. This is another advanced features so leave it set to disabled.
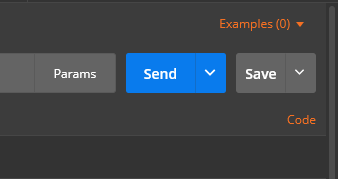
Select Save.
Creating a Callflow
We've created a new task but at the moment it doesn't do very much. To give our task some functionality we will create a simple call flow. A call flow is everything a caller hears when they phone into your service.
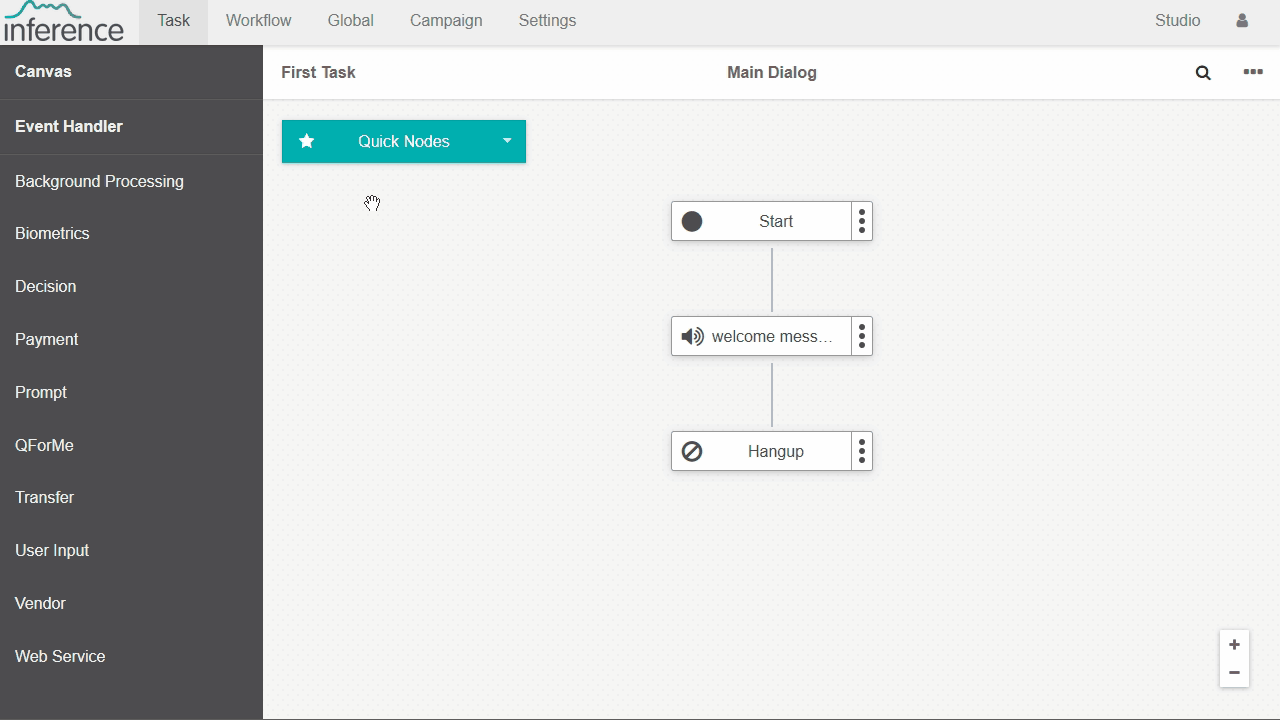
- The canvas view is the graphical view where you will spend most of your time in Studio building call flows. Your call flow currently has a Start and a Hang up node. Each node in Studio serves a specific function. You create a call flow by linking different node types.
We want to play a welcome message as part of our call flow. This is accomplished by using the Play Prompt node.
- Let's add a new Play Prompt node by navigating to the side menu and under the Prompt section, select the Play Prompt node and drag it between the Start and Hangup nodes. You will see an overlay to indicate the possible drop locations for the Play Prompt node.
- Once you have dropped the Play Prompt node you will need to define it. Under the Node tab, Provide a node name.
- Select the Prompts tab and under the Prompt menu, select ==NEW PROMPT==.
- Name your prompt welcome_prompt.
- Keep the default values for Language and Voice.
- Under the TTS block, enter the welcome message that you want to play. For example - Welcome to Inference.
TIP
TTS Speed
To control the speed at which words are spoken in TTS you can add a comma , at any point in the string you are reading to add a 0.33 second delay. You can also add a period . at any point in the string to add a 0.66 second delay.
- Select Add and then Save. You will see that the new Welcome_prompt node has been added to your call flow.

Assigning a Phone Number
You are almost ready to test your first Studio Voice Task. Before we test the tast, we need to assign a phone number to it.
- To map a phone number head back to the Voice Tasks page from the top menu.
- Select the Actions button and select Map Phone Number.
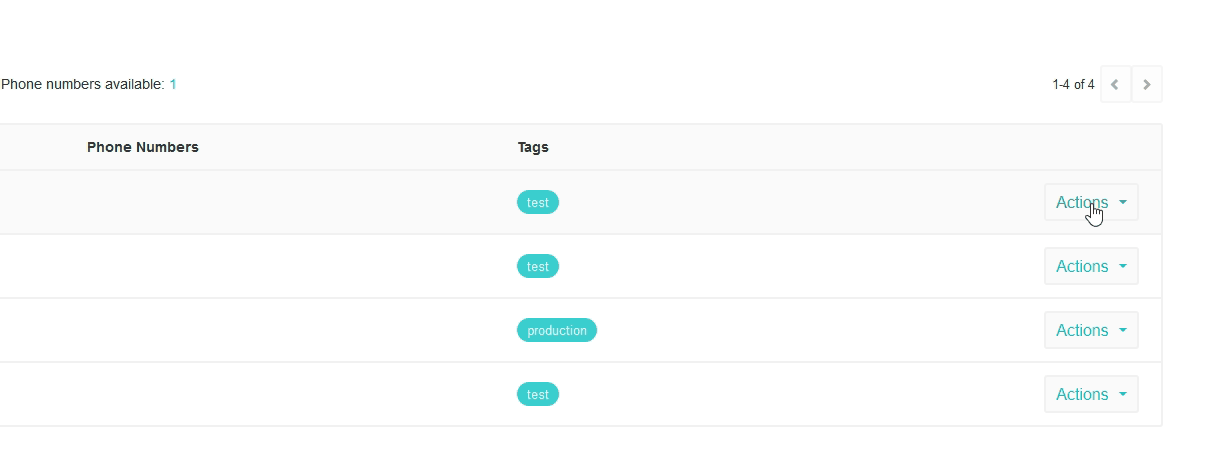
- You will see a list of phone numbers available in a pop-up window. Select one or more service numbers and click the Map selected Phone Number(s) button.
- Your task is now ready and you can test it by calling the phone number you just mapped. You should hear the welcome prompt and then the call will hang up.
Congratulations!
You have successfully created your first working voice task. 💯
An Intro to Messaging in Studio
This tutorial will build on the Getting Started with Voice Tasks tutorial and will demonstrate how to create a Messaging Task that a user can text a message to and receive a message back via the Integration node. Please make sure you have completed Getting Started with Voice Tasks before beginning this tutorial.
In this tutorial we are going to connect to the Quote Of the Day API which will allow us to send and SMS and receive a SMS back with a quote of the day! To achieve this we will be introducing the Integration Node. The Integration node allows communication with any external web service API and is one of the most powerful features in Inference Studio.
Creating your first Messaging Task
Let's create your first Messaging Task by navigating to the Task in the top menu and selecting the Messaging Tasks + icon.
- Studio will ask how you would like to create the Task. Select the Blank Canvas option and click Next.
- In Task Name let's call it Quote of the day.
- Let's also include the tag 'test'.
- Leave the Conversation Session Timeout to the default 60 seconds.
- Select Save to finish creating the task.
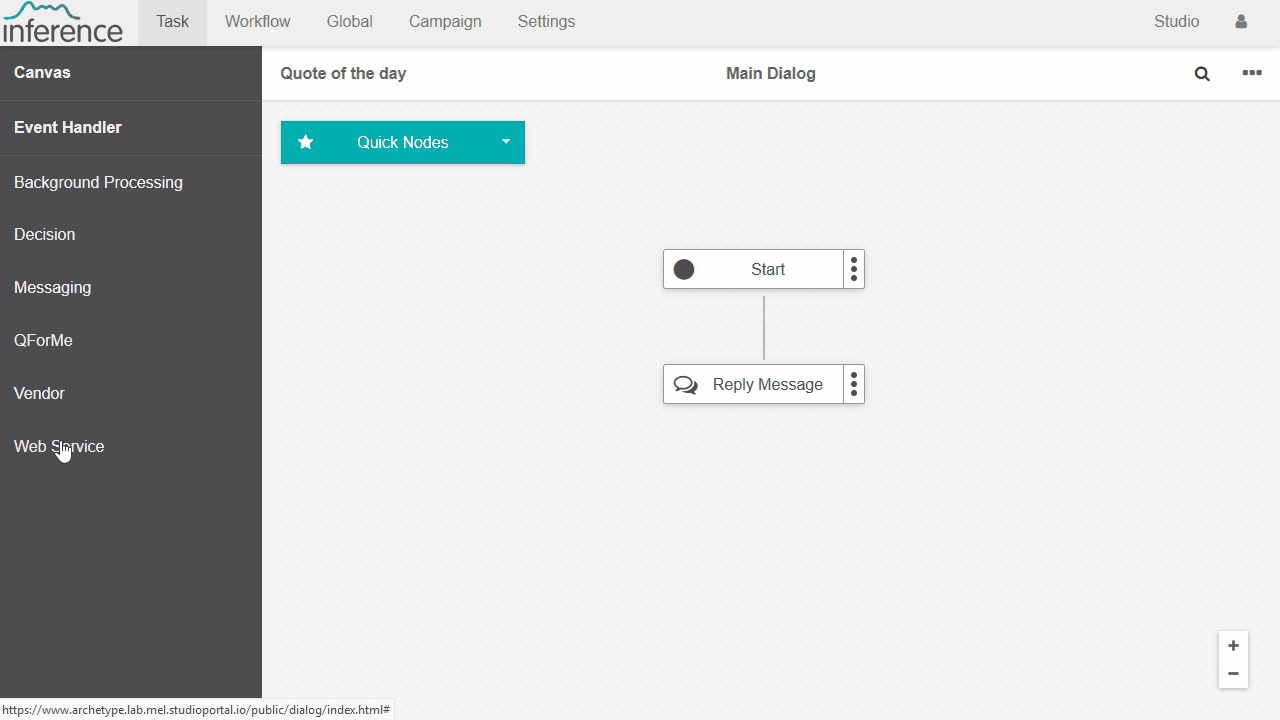
Creating the Callflow
- From the Call flow canvas, in the side menu under Background Processing select & drag the Integration node onto the canvas between the Start node and Reply SMS node. An overlay will indicate where you can drop the node.
- Name the Integration node quote_of_the_day.
- Select the Settings tab. This is where we will provide information for our Quote Of the Day API.
Using the Integration Node
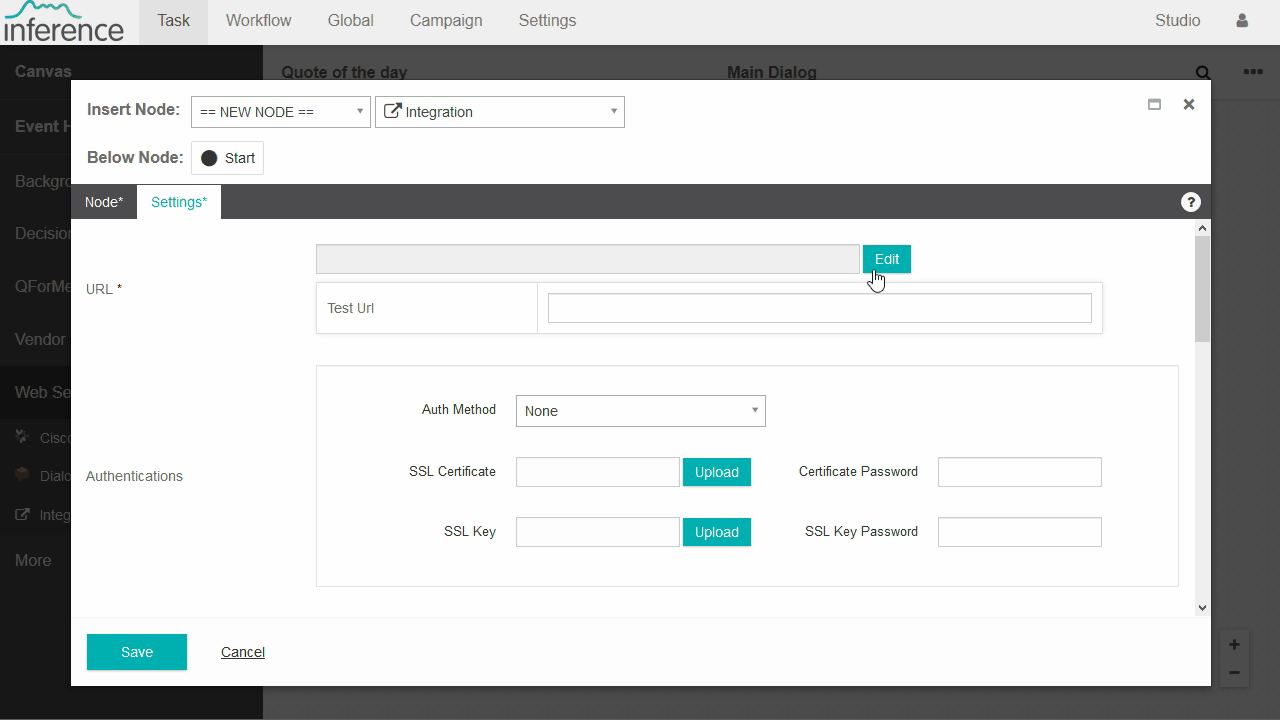
Enter the full URL of the Restful API that you are accessing by selecting the Edit button.
You will be taken to the Expression Builder.
Select the Text button and enter the URL 'http://quotes.rest/qod.json'
Select Apply
You will see that the URL has been added.
We don't need any Authentications for our Quote Of the Day API. So just leave the Auth Method, SSL Certificate and SSL Key fields blank.
Select the GET Http Method.
We also don't require to pass in any headers for this API so leave this section blank.
From the Parameters section select the Preview Test XML button. If your preview is successful, the API you are calling will return a collection of data.
To select a specific Parameter simply click the parameter inside the preview XML document. Studio will automatically extract the XPath for that parameter. Select the quote XPath.
The Xpath can then be assigned to a == NEW VARIABLE == from the Assigned to Variable dropdown menu. Let's assign the quote XPath to a new variable called quote.
Select the Add Return Value button to complete the variable assignment.
Repeat the Steps 10 to 12, this time for the
<author>XPath. And assign it to a new variable called author. You should now have a variable called quote which contains the quote data and a variable called author which contains the author data.Leave the Fetch Timout and Music on hold sections as blank.
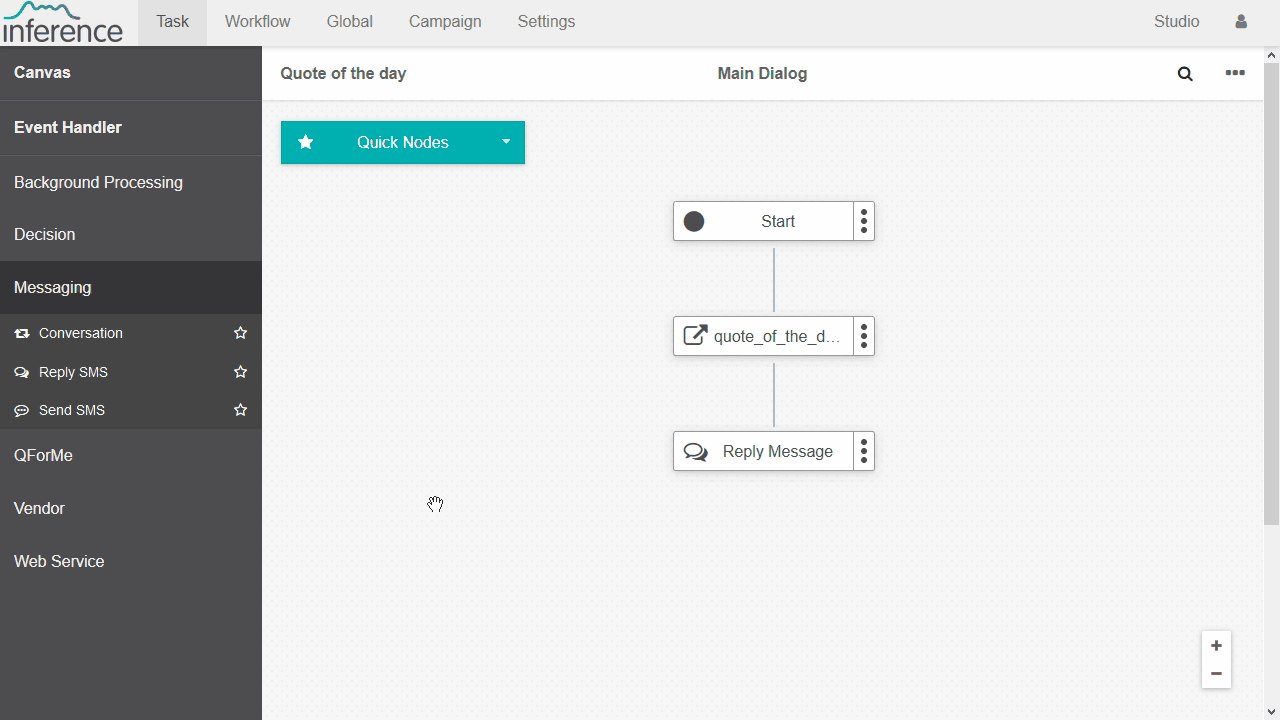
Select Save to finish building your integration node. You will be taken back to the Call Flow Canvas where we can see our get_quote Integration has been added.
Using the Reply SMS node
- On the Reply SMS node select the options icon and click Edit.
- Leave the name set to Reply SMS and select the Settings tab.
- From the Settings tab we can now provide the content for the SMS. Here we will want to provide the Quote Of the Day text and Author that we are obtaining through our newly made integration node. As you will recall, we assigned this information to two variables (quote & author). To insert a variable inside the content box type the double curly brace icon {{ and select the quote variable from the dropdown menu that appears.
- Now lets type in a hyphen (-) followed by the double curly brace {{ and select the author variable. Your SMS content should look as below. Select Save.
Assigning a Phone Number
- From the Messaging Tasks page, select the Actions menu for the task we just created and select Map Phone Number.
- From the Map Phone Number page, select the number(s) you would like to assign and select the Map Selected Phone Number(s) button.
Congratulations!
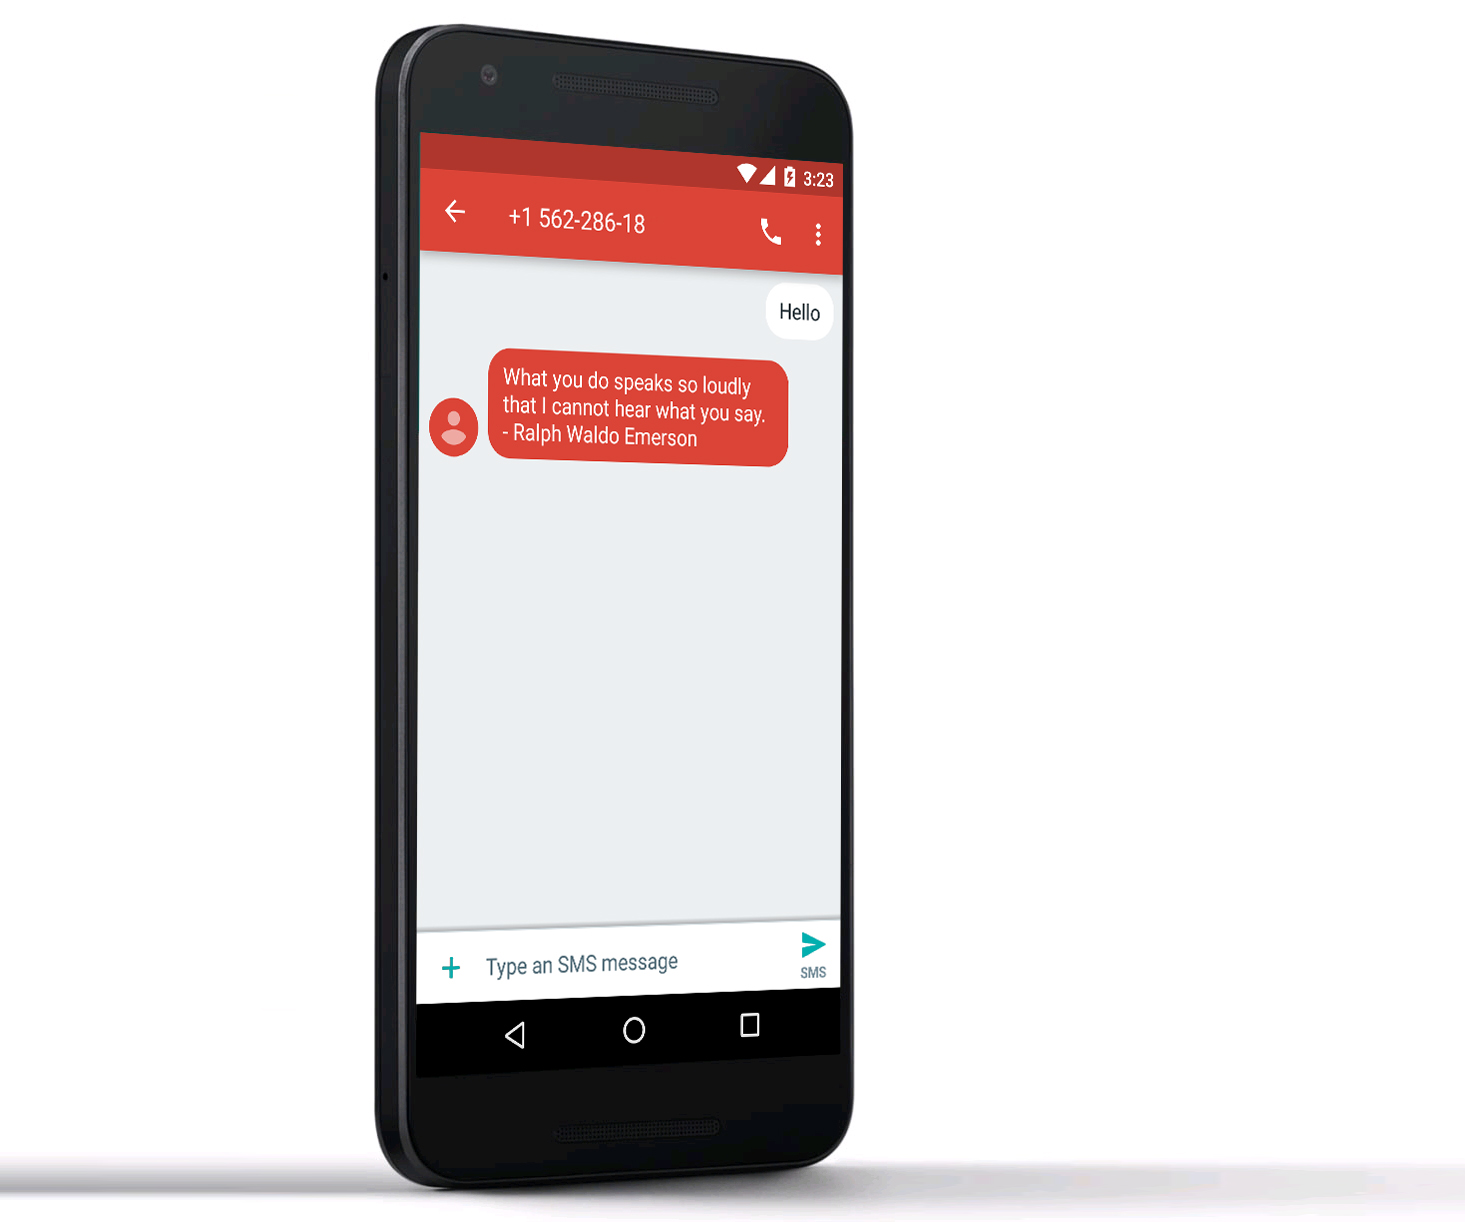
Now all we need to do is send a message to service number you assigned to our SMS Task and you should receive an SMS back with the quote of the day and the author. 👍
Building your first Auto Attendant
This tutorial will build on the previous sections and demonstrate how to accept DTMF or speech input from a caller and direct them to different destinations based on their input using the Menu Node. Please make sure you have completed the Creating your first Voice Task tutorial before continuing.
Editing the call flow
- Login to Inference Studio and navigate to the Voice Tasks page.
- Click on the voice task that we created in the first tutorial, select Actions and Edit Task.
- From the side menu under the User Input section, select the Menu node.
- Drag the Menu node onto the callflow canvas below the Play Prompt node. An overlay will display the available drop points.
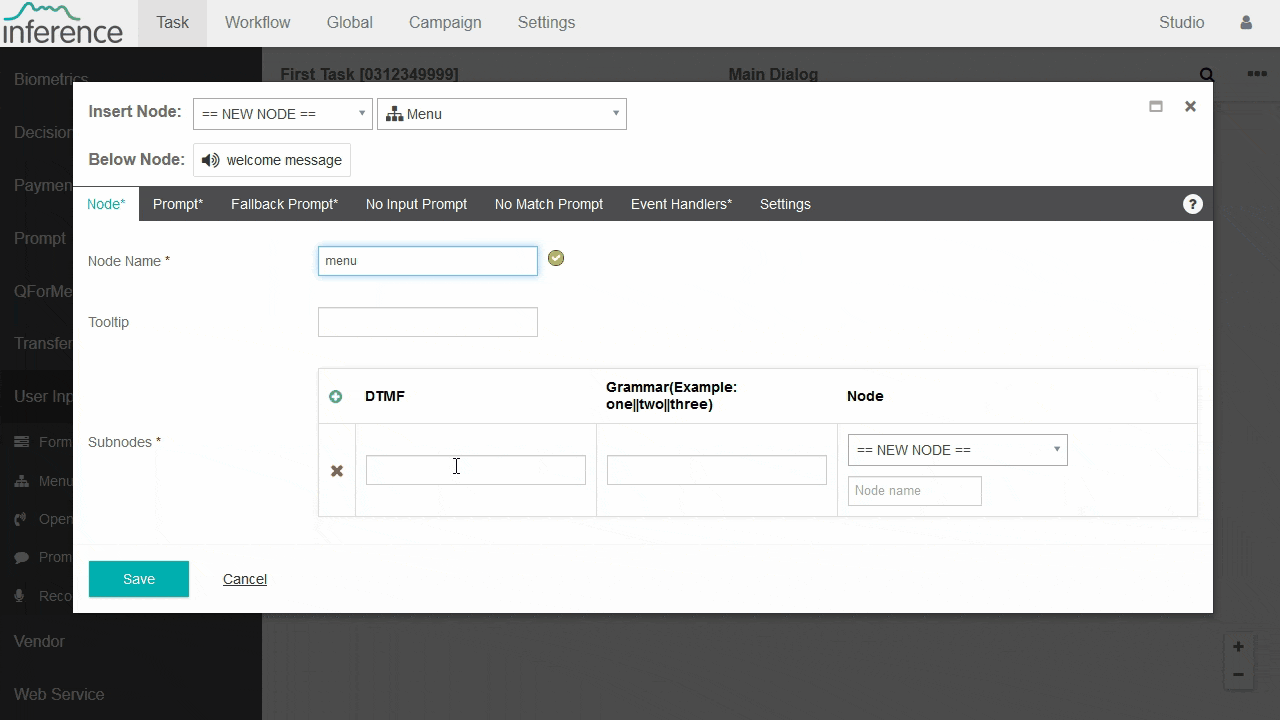
Using the Menu Node
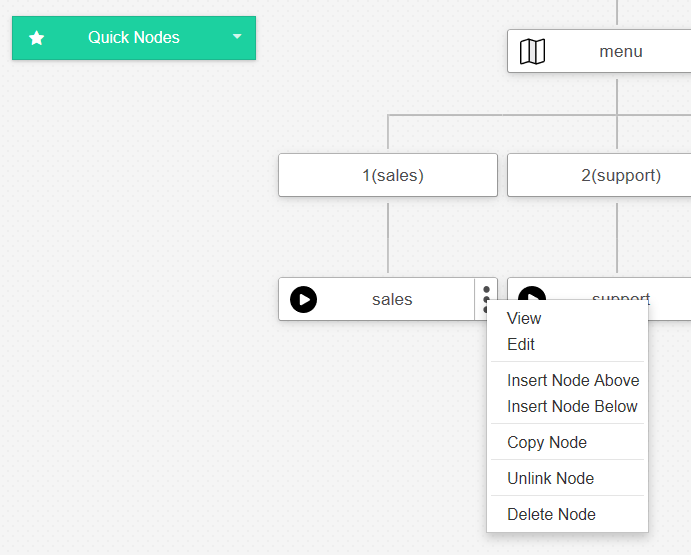
For this tutorial we will be asking the caller to press "1" if they would like to speak with the sales team, press "2" if they would like to speak with the support team and press "3" if they want the address and contact details of the store.
- Inside the Menu Node settings, under the Node tab, enter "1" under the DTMF column and "Sales" under the Grammar field.
- In the Node column, leave the == NEW NODE == selection and enter a name for the new node. We will call our node sales_node.
- Click on the + icon to add a new row to the Subnodes entry.
- Enter "2" under the DTMF column and "Support" under the Grammar field.
- In the Node column, leave the == NEW NODE == selection and enter a name for the new node. We will call our node support_node.
- Click the + icon once more time to add a third row to the menu node.
- Enter "3" under the DTMF column and "Address" under the Grammar field.
- In the Node column, leave the == NEW NODE == selection and enter a name for the new node. We will call our node address_node.
TIP
What this is all basically means is that if the caller enters "1" or says the word "Sales" they will be directed to the node by the name "sales_node". If they enter "2" or say the word "Support", they will be directed to "support_node" and if the enter "3" or say the word "Address" they will be directed to "address_node".
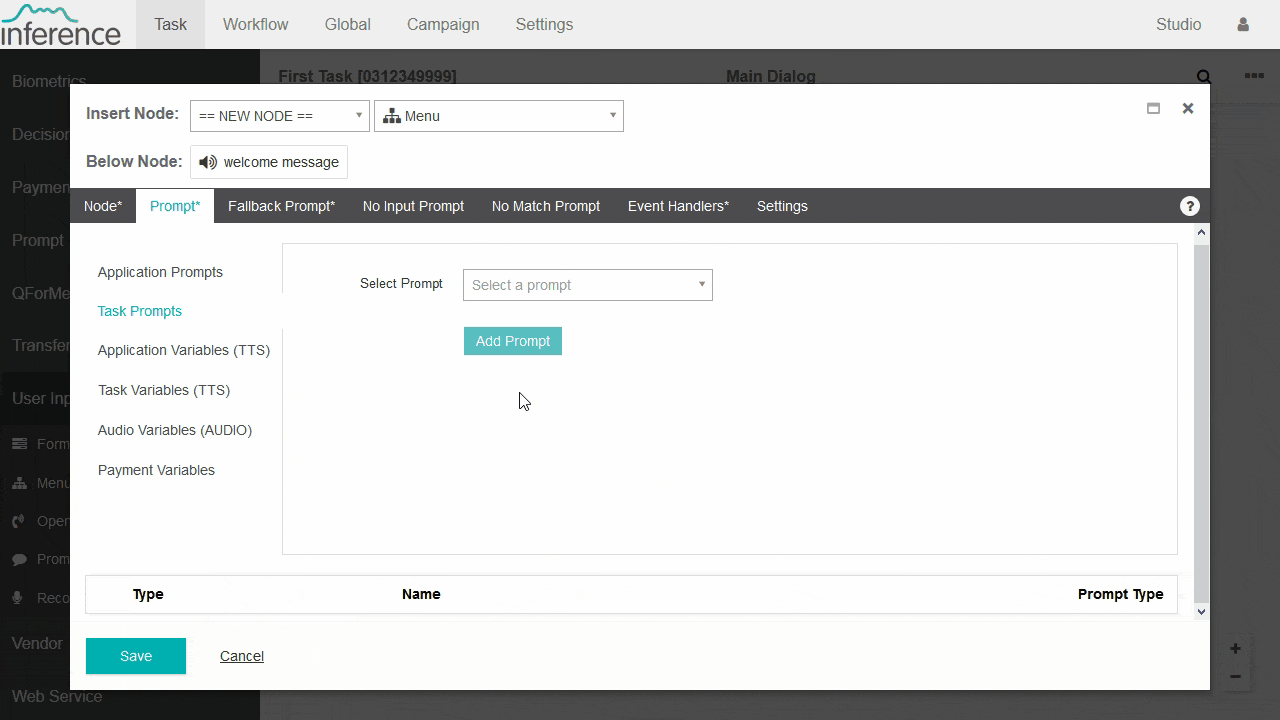
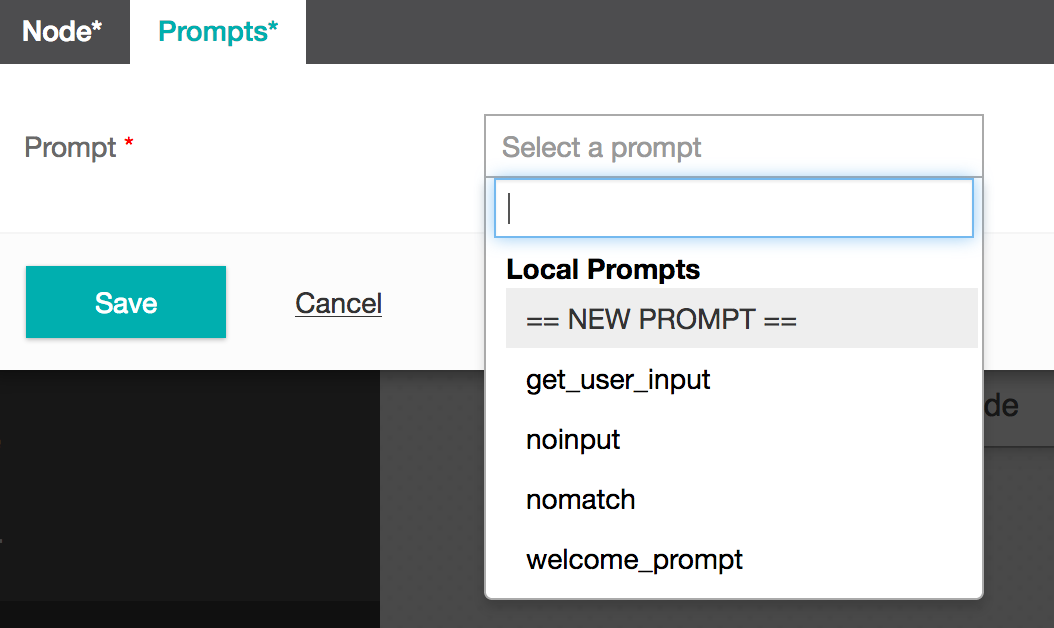
- Next, click on the Prompt tab. This tab allows you to configure the initial prompt that you want to play. In the Select Prompt drop down list, select == NEW PROMPT==.
- You will be presented with the "Add Task Prompt" interface. Enter a name for the prompt. We will call our prompt - get_user_input. Leave the default values for Language and Voice columns. In the TTS column we will enter the following text for our prompt - Please press 1 or say "sales" for sales inquiries or press 2 or say "support" for support. If you want the address and contact details please press 3 or say "Address". Click on the "Add" button to add the prompt. You will be returned to the "Edit Node" interface. Click on the "Add Prompt" button to add this prompt as the main prompt for the menu node.
- Click on the Fallback Prompt tab. The Fallback Prompt is played in the event a caller does not provide input or is not understood. With a Fallback Prompt we can provide context sensitive help to the caller. In this tutorial we will use the same prompt as the Main Prompt so we can give the caller multiple attempts to enter a relevant selection. In the "Select Prompt" dropdown list, select the prompt that we defined earlier, get_user_input and select Add.
- The "No Input Prompt" and "No Match Prompt" tabs provide additional functions to define prompts that will be played if Studio exclusively detects no input from the user or if there is no match detected. We will ignore these tabs for now as the Fallback Prompt is more than enough for this case.
- Select the Event Handlers tab. Event Handlers are used when there is still no match or no input detected after multiple attempts from the caller. In the No Match Event Handler drop down menu, select "==NEW EVENT HANDLER==" and give it a unique name. We will call ours - no_match. Leave the No Match Count to the default value of 2. This value tells Studio after how many attempts should it trigger the event handler. Repeat the same steps for the No Input Event Handler and define a new event handler. We will call ours - no_input. Leave the default value of 2 for the No Input Count field.
- The Settings tab offers some advanced configuration so just ignore it for this tutorial.
- Click Save.
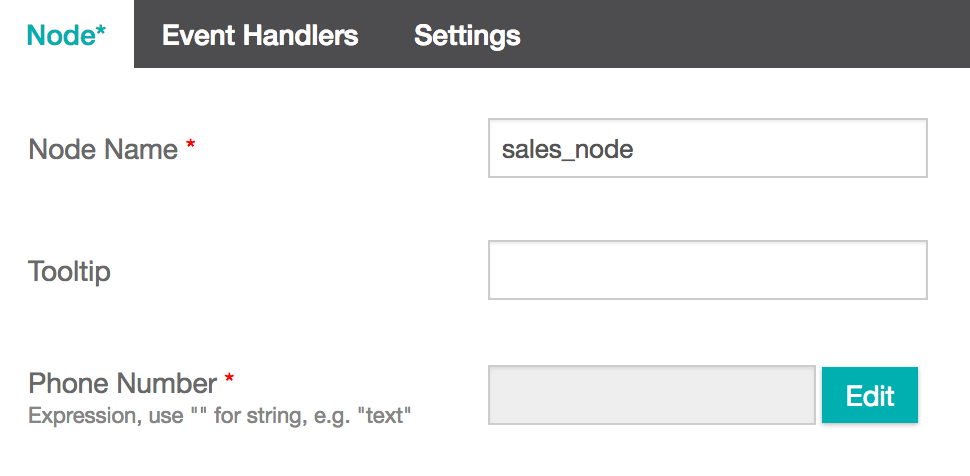
You will now see three additional nodes on your call flow canvas - sales_node, support_node, address_node. By default, the Menu Node creates basic Play Prompt nodes for each of the three options we defined. Seeing as we want to use these nodes to actually transfer callers rather than play a prompt we will need to change their node type. 16. On the sales_node, from the action dropdown select Edit.
- Click the Node Type drop down and select the Transfer node icon. This will change the node type from the default Play Prompt to a Transfer node.
- Next we need to enter the phone number for the sales department so Studio can transfer the call to them. Click the "Edit" button next to the Phone Number field.
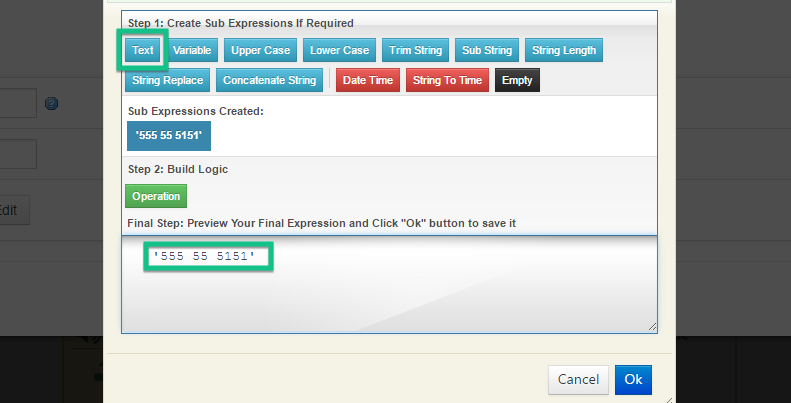
- You will be presented with the "Expression Builder". Expression builder is Studio's interface to perform complex operations on variables. We won't get into the details of "Expression Builder" at this stage. In order to enter a standard number, click on the "Text" button and enter the phone number that you want to transfer the call and then click on the "Create Sub Expression" button. Click the "OK" button and you will be taken back to the "Edit Node" interface. Click on the "Save" button to save the node.
- Repeat the above step for the support_node. You will preferably choose a different transfer number. This will transfer the caller to a support number when they press 2 or say "Support".
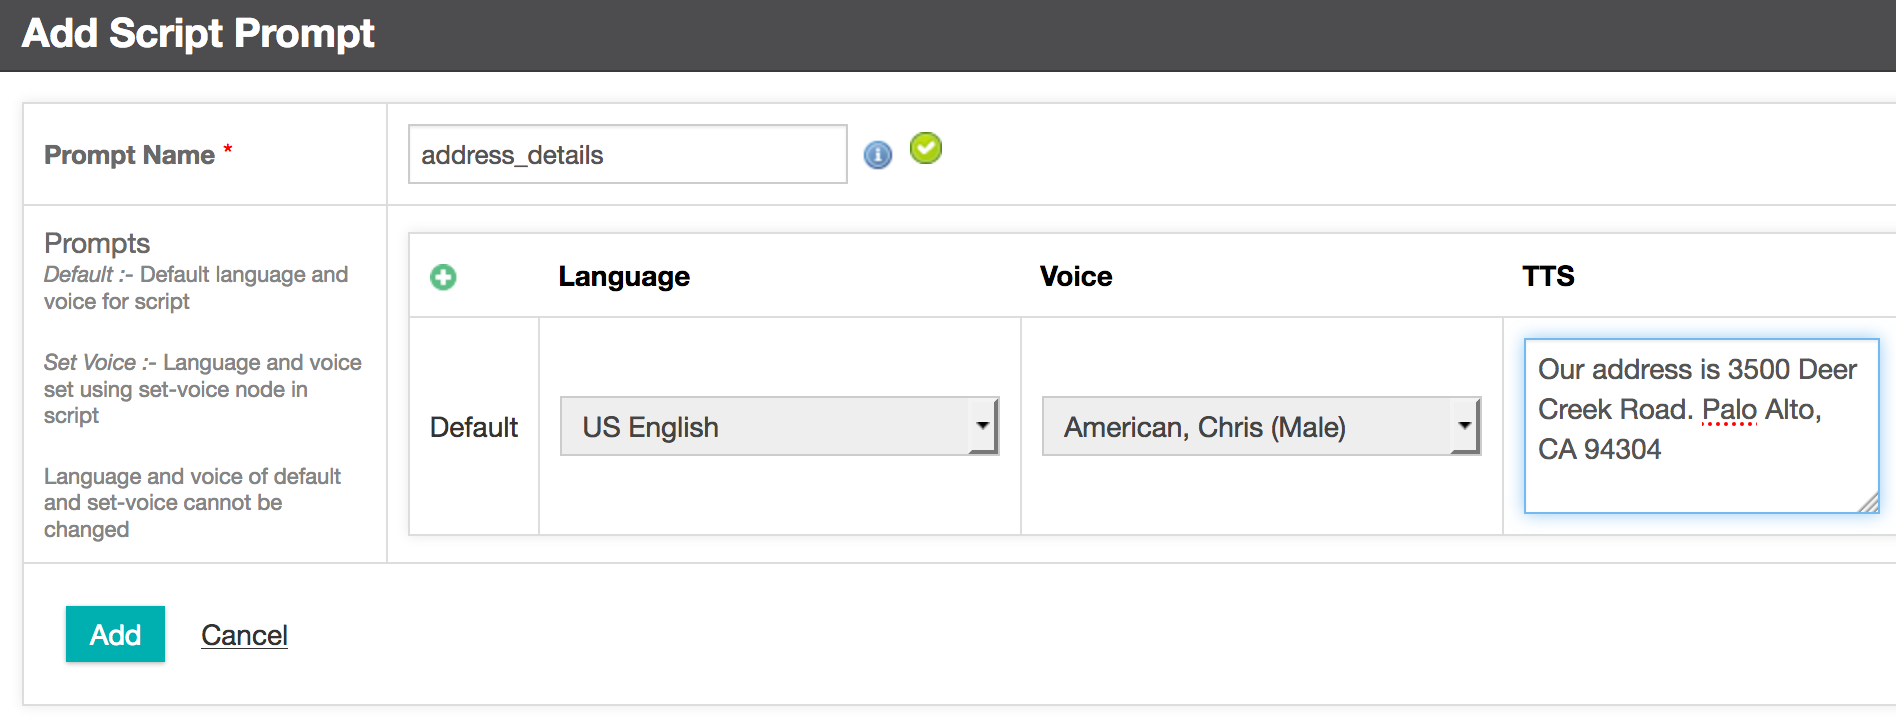
- Finally, We need to edit the address_node to play an appropriate prompt when the caller presses 3 or says "Address". In this case the default Play Prompt node is perfect so we just need to define the actual prompt itself. Click on the node actions icon and select Edit.
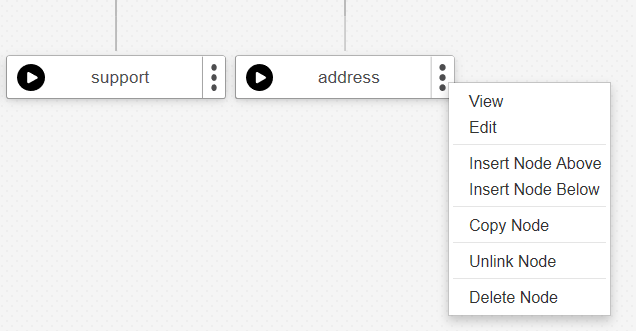
- Click the Prompts tab and select "==NEW PROMPT==" from the drop down list for the Prompt field.
- You will be presented with the Add Task Prompt interface. Give the prompt an appropriate name. We will call our prompt - address_details. Add the message that you want to play in the TTS column. We will add the following text as an example - "Our address is 3500 Deer Creek Road. Palo Alto, CA 94304". Click Add then finally, Save.
Congratulations!
You have successfully built your first working Auto Attendant! 💯
Creating and Running your first Campaign
This tutorial will build on knowledge from the Building your first Auto Attendant tutorial. If you have not yet completed that tutorial we suggest you do before continuing.
Let's Begin
Thanks to your excellent Auto Attendant, the Sales Team have been receiving a lot of customer calls about the new product launch.
The Sales Team now have a list of phone numbers for all the customers they have spoken to and want a way to contact them all, to offer a 10% discount as appreciation for their interest and loyalty.
This is an excellent use-case for a List-Based Campaign. A List-Based campaign is used to execute outbound calls based on a supplied list of recipients. This campaign type is configured to execute automatically, based on a specified schedule.
We are almost ready to make our first campaign, but first, we will need to add a new Voice Task to use in our campaign. In this instance we are just going to make a very simple task which will play a prompt to the customer thanking them for their recent interest and offering them a discount coupon code.
Creating a New Voice Task
We will be creating a new Voice Task in the exact same way as the Creating your first Voice Task tutorial.
- Name the task Discount Task.
- For the call flow we simply want to add new Play Prompt node with the TTS "You recently called the sales team at Tyrell Corporation regarding our new product line. As an appreciation for your interest we would like to offer you a 10% discount. To redeem your discount please phone our Sales Steam and quote the coupon code, BR1982."
Mapping a Phone Number
- From the Voice Tasks, select the Actions menu for the Discount Task and choose Map Phone Number. Assign a phone number to your task.
Creating the Campaign
- Navigate to Campaign in the top menu.
- Select the List-Based Campaigns + icon.
- Provide a Campaign Name. We have called ours 'Outbound Sales Call'.
- Select the task you would like the campaign to use from the dropdown menu. We have selected the new 'Welcome Message' task we just created.
- You can skip the Parameters section as we won't be passing in any parameters to our task.
- Leave the Campaign Caller ID and Dial Timeout (seconds) as the default.
- For Maximum of Threads, select 1. from the dropdown. This is the maximum number of calls that can be made concurrently. You will need to select at least 1 thread to perform an outbound call.
- Leave Repeat Call Frequency (Days) and Number of Redials set to the default. For the sake of this tutorial we only want to run the outbound call once.
- Leave the Campaign Schedule empty for now as well.
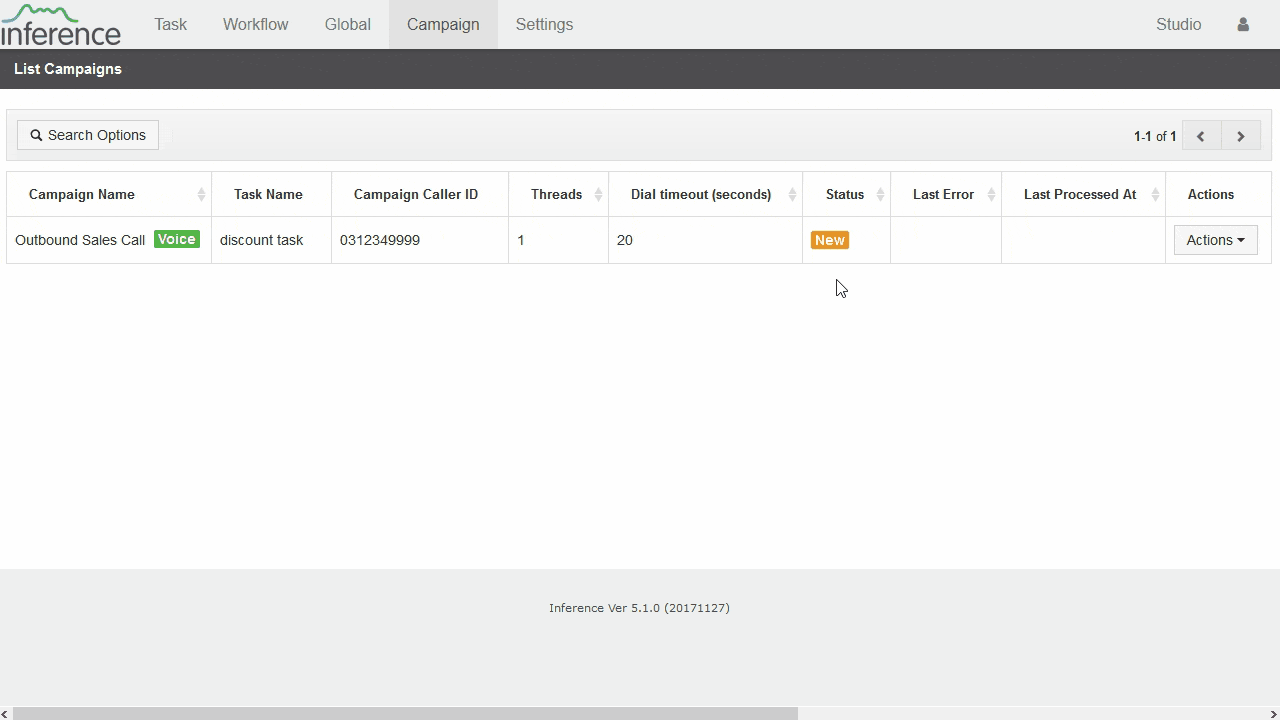
- Select Add.
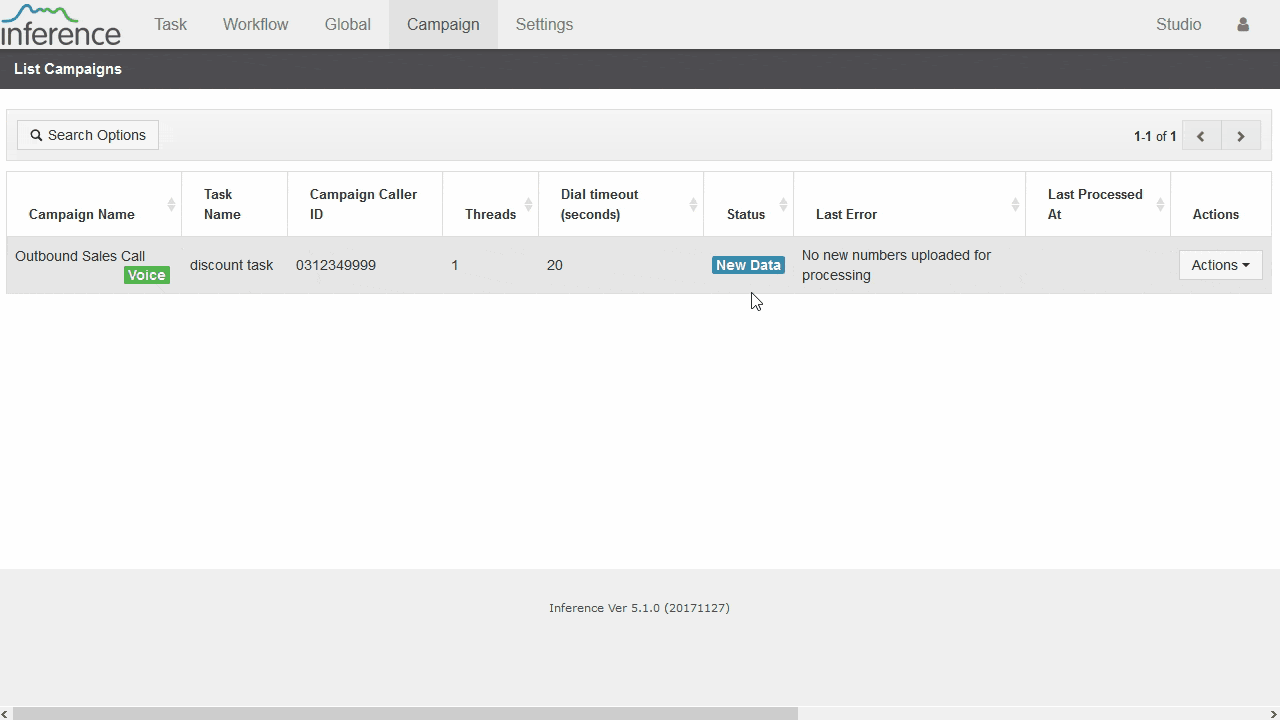
- You will then be taken to the List Campaigns page where you will see the new campaign has been added.
Adding Phone Numbers
Now that we have our campaign set up we need to upload the list of customer phone numbers from the Sales Team.
- From the List Campaigns page, find the Outbound Sales Call campaign we just created.
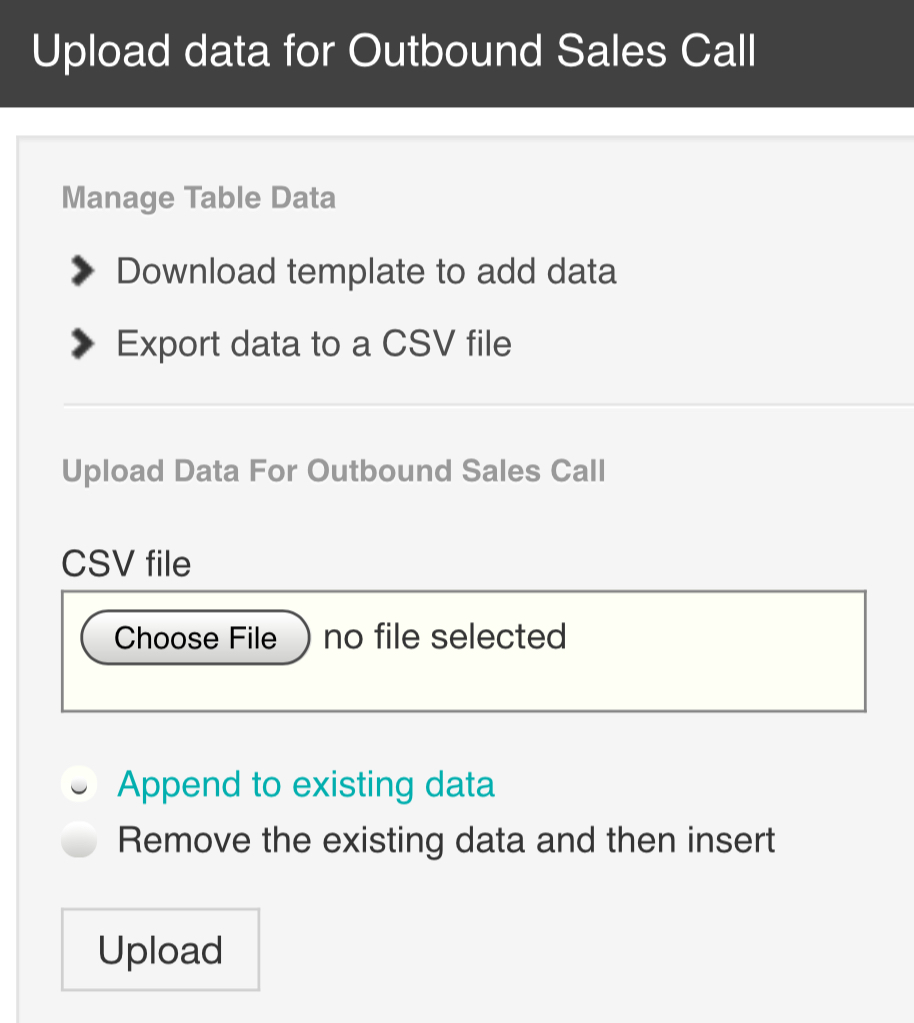
- From the Actions dropdown menu, select Upload Data. This is where you can add your list of numbers for the campaign to dial.
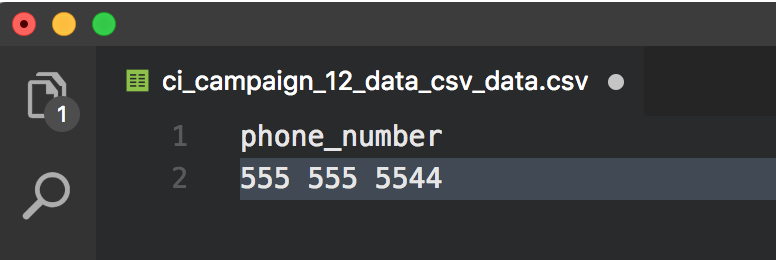
- Select Download template to add data. This will download a .csv file to your system.
- Open the .csv file in any text editor and under the 'phone_number' line of text add your list of phone numbers directly underneath. One phone number per line. For this tutorial we will just add our own phone number and then Save the file.
- From the Upload Data Section, select the Choose File button and select the .csv file we just updated.
- Select Upload.
- A dialogue will appear to let you know the file was uploaded successfully.
Running the Campaign
- Navigate back to the List Campaigns page.
- Select the Actions menu for your campaign and choose Start Campaign.
- Your campaign will now run and dial the phone number(s) you provided in the .csv file.
If everything went as planned (and you uploaded your own telephone number to the .csv file), you should receive a call from the campaign and hear the prompt we assigned to our task.
Congratulations!
You have successfully completed your first outbound call campaign, with list-based data. 💯
Using the Studio API with Postman
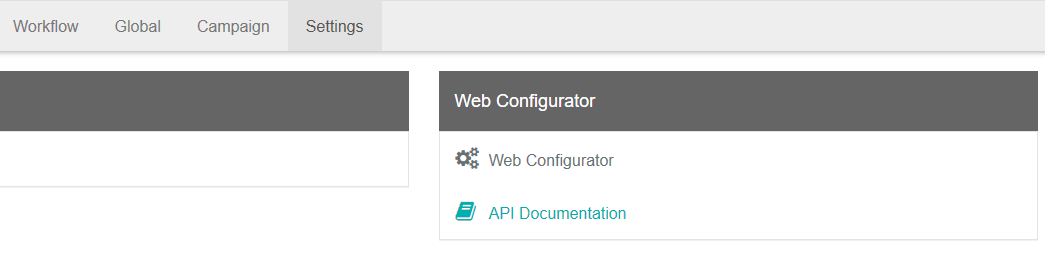
Using the Web Configurator
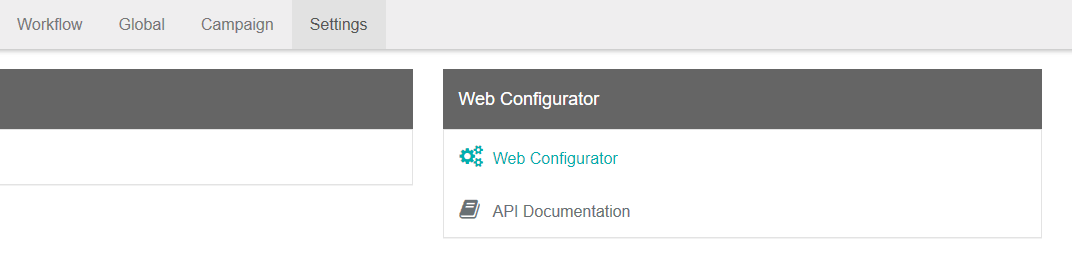
- Navigate to Settings in the top menu and select the Web Configurator heading.
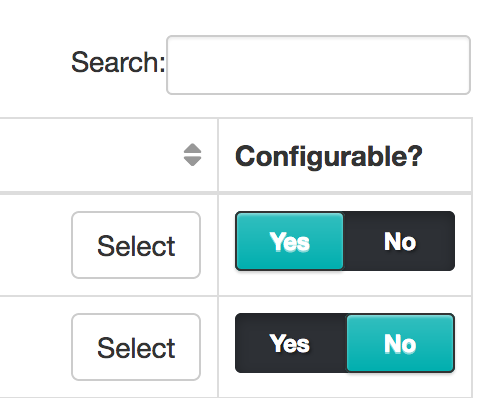
- Under the Configurable? table heading, select Yes, on the task you wish to make accessible with Studio APIs.
- Take note of the Script Id value as we will use it later in the tutorial, then click the Select button.
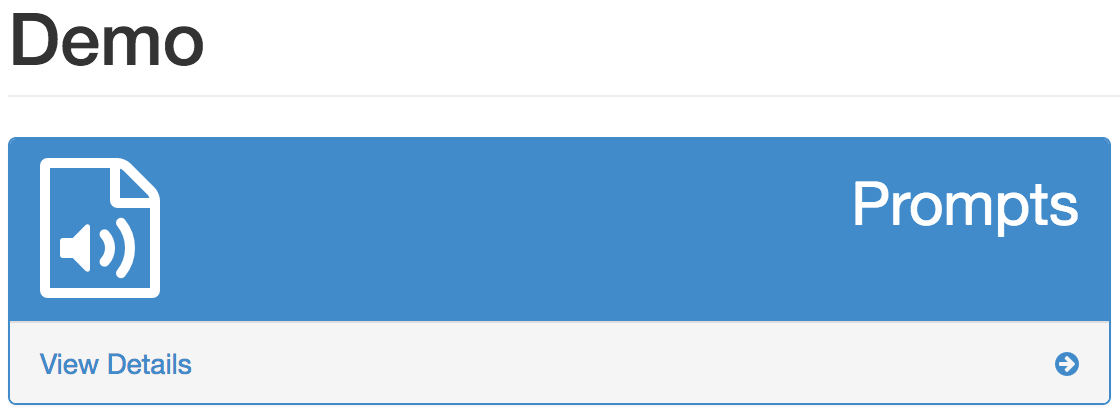
- On the Prompts card, select View Details.
- Under the Configurable? table heading, select Yes, on the prompt you wish to change with Studio APIs.

API Documentation & Postman
- Navigate to Settings in the top menu and select the API Documentation heading.
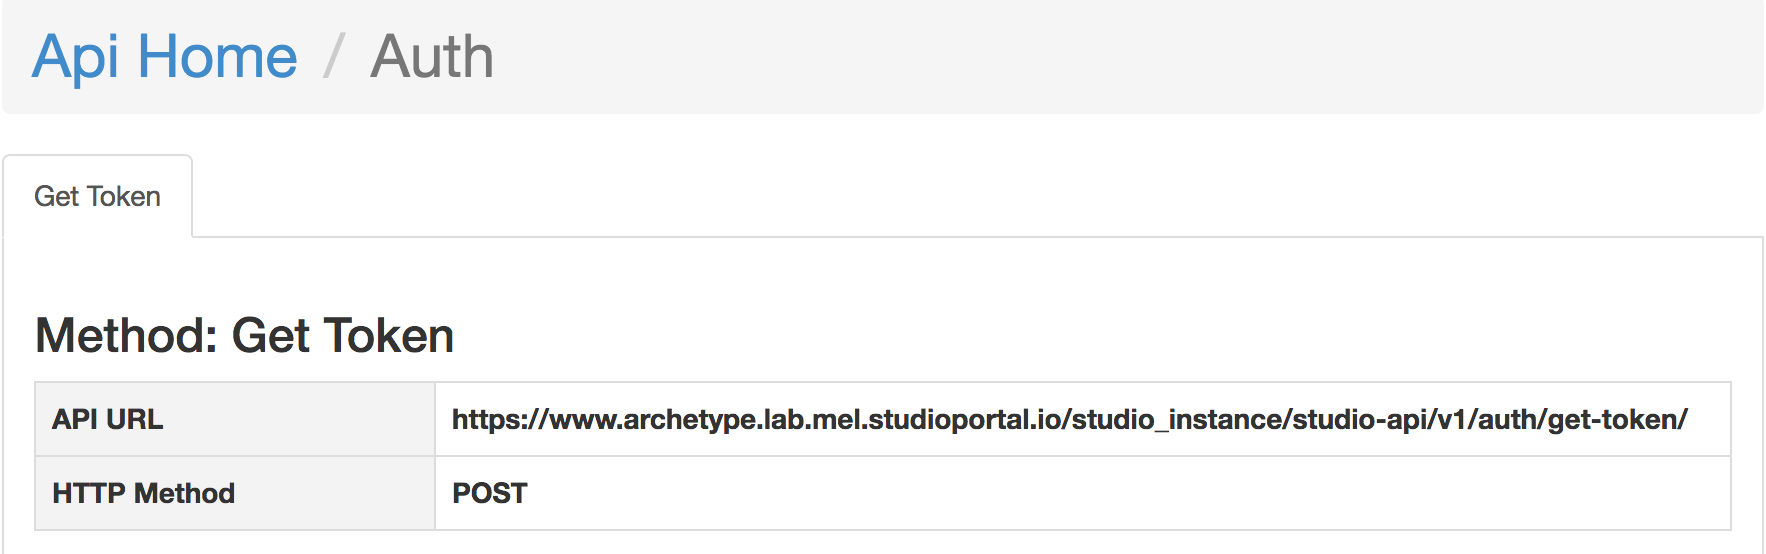
- On the Step 1 card, select Auth. You will be taken to the Auth page where all authenication information is available. This is the information we will use in Postman.
- Download the Postman App https://www.getpostman.com/
- Using the Postman interface, navigate to the GET dropdown list and change it to POST.
- Fill in the URL field at the top with the API URL that is provided on the Studio Auth page.
- Navigate to the Authorization tab and select Digest Auth from the Type dropdown list.
- Fill in the Username field using the Username details from the Studio Auth page.
- Fill in the Realm field using the phrase "Please enter your email and secret_key."
- Fill in the Password field using the provided Password in the Studio API Documentation.
- The Nonce field can accept any value. Go ahead and add anything you feel like.
- Fill in the Algorithm field using the value MD5.
- Fill in the qop field using the value auth.
- For the Nonce Count field, add the value 1.
- For the Client Nonce you can enter any value e.g. 12345, as it is out of the scope of this tutorial.

- Select the Body tab at the bottom.
- Under the key heading, add apikey and under the value heading add the apikey value from the Studio API Documentation.
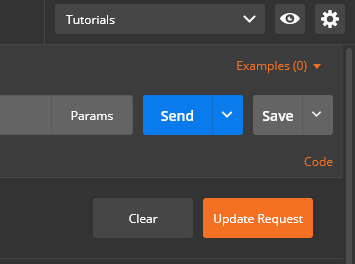
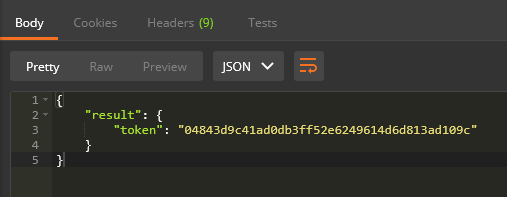
- Click the blue Send button, next to the URL field in Postman.
- In the response box, a token will be listed. Please make a record of this token as it will be used for the rest of this tutorial. Please note that this token only lasts for 20 minutes. After that time you will need to create a new one by selecting Send again.
- Navigate to back to the Main API Documentation page, by selecting Api Home in Studio.
- On the Step 2 card select prompt. This page provides all the API details required for Prompts. This is the information we will use in Postman to update our studio Prompt.
- Using the Postman interface, in the tab bar, select the + icon to create a new tab.
- Navigate to the GET dropdown list and change it to POST.
- Fill in the URL field with the API URL provided in the Studio API Documentation.
- Navigate to the Body tab.
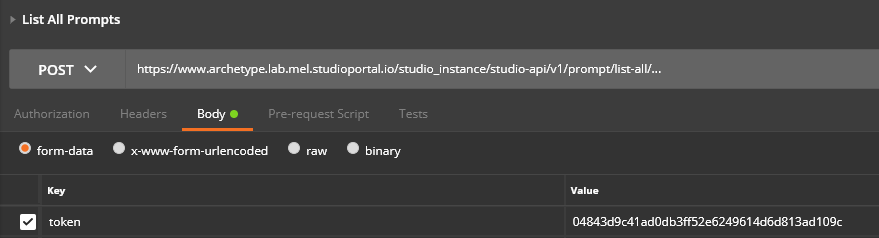
- Under the Key heading, click in the text field and type token. In the Value field heading add the token we generated in step 18.
- Add another key, this time called script_id. In the value field add the value of the Script Id that we noted down earlier in the tutorial.
- Click the blue Send button, next to the URL field in Postman.
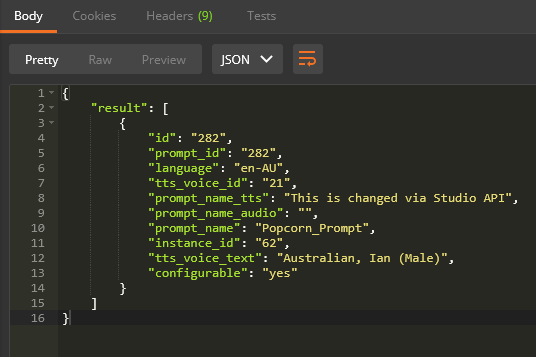
- In the response box, details of configurable prompts will be listed. Please make a record of the prompt_id and tts_voice_id values as we will need these in the following steps.
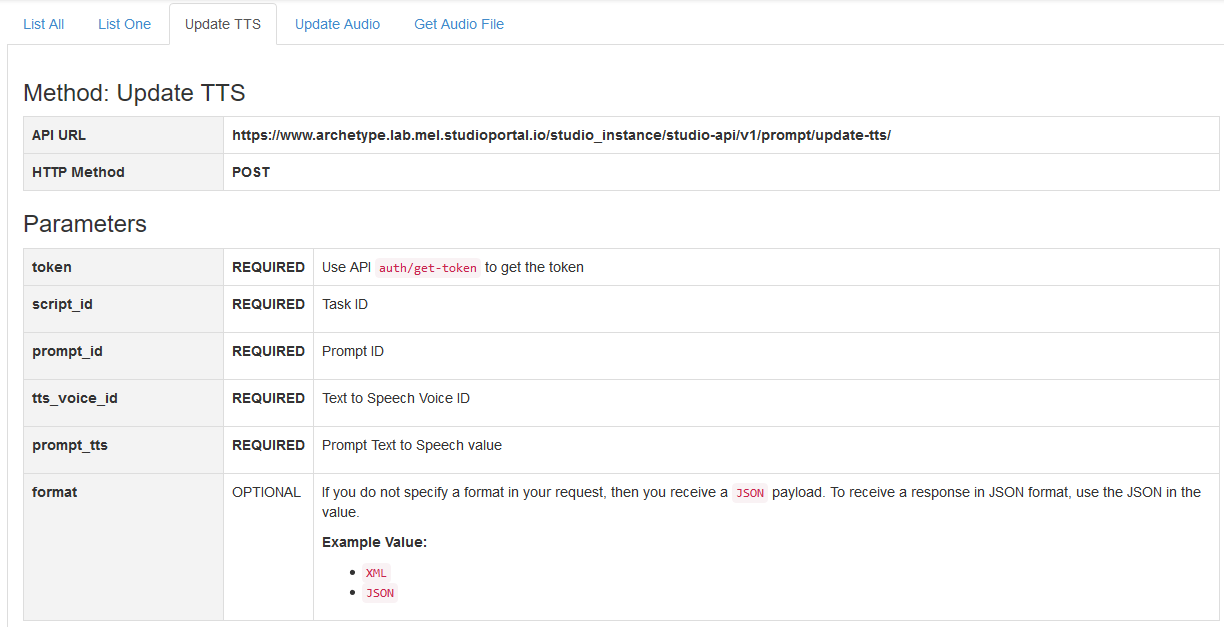
- In the Studio API Documentation, navigate to the tab list beneath the API HOME / Prompt heading, and select Update TTS. This page lists the details required to change the value of a Studio Prompt. We will use this in Postman.
- Using the Postman interface, in the tab bar, select the + icon to create a new tab.
- Navigate to the GET dropdown list and change it to POST.
- Fill in the URL field with the API URL provided in the Studio API Documentation.
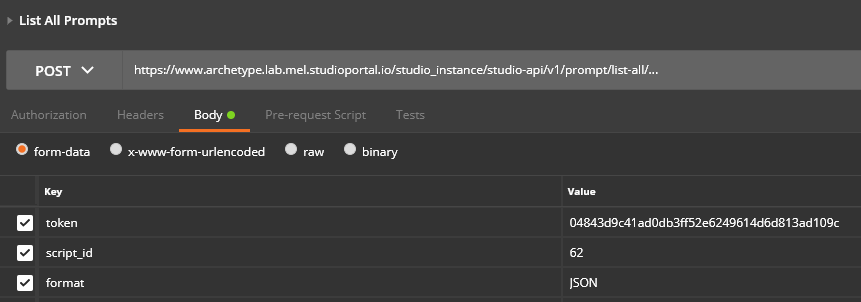
- Navigate to the Body tab.
- In the Key field add token and in the Value field add the token value we generated in previous steps.
- Add another key, again called script_id. Under the value heading in the same row, add the value of the Script Id that we noted down in step 28.
- Create another row with key 'prompt_id' and the value of 'prompt_id' gathered in previous steps.
- Create another row with the key of tts_voice_id and the value of tts_voice_id gathered in previous steps.
- Create one more row with the prompt_tts. Under the value heading in the same row add what you would like the prompt to now say. For example "This is changed via Studio API".
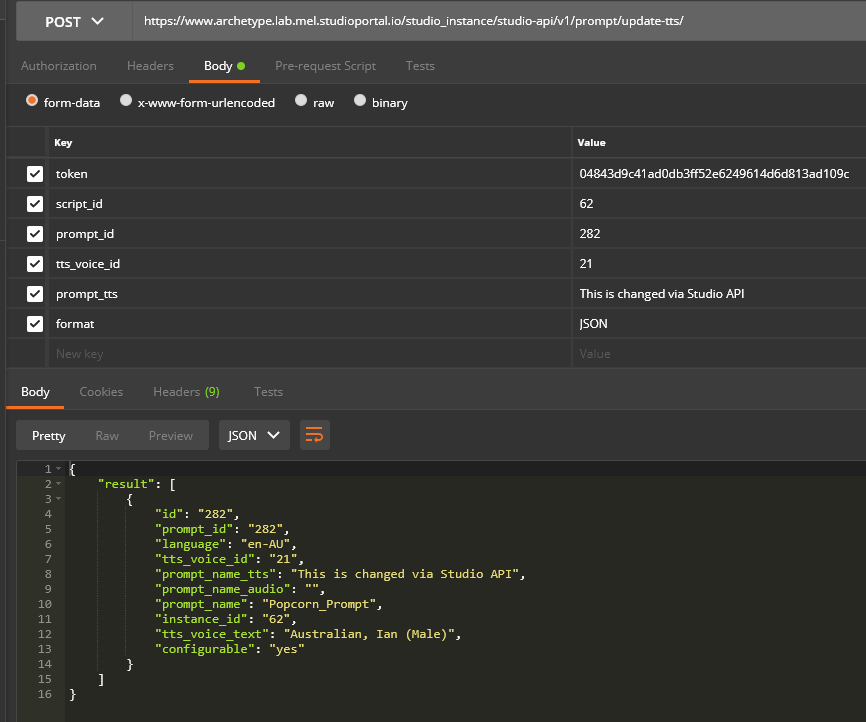
- The only thing left to do now is press the blue Send button again! This will POST the updated prompt_tts information to the specified prompt inside Studio.
- If you like you can now navigate back to Studio, locate the prompt you specified earlier and see that the TTS value has been updated.
Congratulations! 🎉
You have successfully changed the value of a Studio Prompt using Postman via the Inference Studio API.
Building a PCI-Compliant Payment Application
What is PCI?
The Payment Card Industry Data Security Standard (PCI DSS) is a set of requirements designed to ensure that ALL companies that process, store or transmit credit card information maintain a secure environment.
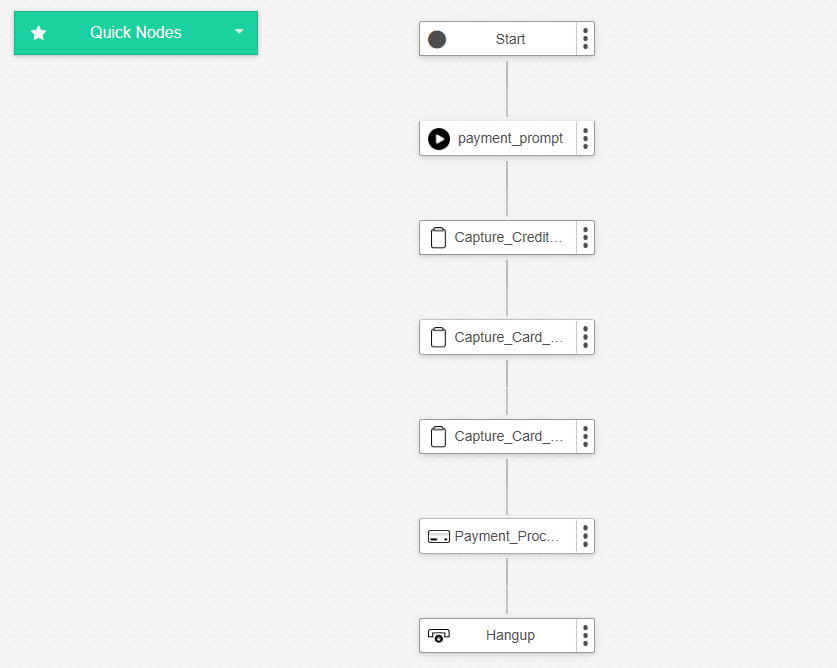
For this tutorial we will make a basic task that asks a caller for their credit card details, stores these details in specialized forms and then processes the payment via the Payment Process node. If you are not yet familiar with Studio please make sure you have completed Creating your first Voice Task before continuing with this tutorial.
Create a new Voice Task. We will call ours Payment_demo.
For the first node in the callflow, drag in a Play Prompt node from the node pallette.
Provide a Node Name.
Select the Prompts tab and provide the TTS "Welcome to the PCI compliant payment system".
Select Add and Save.
Securely Capturing Credit Card information
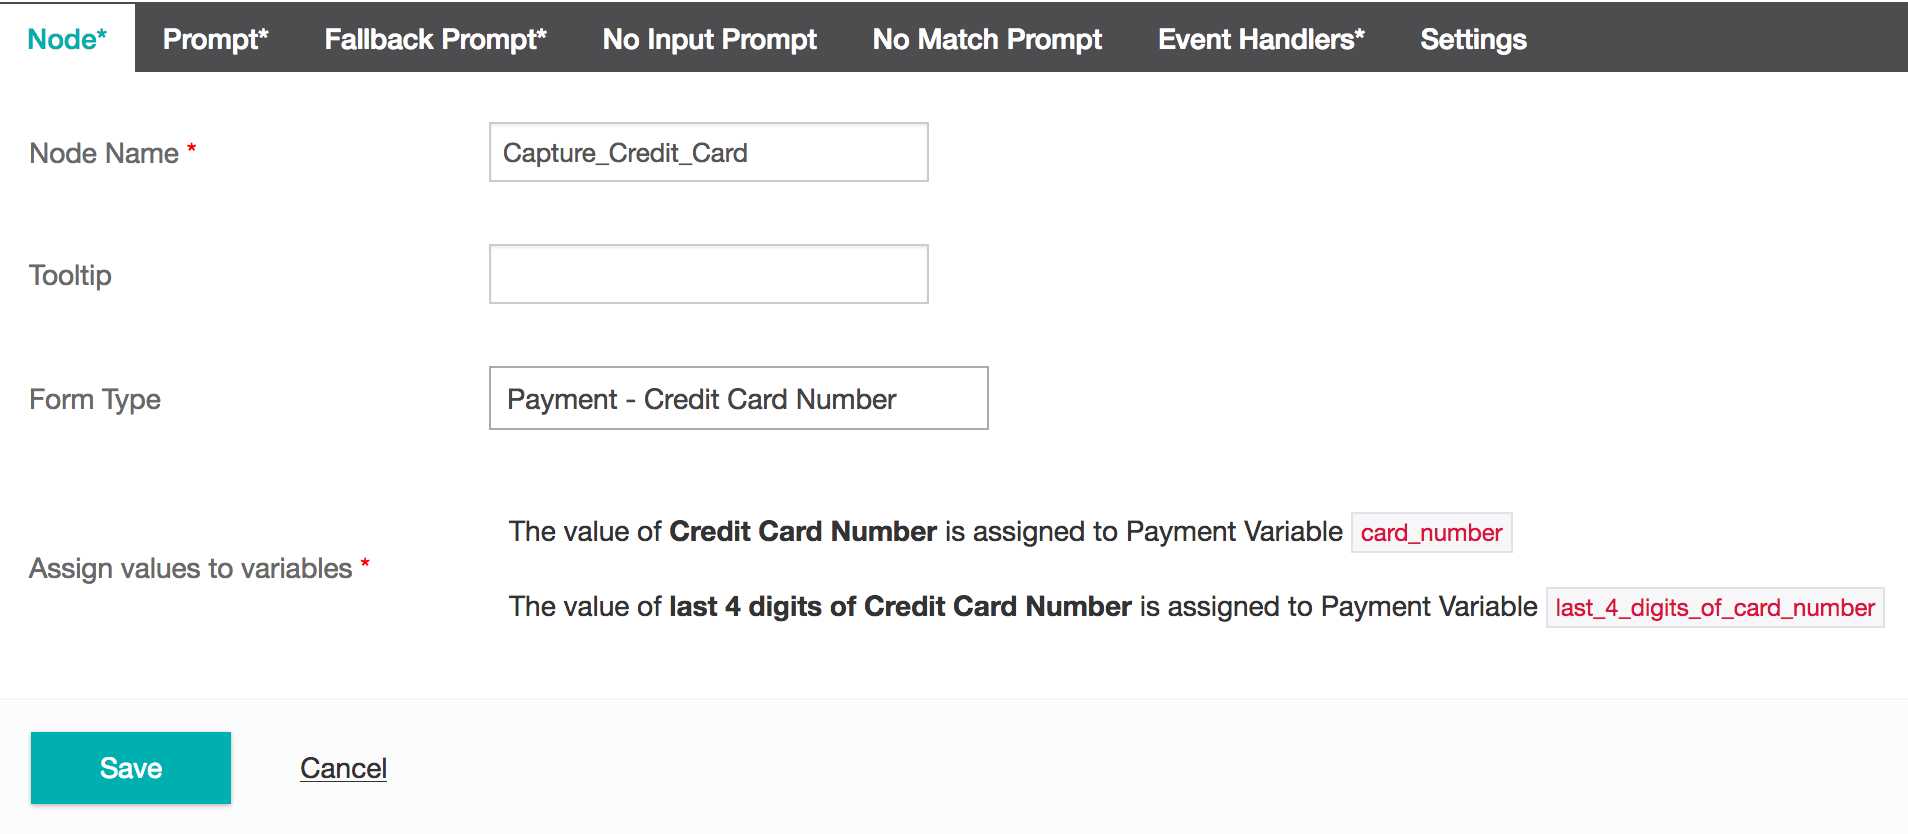
- Add a Form Node below the previous Play Prompt node.
- Under the node tab add a Node Name. We will call it capture_credit_card.
- Under the Form Type dropdown, select Payment - Credit Card Number. This is a specific form type used for storing credit card numbers.
- Select the Prompt tab and provide the desired prompt. We will add the TTS "Please enter your credit card details".
- Add a Fallback Prompt and Event Handlers.
TIP
By default, customers can only enter their credit card details by touch-tone DTMF. On the Settings tab, Grammar Mode is set to Disable Speech Grammar.
To adjust the settings so customers can speak their credit card details, click the Settings tab, then set Grammar Mode to ==Default Mode===.
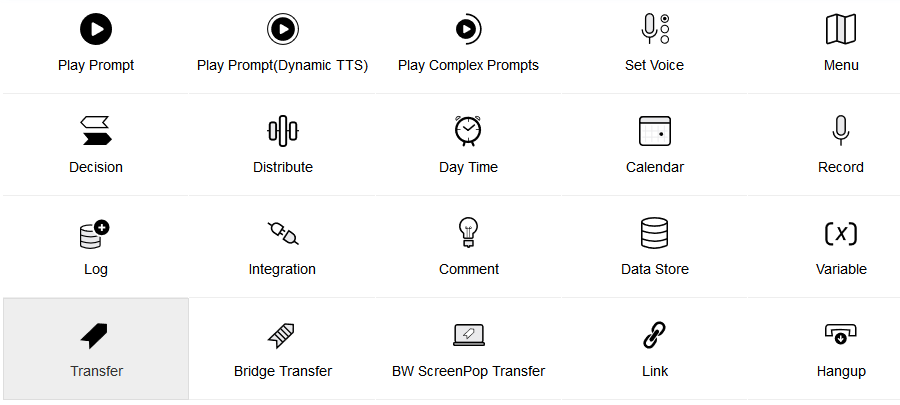
Use the following nodes to play back the credit card number, credit card expiry, and ccv: Menu, Play Complex Prompt, Biometrics Enrol, Biometrics Verify, Open Speech, Cloud Speech-to-Text, and Open Form. The audio playback is in UK English in the UK pop instance, and US English in other pop instances.
- Select Save to finish the Capture_Credit_Card form node.
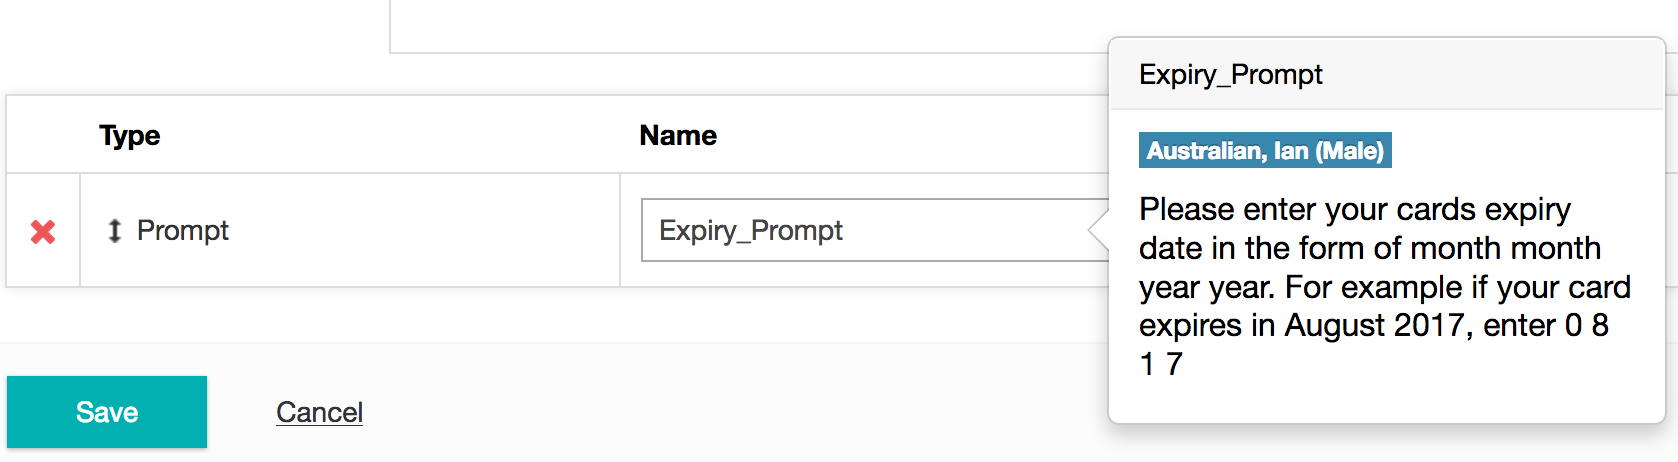
- Add another Form Node, this one will be used to store the credit card expiry.
- Repeat steps 8 to 12. For the Form Type, select Payment - Credit Card Expiry. This is a specific form type used for storing credit card expiry details.
- From the Prompt tab create a new prompt, making sure to give specific instructions to the caller to input their expiry as a 4 digit number.
- Provide a Fallback Prompt and Event Handlers.
- Add a final Form Node. We will call this one Capture_Card_CVC.
- Repeat steps 8 to 12 again. For the Form Type, select Payment - Credit Card CVC. This is a specific form type used for storing credit card CVC details.
- From the Prompt tab create a new prompt. We will provide the TTS "Please enter your cards CVC number".
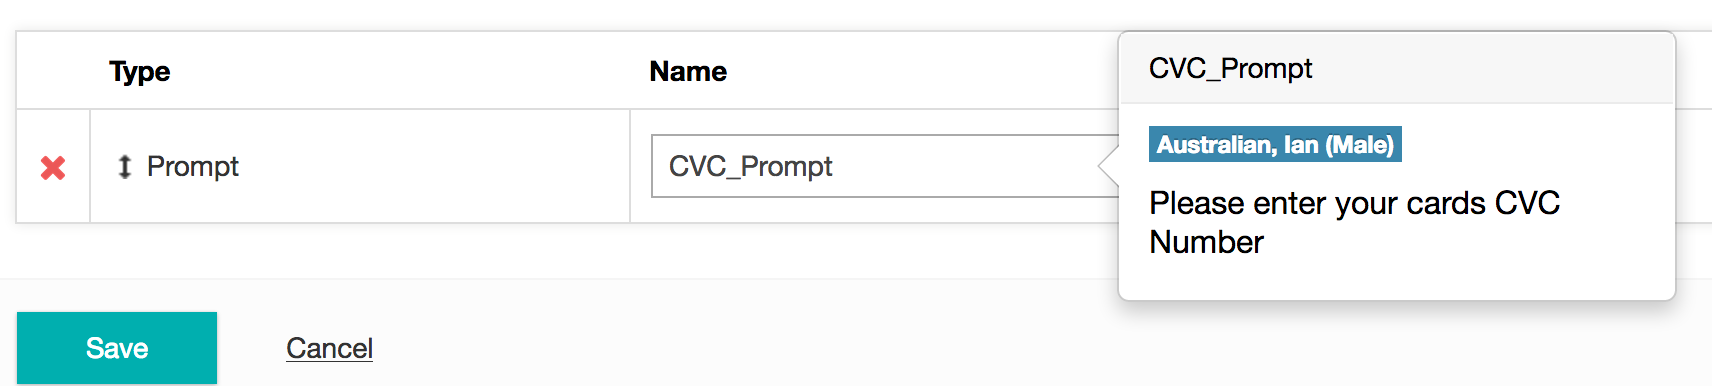
- Provide a Fallback Prompt and Event Handlers.
- Finally, add we are going to add a Payment Process Node.
Payment Process Node
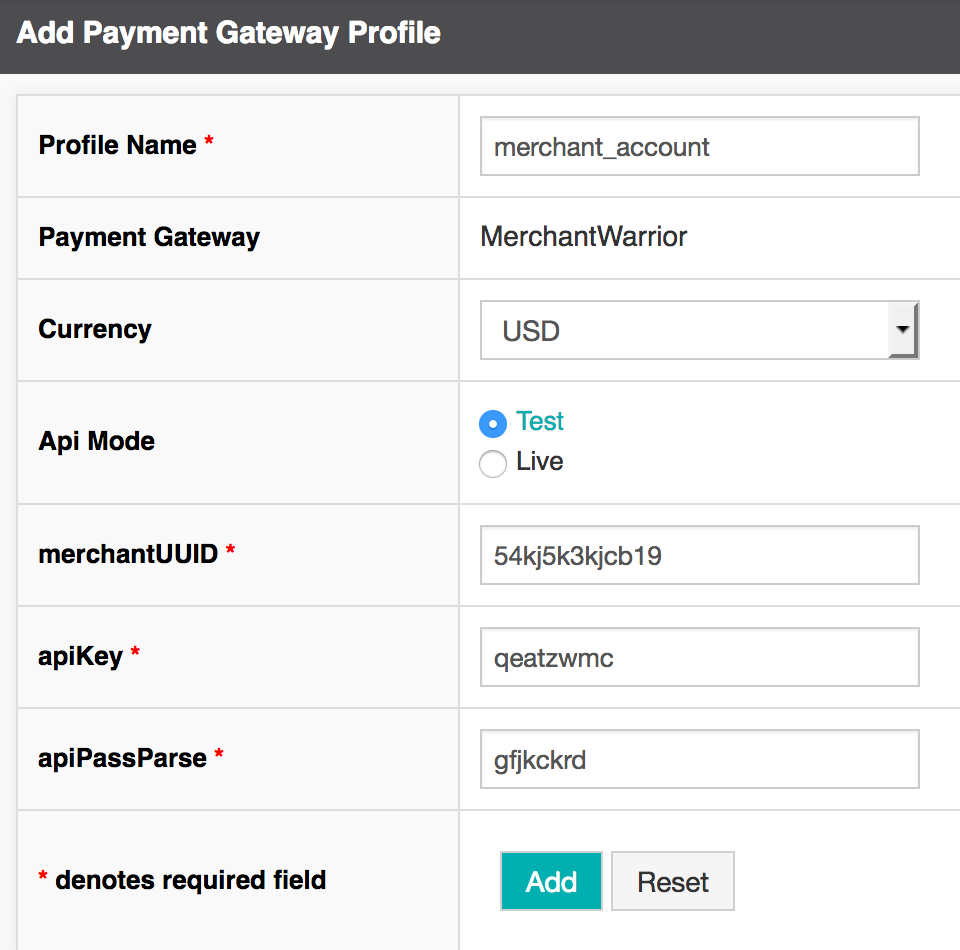
Before you can use the Payment Process node you will need to have a merchant account. At present time Studio supports the merchant accounts: Fat Zebra, Merchant Warrior and eWay.
- First you will need to set up a Payment Gateway Profile in Studio.
- From Global in the top menu select Payment Gateway Profiles + button.
- Select your merchant and fill in the necessary fields. Select Add.
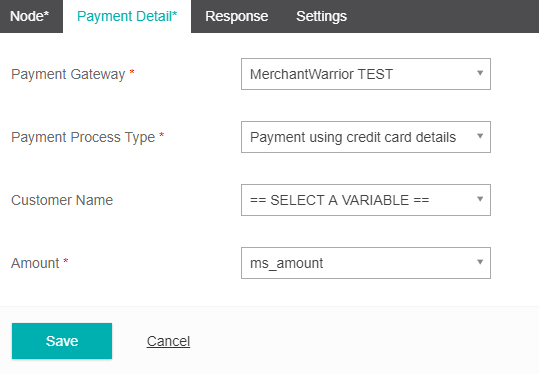
- Now that you have set up your Payment Gateway Profile we can add the Payment Process Node to the call flow beneath the previous Form Nodes.
- From the Node tab provide a node name. We will call ours Payment_Process.
- Select the Payment Detail tab.
- Select your Payment Gateway you just created.
- Select the Process Payment Type. This may have one or more options depending on your specific merchant.
- Select the optional Customer Name variable.
- Select the Amount variable. This is a required field.
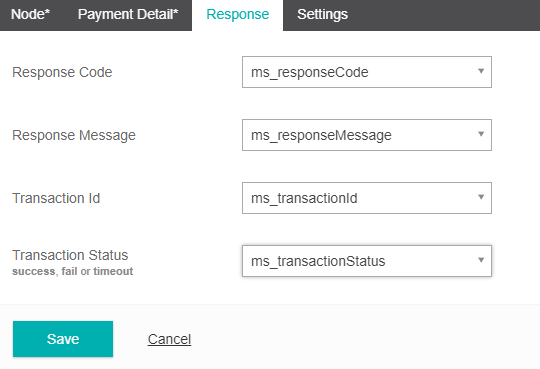
- Select the Response tab. This is not required but allows some greater functionality if you would like to send back additional information to the caller once a payment has been processed.
- For fields in the Response tab, you can select pre-existing variables or create new variable to store the various responses.
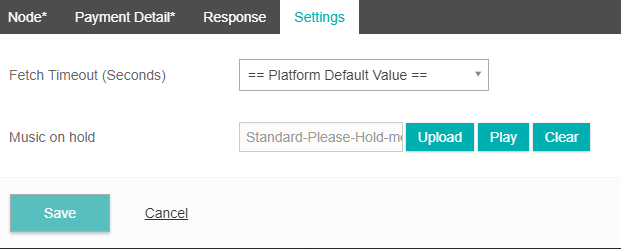
- Select the Settings tab. Here you can provide some additional control to the node by modifying the Fetch Timeout and including some on-hold Music. We will leave the default settings.
- Your completed call flow should now look like the screenshot below.
Congratulations!
You have successfully completed a PCI Compliant Payment Task!
Building a natural language Auto Attendant (with Cloud Speech-to-Text and Tone Analyzer)
Studio 6.0
You will need to be running Studio 6.0 or higher in order to complete this tutorial.Now that you've had some experience building tasks with Studio, let's see the power of the Studio Task Library by using a prebuilt task and modifying it to our needs.
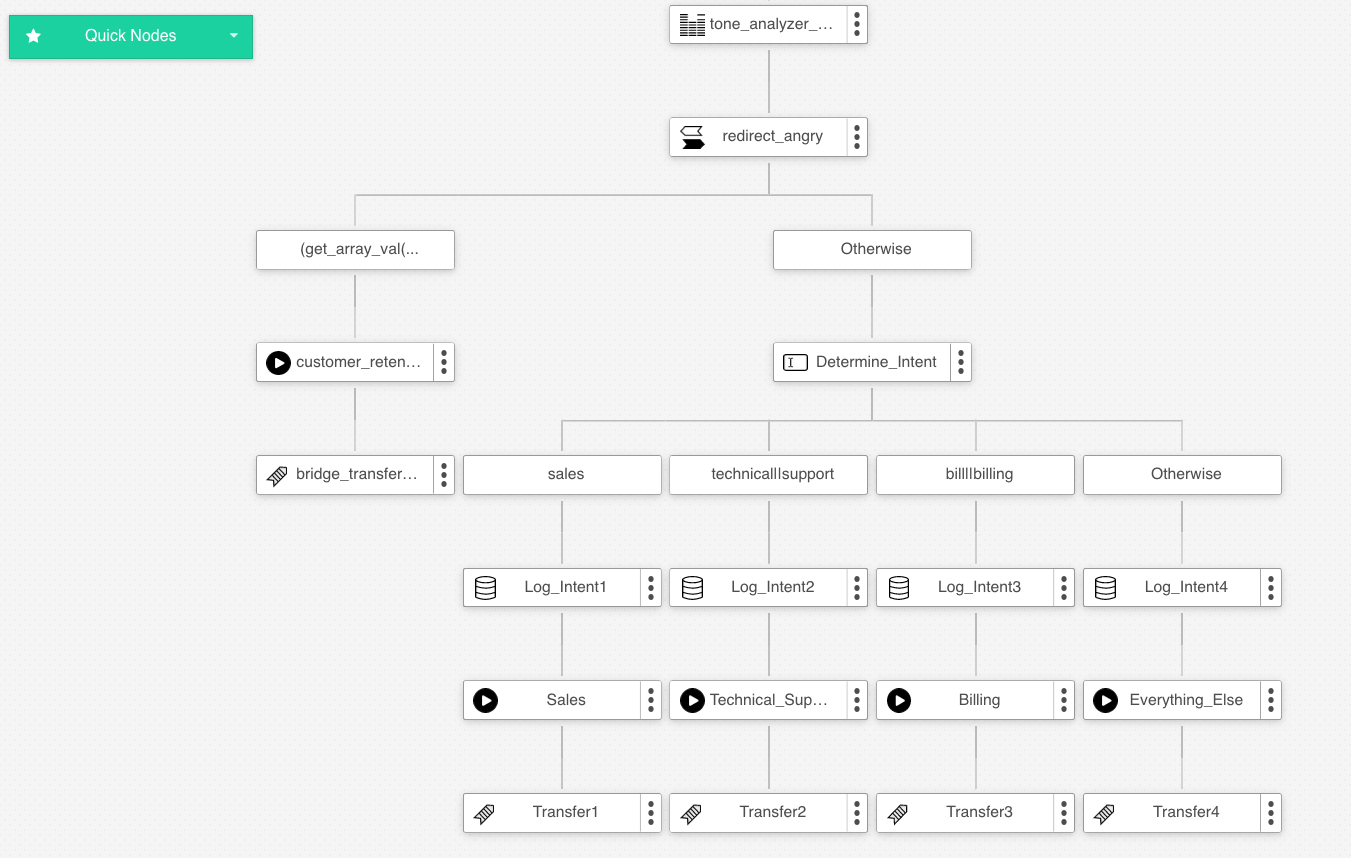
For this tutorial we are going to start with the Natural Language Call Steer task (from the Task Library) and add some further functionality by adding on the Tone Analyzer node. The end result will be an Autoattendant that can direct caller's based on their natural language reponses as well as transfer angry callers directly to the customer retention department.
Let's dive in!
Creating a New Task (from the Task Library)
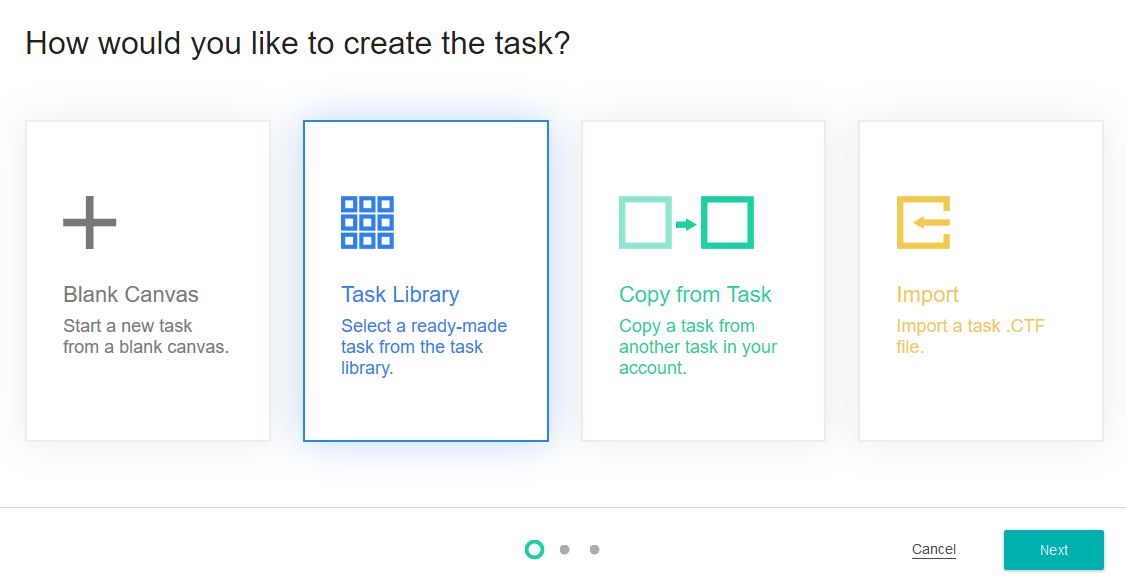
- Create a new voice task but instead of selecting a Blank Canvas, this time we will select Task Library. Click Next.
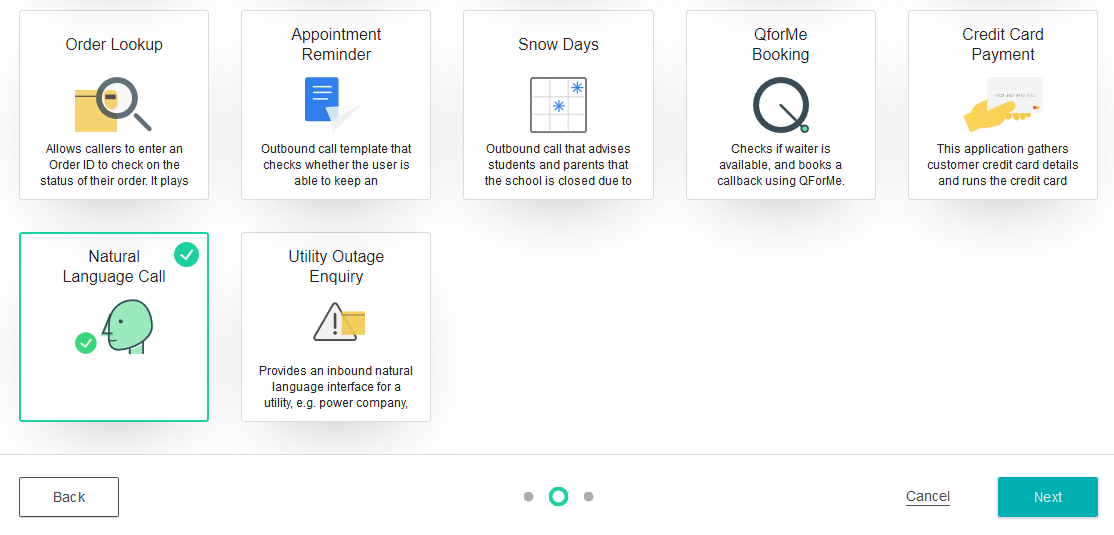
- From the Task Library find and select the Natural Language Call task. You can also use the search box in the top right hand side to help find it by typing in "natural". Click Next.
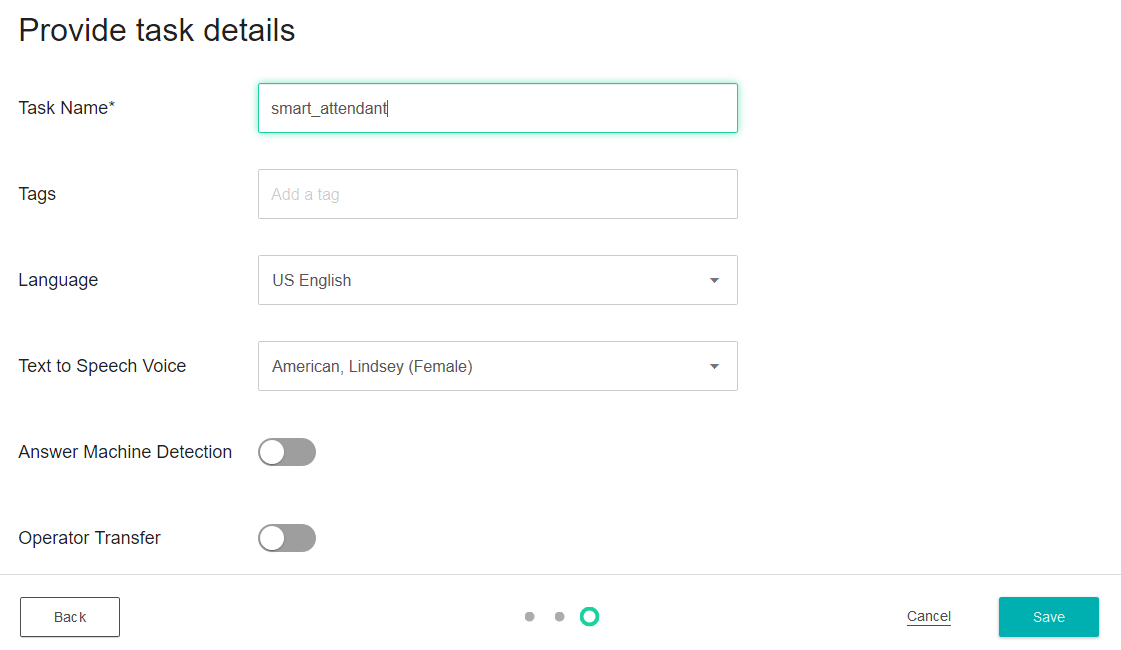
- Now provide the Task Details as you have with previous tasks. We will call ours Smart Attendant and leave all other fields as default. Click Save.
TIP
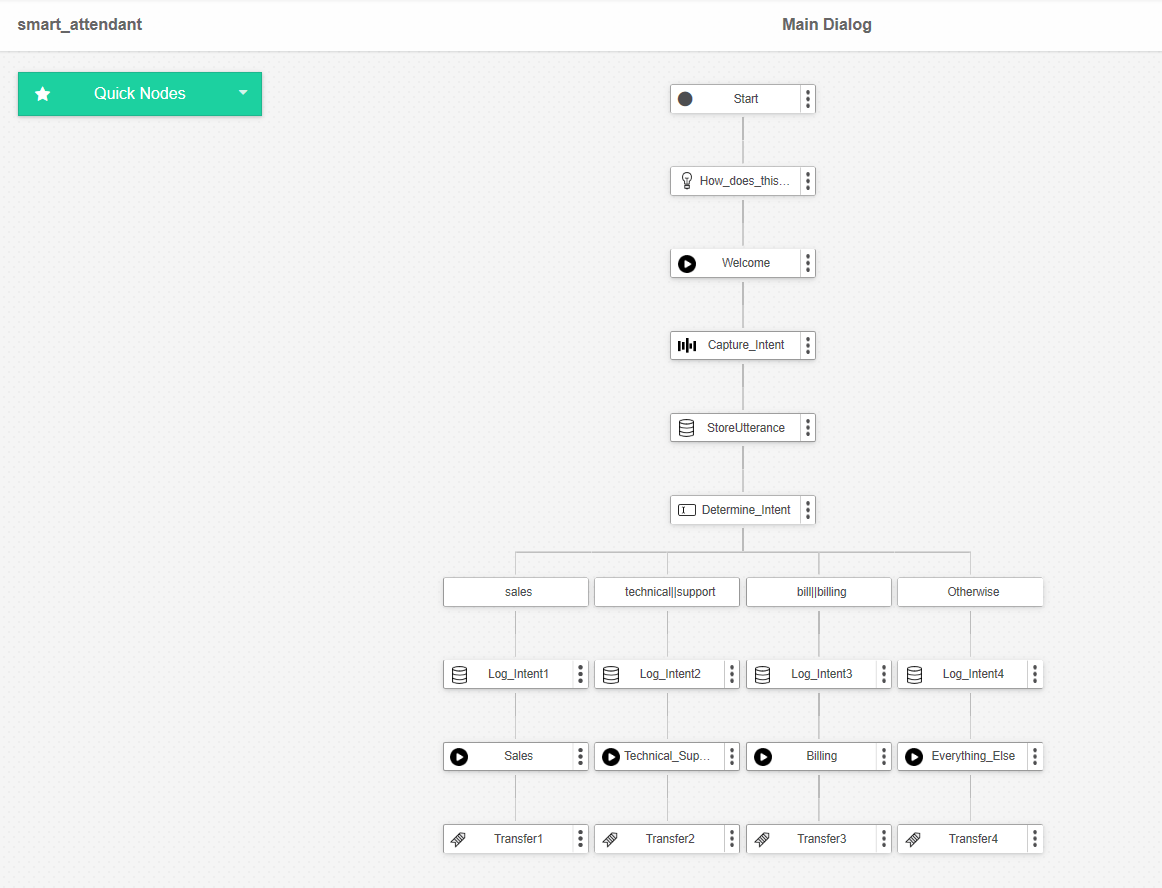
From here Studio will build the entire callflow for you and present you with the canvas view once completed. This is the power of the Task Library.
- From the canvas view you can see the completed callflow. Take a few moments to click through the nodes to see how the task works if you like. If you click the Comment node at the top of the canvas it will provide a text description on what this task currently does.
TIP
TL;DR the task is designed to direct and transfer a caller to one of three main areas based on their natural langage reponses and a keyword match (Sales, Technical_Support or Billing). If no match is found to any of these departments it will transfer them to an Everything Else phone number instead.
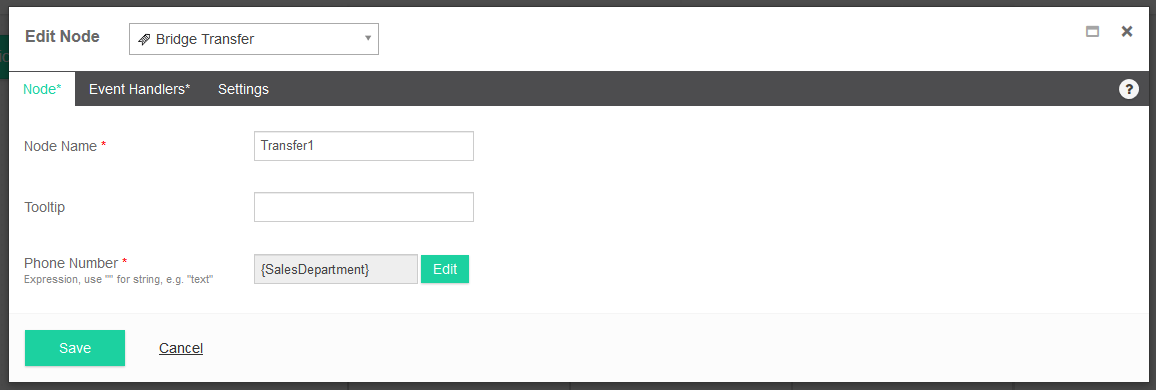
Providing transfer phone numbers
Currently, each of the four Transfer nodes at the bottom of the canvas (Transfer 1, Transfer 2, Transfer 3, Transfer 4) transfers to a phone number variable. Because the Task Library doesn't know which numbers we want to transfer to though, at the moment the variables are empty. Let's update those variables now.
- From Task in the top menu, select Task Level > Variables
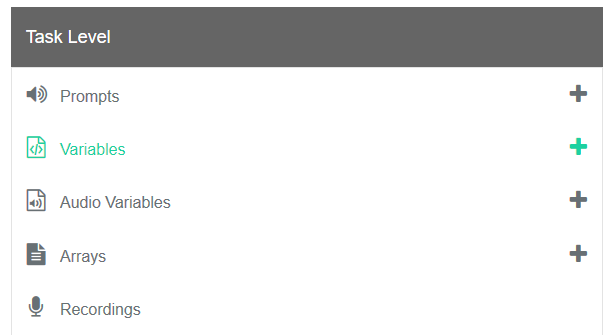
- You will see the variables in our new task have already been made for us.
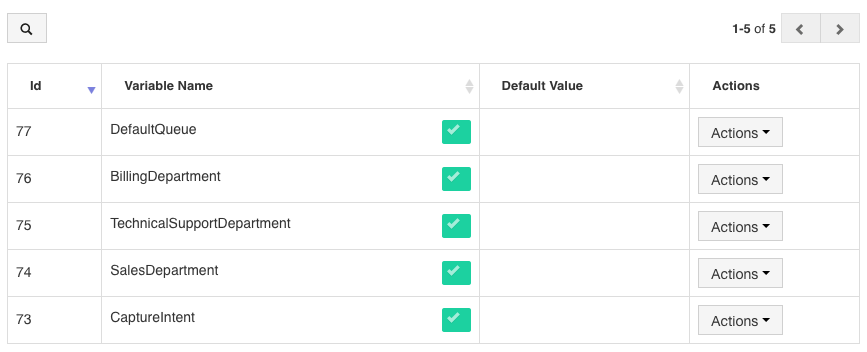
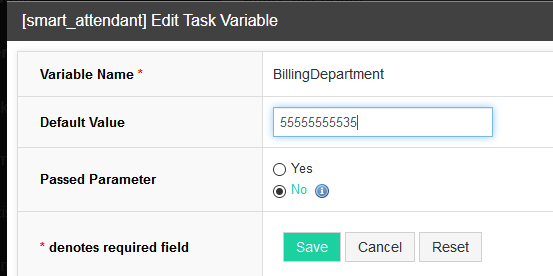
- Select the Actions button and Edit for each of our departments. Be sure to provide a real transfer phone number though! Click Save.
Once completed you will now have a functioning natural language call steering task. How easy was that! 👍
But wait, there's more!
So far our autoattendant is pretty darn smart, redirecting callers with natural language but what about our angry callers? Let's go one step further and add in a Tone Analyzer node to provide some additional functionality to our task.
We want to actually detect our caller's emotion with their responses and if the system detects anger, we will bypass the typical callflow and transfer them directly to the customer retention department.
Adding extra functionality with the Tone Analyzer node
TIP
Please note that the Tone Analyzer node detects tone by analyzing transcribed text, not audio.
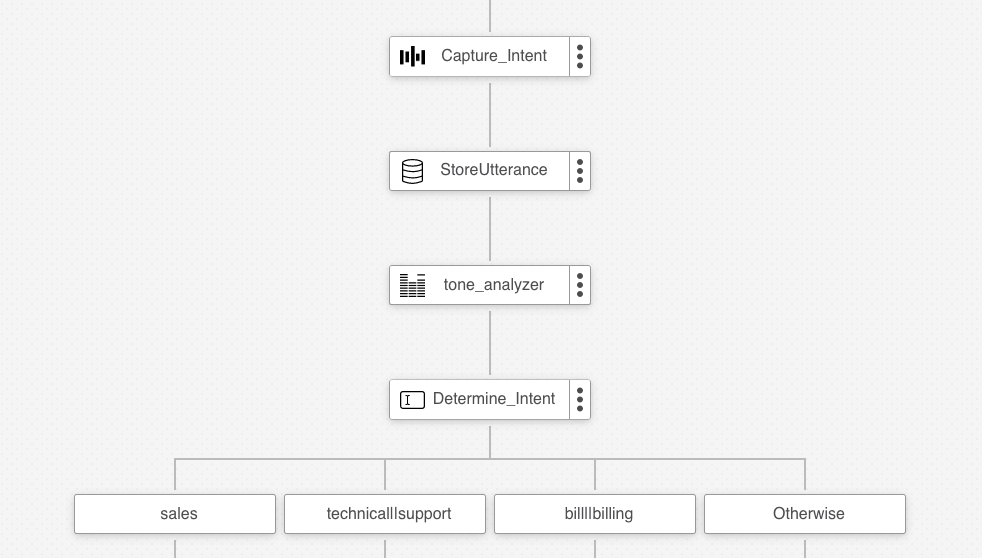
- Let's head back to our canvas. From the node palette, under the Web Service category, drag & drop the Tone Analyzer node onto the canvas just under the Store Utterance node.
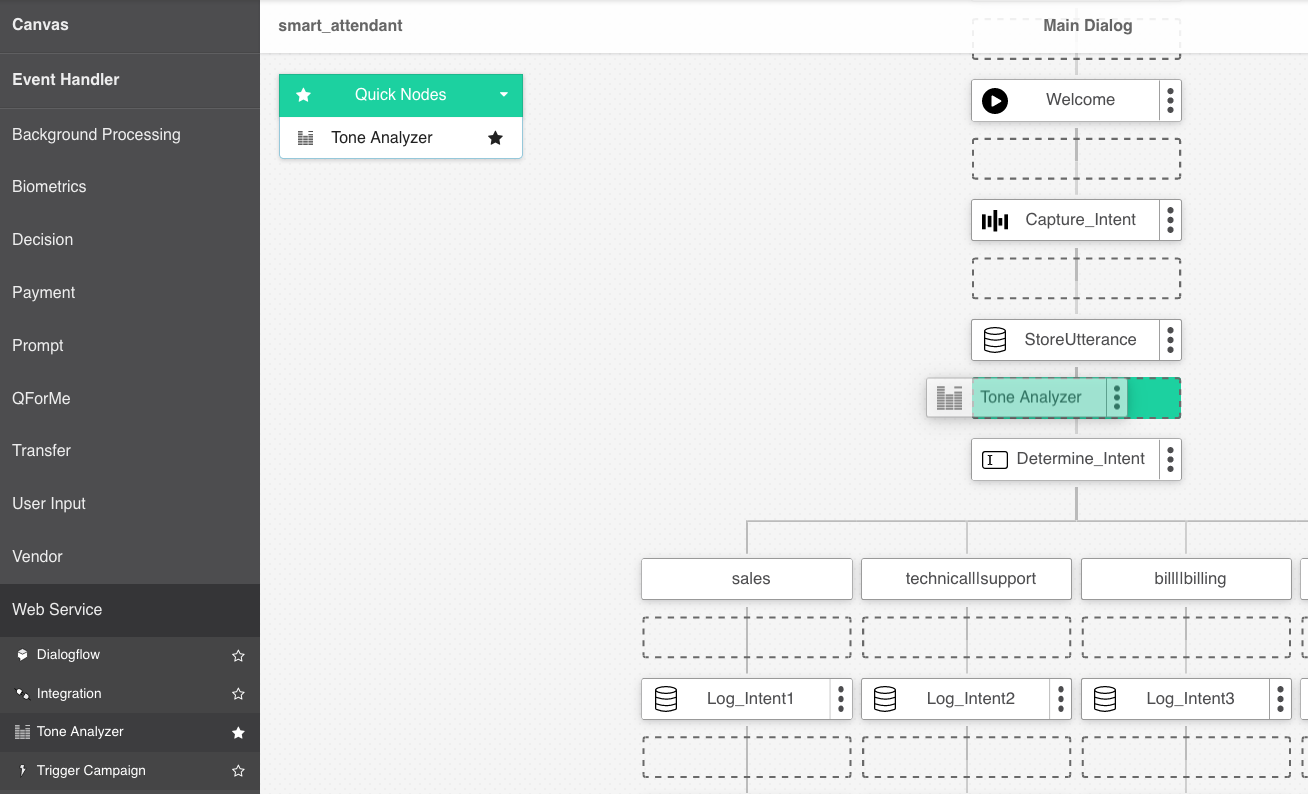
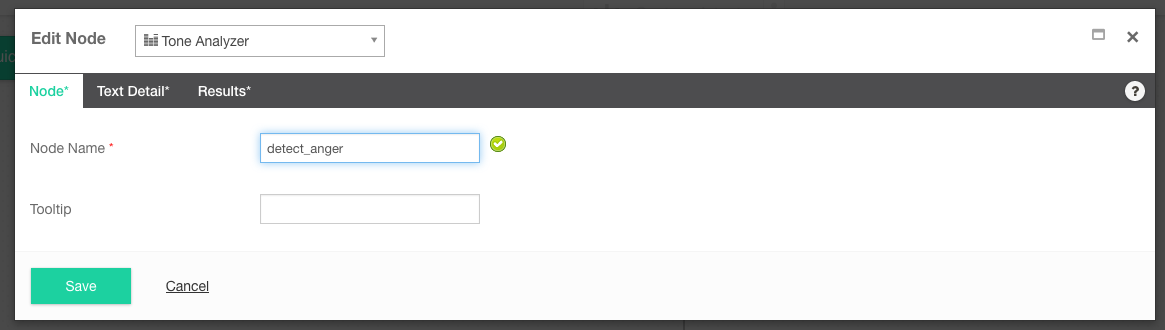
- Provide a Node Name. We will call ours detect_anger
- From the Text Detail tab we need to select the variable that we want to analyze for any anger. Select the CaptureIntent variable that is created in the Cloud Text-to-Speech node above. This is the caller's whole audio response, transcribed into text format which the Tone Analyzer can then analyze.
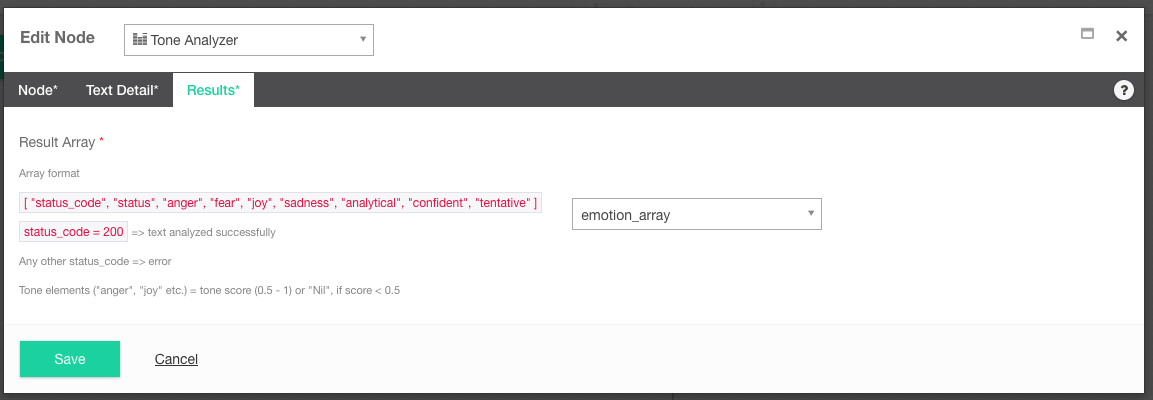
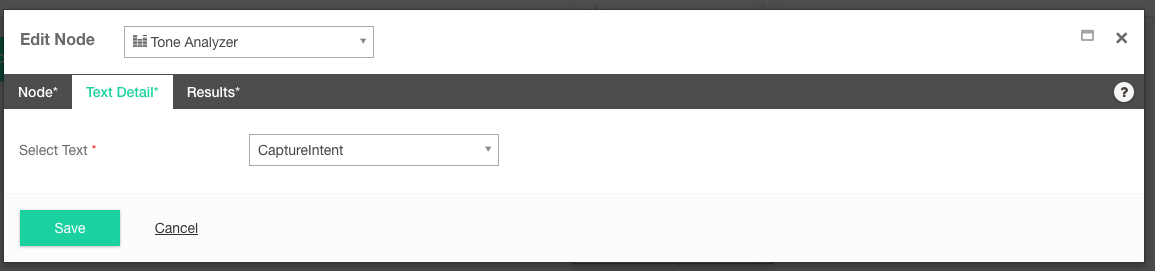 4. From the Results tab, we then need to save the analysis in an array variable. This will then let us run some logic based on the information in the array. Which in this case will be to transfer the caller if they were angry. But for now let's just select a new array and call it emotion_array. Click Save.
- Your canvas should now look like this.
Deciding what to do with angry callers
Now that we have the functionality set up to detect the emotions of our callers, let's add a bit of logic inside a Decision node to transfer those callers directly to our customer retention department (and skip all the other options in the callflow).
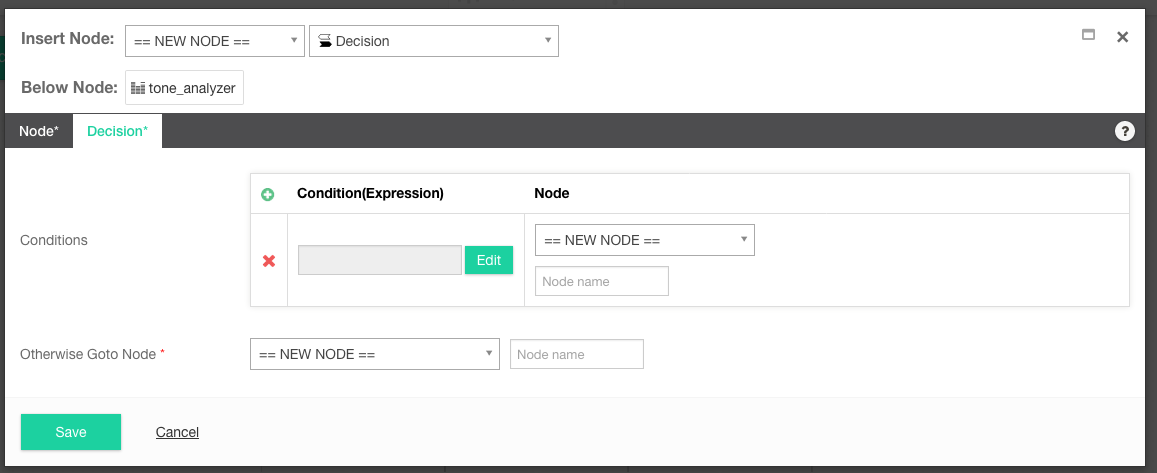
- To do this, from the node palette, drag & drop a Decision node directly under our Tone Analyzer node.

- Provide a Node Name. We will call ours redirect_angry.

- From the Decision tab in the Conditions section, select the Edit button. This is where we will use the Expression Builder to provide some actual decision logic.
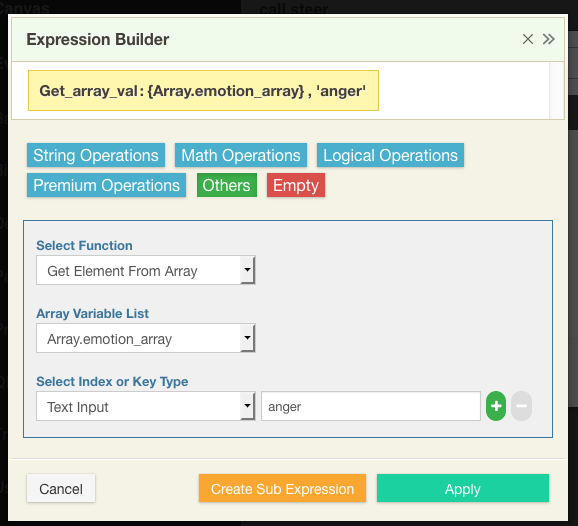
- Inside the expression builder we first need to search our emotion_array for the presence of anger. You can do this for a range of different emotions but in this case anger is most useful to our business.
- Select the Others button.
- From the Select Function dropdown, select Get Element From Array.
- From the Array Variable List, select our emotion_array.
- Under the Select Index or Key Type dropdown, select Text Input and fill in the value 'anger'. This is bascially saying search the emotion_array for any reference to anger.
- Click Create Sub Expression. It should look like this.
- Finally, we want to also add a bit of logic to not just detect any anger at all, but only those that the Tony Analyzer is quite confident are indeed, actually angry. To do this, we can say let's only include caller's that you're at least 50% confident are angry.
- Select the Logical Operators button.
- From Select Function, click Compare.
- From Select Value type, choose the Sub Expression we just made. Simply called Expression 1.
- Under operator, select the greater-than symbol.
- Under Select Value Type, choose number and provide the value 0.5 (50%). It should look like this.
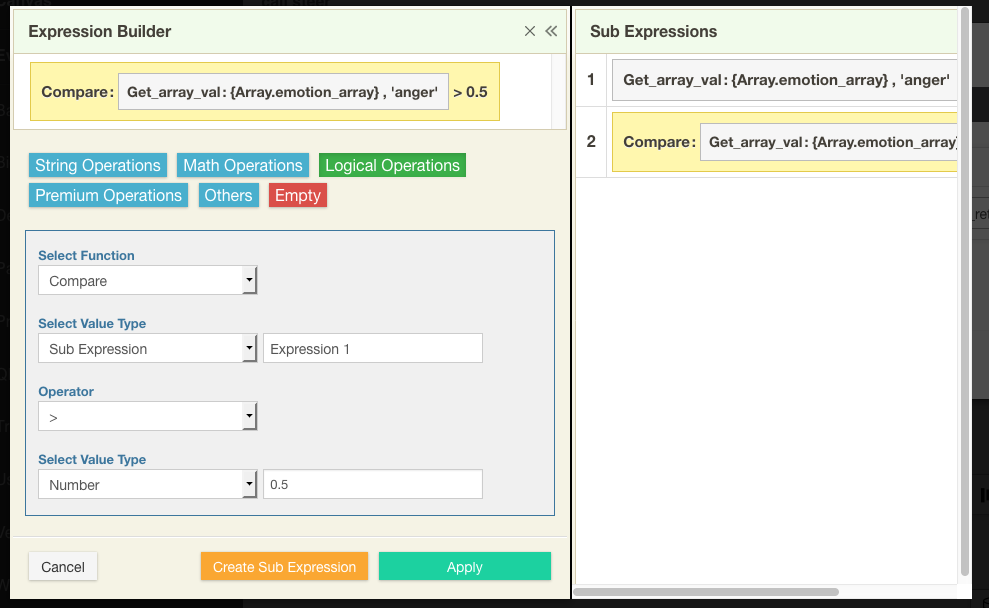
- Click Apply.
- Back in the Decision node, in the Node section, select New Node and call it customer_retention. So now we have it set up that if the Tone Analyzer detects anger with a confidence score greater than 50%.
- In the Otherwise Goto Node section, select the Determine Intent node. This is the regular Keyword Match node so if anger is not detected, the caller will go down the typical callflow and transferred to the appropriate department.
- Click Save.

Finishing Up
Now that we have a way to detect anger and then redirect a caller out of the normal callflow, let's simply fill in our Prompt Node then do the actual transfer.
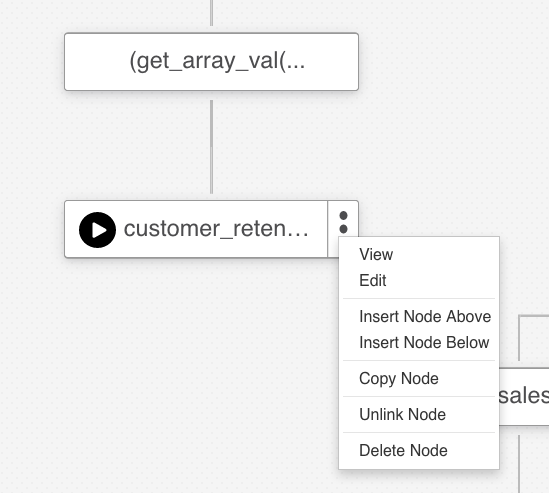
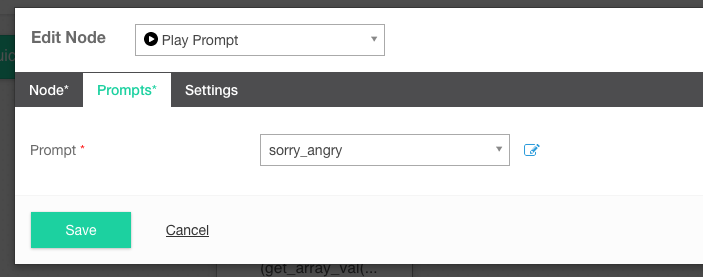
- Click on the elipses icon on the right hand side of the customer-rention node. Select edit.
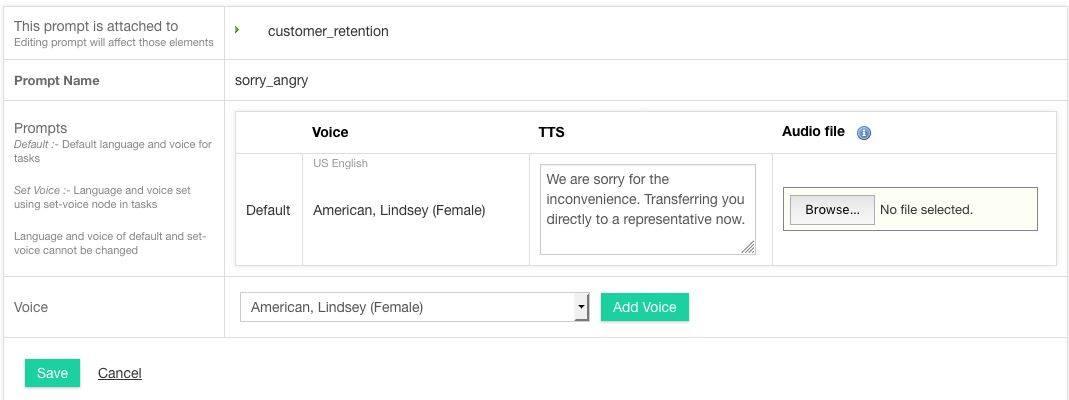
- From the Prompts tab click Prompt > New Prompt and provide a prompt name and the TTS text. We called ours 'sorry_angry' and have added "We are sorry for the inconvenience. Transferring you directly to a representative now." Click Save.
- Click Save.
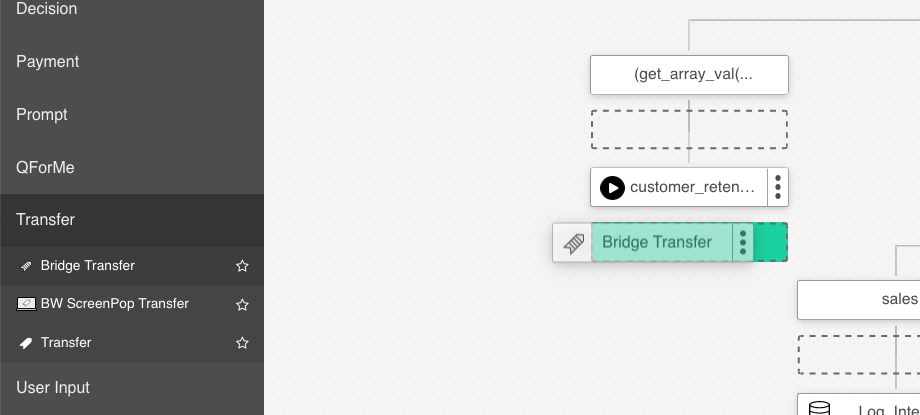
- From the node palette, under Transfer, drag & drop the Bridge Transfer node onto the canvas beneath the customer_retention prompt we just made.
- Then in the Phone Number section, select the Edit button > String Operations > Text Input and the phone number you would like to use. Note: You could also use a variable instead of a string and edit the phone number variable in the same way we did for the other transfer nodes. Click Apply.
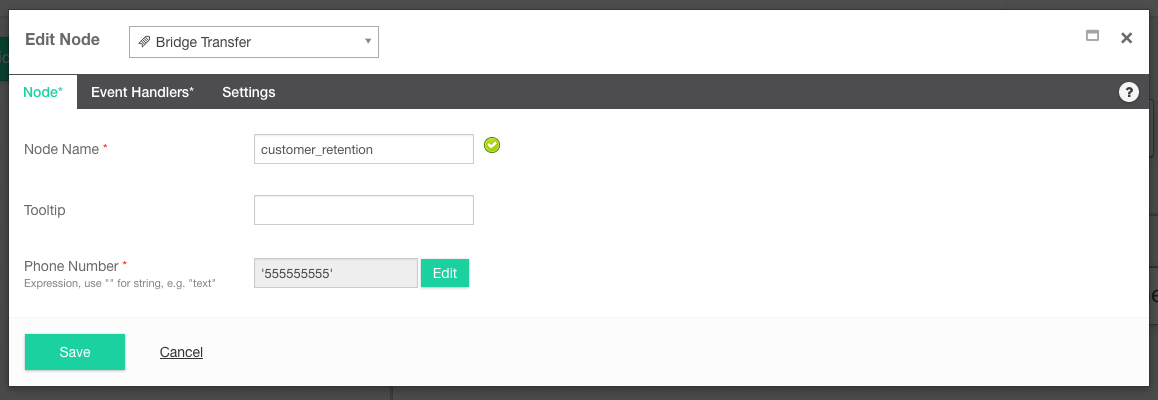
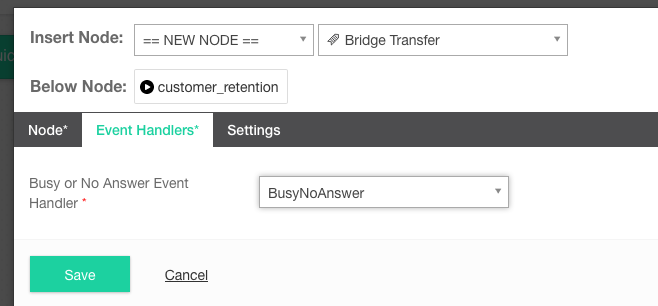
- Under the Event Handler tab, select an event handler. And finally, click Save.
- The final callflow should look like this.
- Now you can test your new autoattendant by clicking the test dialer icon in the top right hand side. You can practice by asking for specific departments are even try getting angry or swearing to get the customer_rention transfer to trigger. Happy cussing!
Create an Open Form Type using Google Dialogflow
Studio 6.1
Open Form introduced in Studo 6.1Creating an Open Form Type
The Open Form node uses a Studio streaming interface with Google Dialogflow to transcribe natural language responses in real time. This allows you to capture a caller's inputs via a form in a faster, more natural way & in multiple languages.
To use the Open Form node you need to first make an Open Form Type. We will create one for a Coffee Ordering virtual agent.
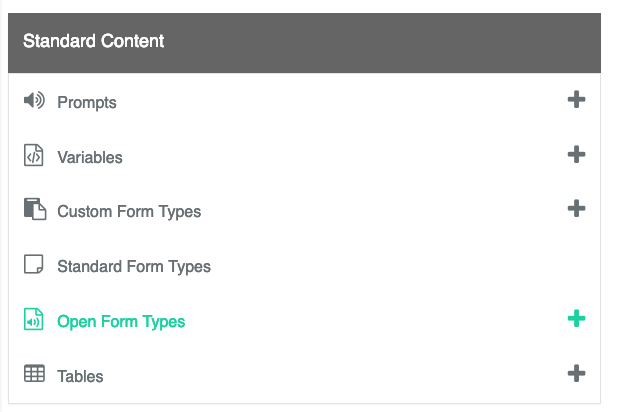
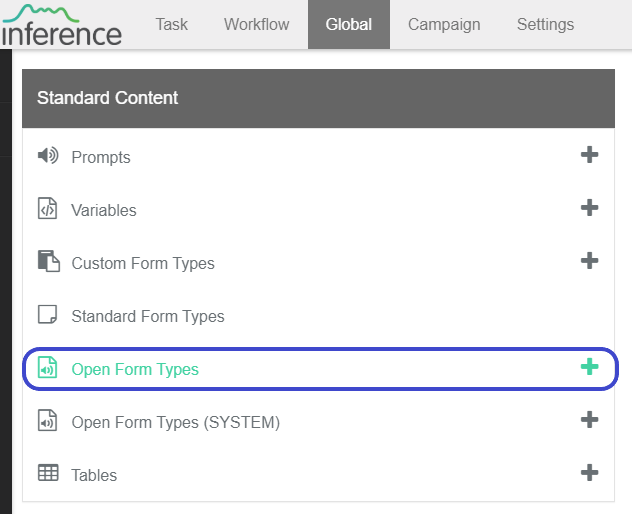
- Select Global from the top menu and the Open Form Types + icon, to create a new Open Form Type.
- Provide a Name and Description for your form. We will call ours simply,
Coffee_Order. - From the NLP Engine dropdown menu, select Google Dialogflow. If you wish to use the Amazon Lex engine, follow the tutorial here.

- Enter the Google Cloud Dialogflow Project ID. For more information, see the Google Dialogflow Setup instructions.
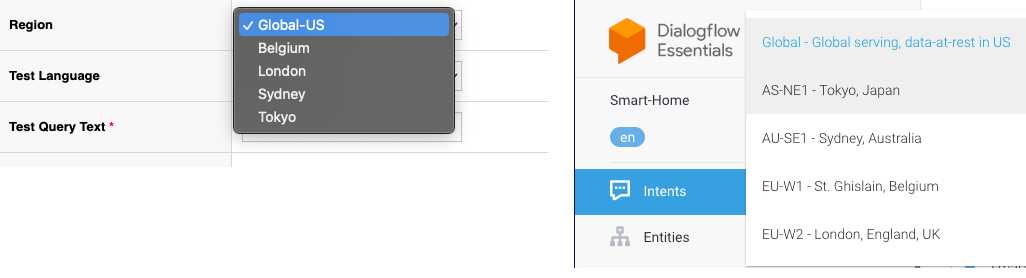
- Select a region. Use to integrate the Dialogflow bot host to the region. Regions include Global-US, Belgium, London, Sydney, and Tokyo.
Google Dialogflow Setup
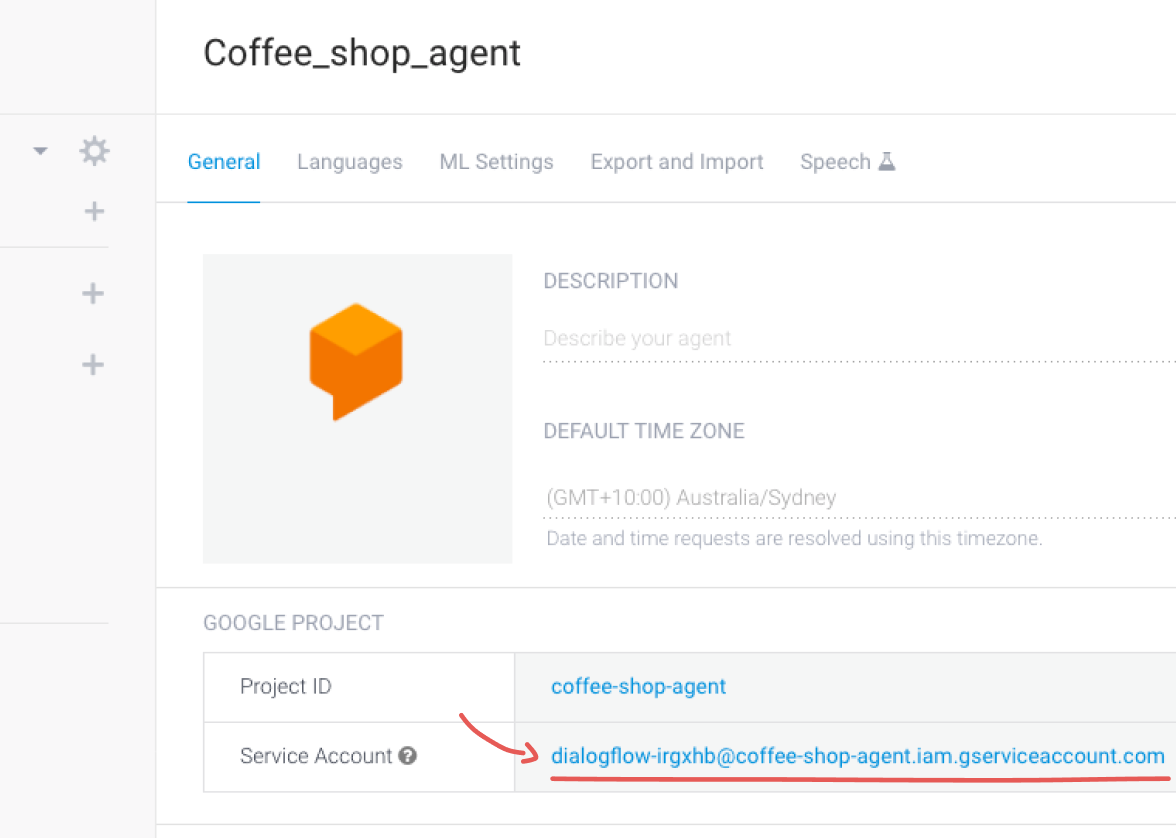
- You will need to provide your Project Id - this is the project id for your Dialogflow virtual agent. Login to Dialogflow https://console.dialoglfow.com and select your agent. The project id can be found under settings (gear icon) inside your Dialogflow project. Copy and paste the Project Id into Studio.
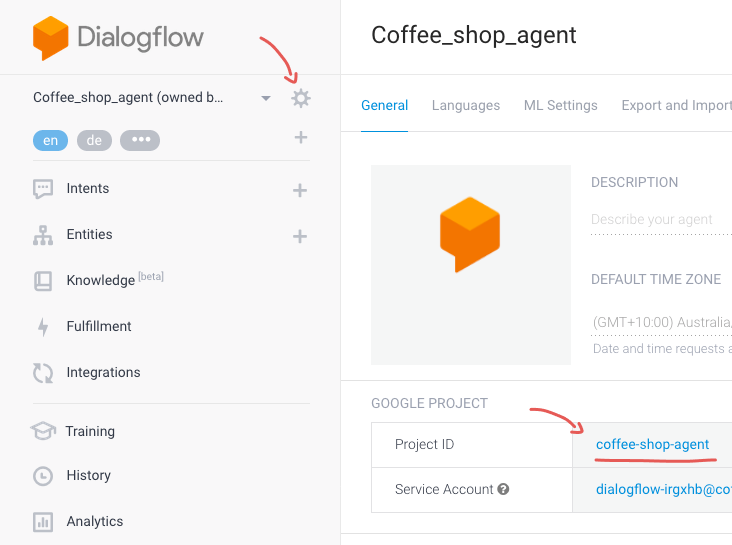
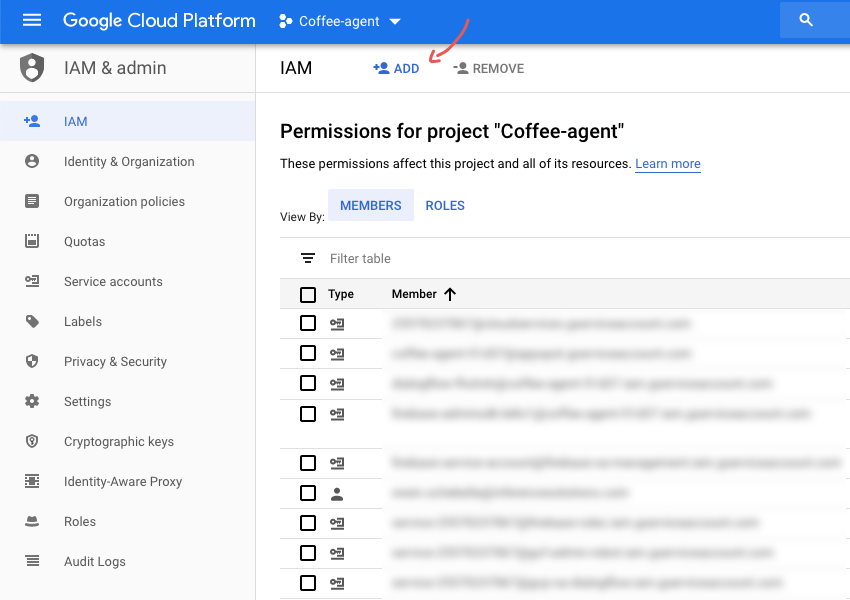
- We also need to set up some permissions in Dialogflow account so that Studio has access the Dialogflow Virtual Agents. Just below the Project Id in Dialogflow, click on the Service Account URL. This will open the Google Cloud Platform console.
- Inside the Google Cloud console, select IAM from the side menu then click the ADD button. You will see the Add members section.
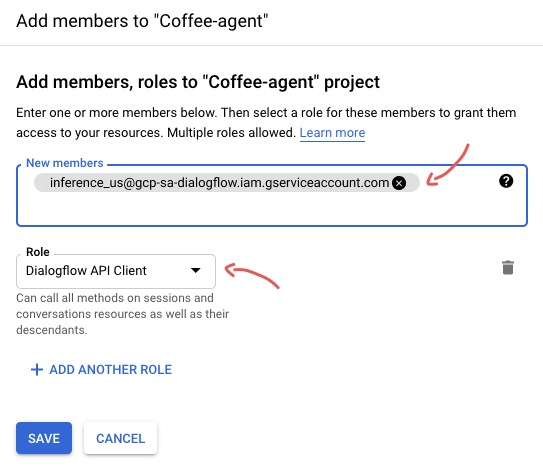
In the Add Members text box, paste in the Studio Google identity associated to your Studio region.
From the Role dropdown menu search and select Dialogflow API Client. Click save.
TIP
Note: If you don't have a Dialogflow account you can create one here. And to learn how to use Dialogflow, you can view the documentation here.
With Dialogflow now connected we can return to Studio to continue creating our Open Form.
Open Form in Studio
- Back in Studio, next you will need to provide a line of text as a test query. This is a typical response you would hope to expect from a caller using your service. In the case of our coffee order virtual agent we would ideally want the caller to let us know which
typeof coffee they wanted (e.g. a latte), anextrasfor their coffee (e.g. skinny milk), thenumberof coffees they wanted (e.g. 4), and thedeliverymethod (e.g. to-go). Let's meet all these criteria with our test query and include the textI want to order 4 skinny lattes to go.

- Select the Language for the test query and click the Preview Test XML button. You will see the returned XMl based on your test query text.
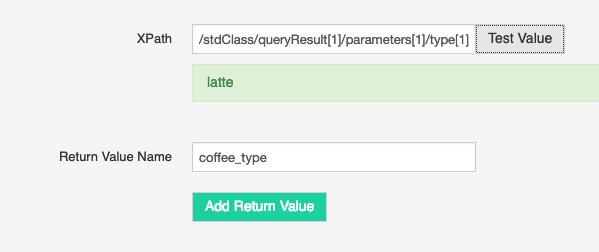
- Now we need to click through the XML tags to select the parameters we are interested in and then assign those to variables to be used in our Open Form. Select the
typeXML tag, click the Test Value button which should return 'latte'. - Provide a return value name, we will call ours
coffee_typethen click the Add Return Value button.
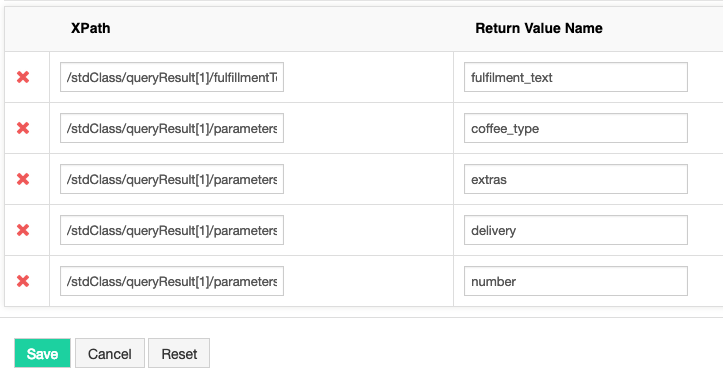
- Continue this process for each XML tag you wish to capture from the query. To finish click Save.
Using the Open Form Node
Now that we have our form type set up we can go ahead and actually use it inside the Open Form node inside our task.
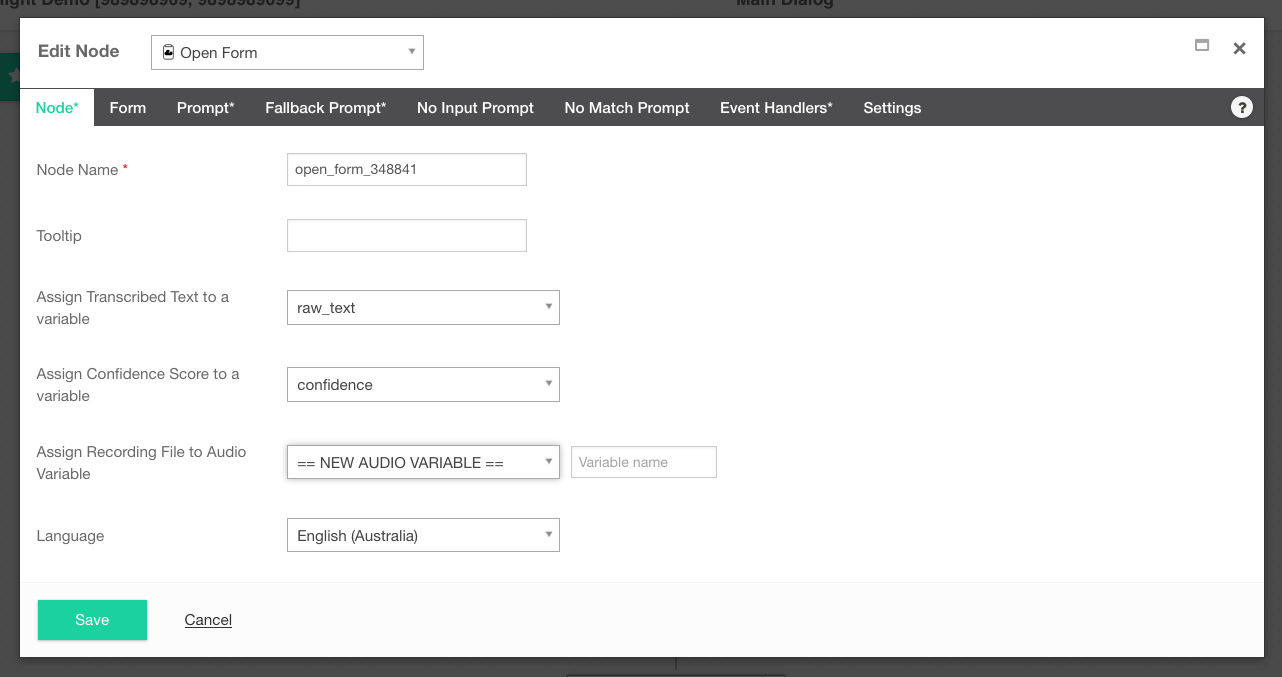
- Drag & drop the Open From node onto the canvas.
- Under the Node tab, provide a name, we will call ours
take_coffee_order. - Select or create a new variable under Assign Transcribed Text to a variable. We will create a new variable simply called
raw_text. - Select or create a new variable under Assign Confidence Score to a variable. We will create a new variable called
confidence. - If you like, you can also save the raw verbatim audio from a call into an Audio Variable. We will leave this for now.
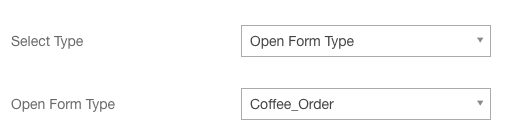
- Click the Form tab and under the Select Type, choose Open Form Type then select our newly created
Coffee_Orderform.
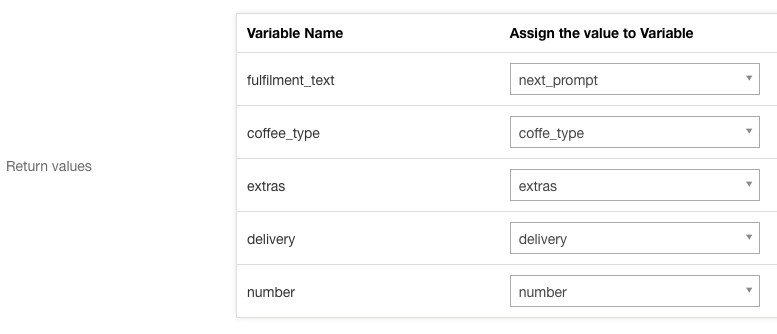
- Under the Return Values section go ahead and assign each of the return values to a new variable of the same names. See below.
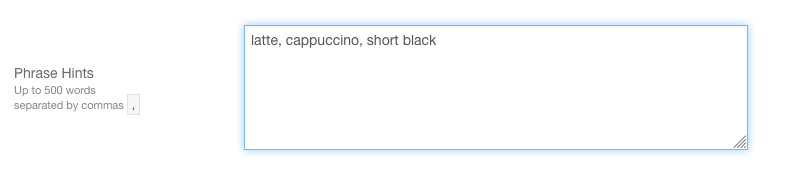
- In the Phrase Hints text box you can also include comma
,separated words that help guide the Google speech analysis. This is helpful if you are expecting certain responses that might not be typically common e.g. orange mocha frappuccino
TIP
Phrase hints with Open From nodes do not allow the use of special characters. If you are using a variable value or text which contains special characters, those characters will be ignored.
Note: the characters $ and _ are exempt from this rule and are allowed within phrase hints.
Complete the Prompt and Event handler tabs as you would for a standard Form node.
On the Settings tab, select whether your task should allow Bargein or not. Bargein allows the caller to interrupt the system and key ahead to the next prompt. This can be a great feature as it enables experienced users to move rapidly through the system to get to the information that they want. However, there will be cases when you may want to disable bargein. e.g. When your prompts or menu system have changed recently.
TIP
For Google Cloud Dialogflow, if you enable barge in, the prompt time should not exceed 60 seconds. If Studio detects non-speech energy, the call routes to the no-match event handler after 60 seconds.
- Confidence Level is the system's confidence when interpreting an input from a caller. The higher the confence level, the more accurate the caller's inputs must be.
- Single Utterance is ON by default.
- A single utterance is a string of things said without long pauses. A single utterance can be yes or no or a request, like Can I book an appointment?, or I need help with support.
- You may decide to disable the single utterance setting if the caller is expected to pause as part of the conversation. For example, the caller may read out a sequence of numbers and pause in appropriate places.
- Single Utterance must be OFF to customize Inter Result Timeout and Speech Complete Timeout.
- Inter Result Timeout
- To customize, turn OFF Single Utterance.
- Shortens or lengthens the time where silence delimits interim results.
- The typical use case would be for a caller reading out numbers. The caller might pause between the digits.
- Generally speaking, the Inter Result Timeout is set between 1 and 2 seconds.
- When set, ensure the allocated time is shorter than, and not too close to, the Speech Complete Timeout.
- Inter Result Timeout does not reset if there is background noise. Speech Complete Timeout does reset if there is background noise. If there is background noise, Inter Result Timeout may be more reliable in determining when the speech is complete.
- Speech Complete Timeout
- To customize, turn OFF Single Utterance.
- Speech Complete Timeout shortens or lengthens the time where silence indicates the caller's speech is finished.
- Use for responses with an interlude to ensure the system listens until the caller's speech is finished.
- Recognition Model
- Studio supports these Google Cloud Dialogflow voice models. The voice models available depend on the language selected.
- ASR Default - Use if your audio does not fit the other models. You can use this for long-form audio recordings that feature a single speaker only. ASR default produces transcription results for any type of audio, including audio from video clips. Ideally the audio is high-fidelity, recorded at 16,000Hz or greater sampling rate. Do not use when Single Utterance is selected.
- Latest Long - Use for long content. Examples include media like video or spontaneous speech and conversations. You can use this in place of the default model.
- Latest Short - Use for short utterances a few seconds in length. Examples include capture commands. Consider this model instead of ASR Command and Search.
- Phone Call - Use to transcribe audio from a phone call. Typically, audio from a phone call is recorded at 8,000Hz sampling rate.
- ASR Command and Search - Use for shorter audio clips. Examples include voice commands and voice search.
TIP
When Single Utterence is ON, either leave the Recognition Model as ==Disabled== or set the Recognition Model to Phone Call or ASR Command and Search. Single Utterance cannot be used with other recognition models.
- Click Save.
Create an Open Form Type using Amazon Lex V2
The Open Form node uses a Studio streaming interface to transcribe natural language responses in real time. This allows you to capture a caller's inputs via a form in a faster, more natural way & in multiple languages.
Before you can create an Open Form Type using Amazon Lex V2 you must first integrate Amazon Lex with Studio and create an Amazon Lex V2 bot.
Integrate Amazon Lex with Studio
Follow these instructions to grant Studio access to your Lex bots. You need only do this once. If you have completed these instructions in the past there is no need to repeat.
To complete these instructions you need the Five9 Inference Studio ARN which is arn:aws:iam::008688055724:user/svc_prod_inferencestudio_lex
Sign up for an AWS account. Skip this task if you already have an account.
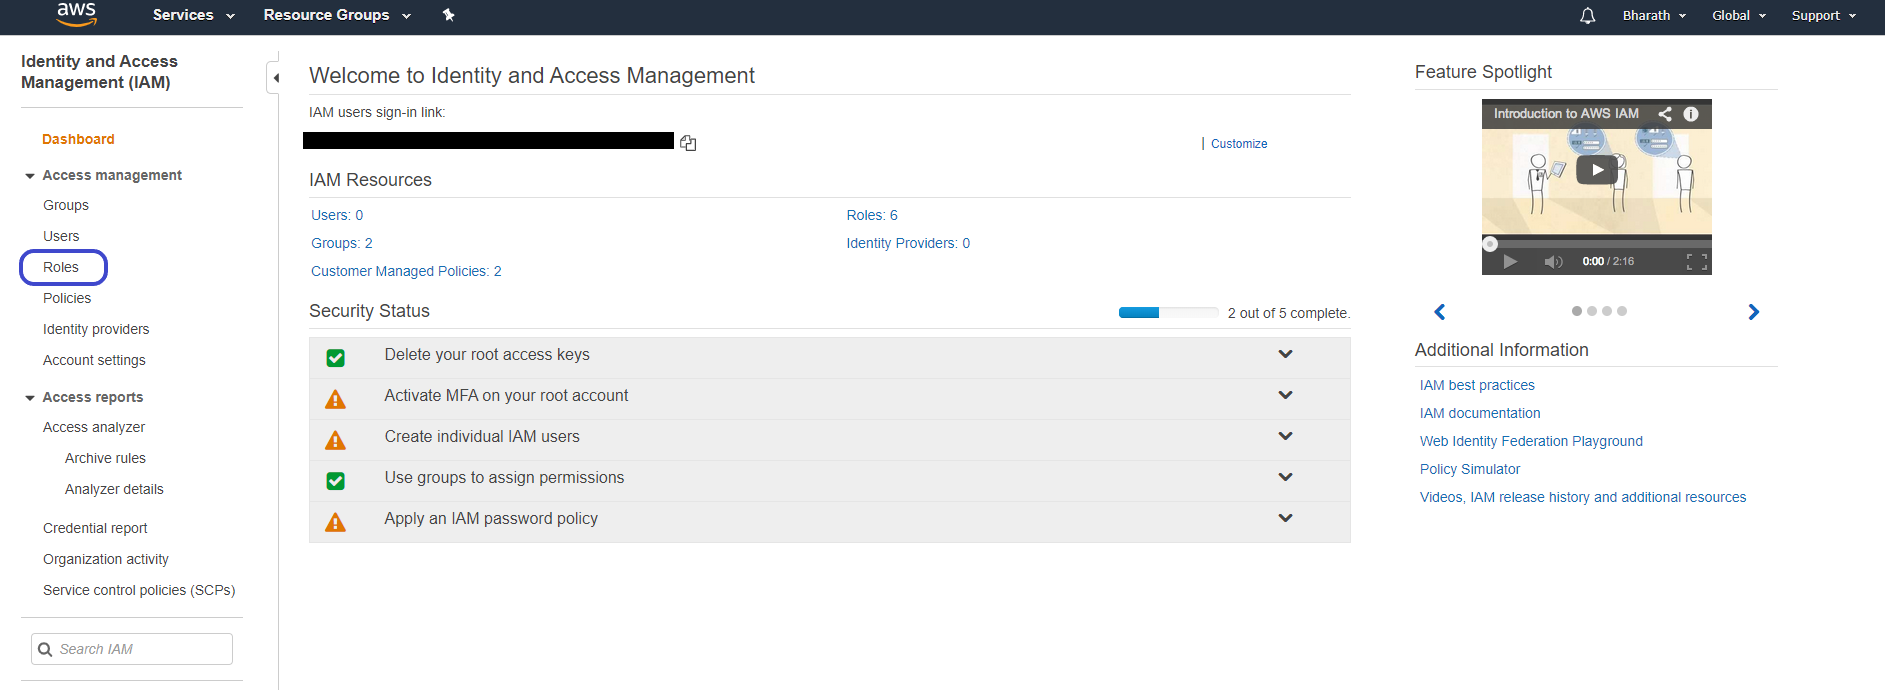
From Services, navigate to IAM.

- From IAM, select Roles.
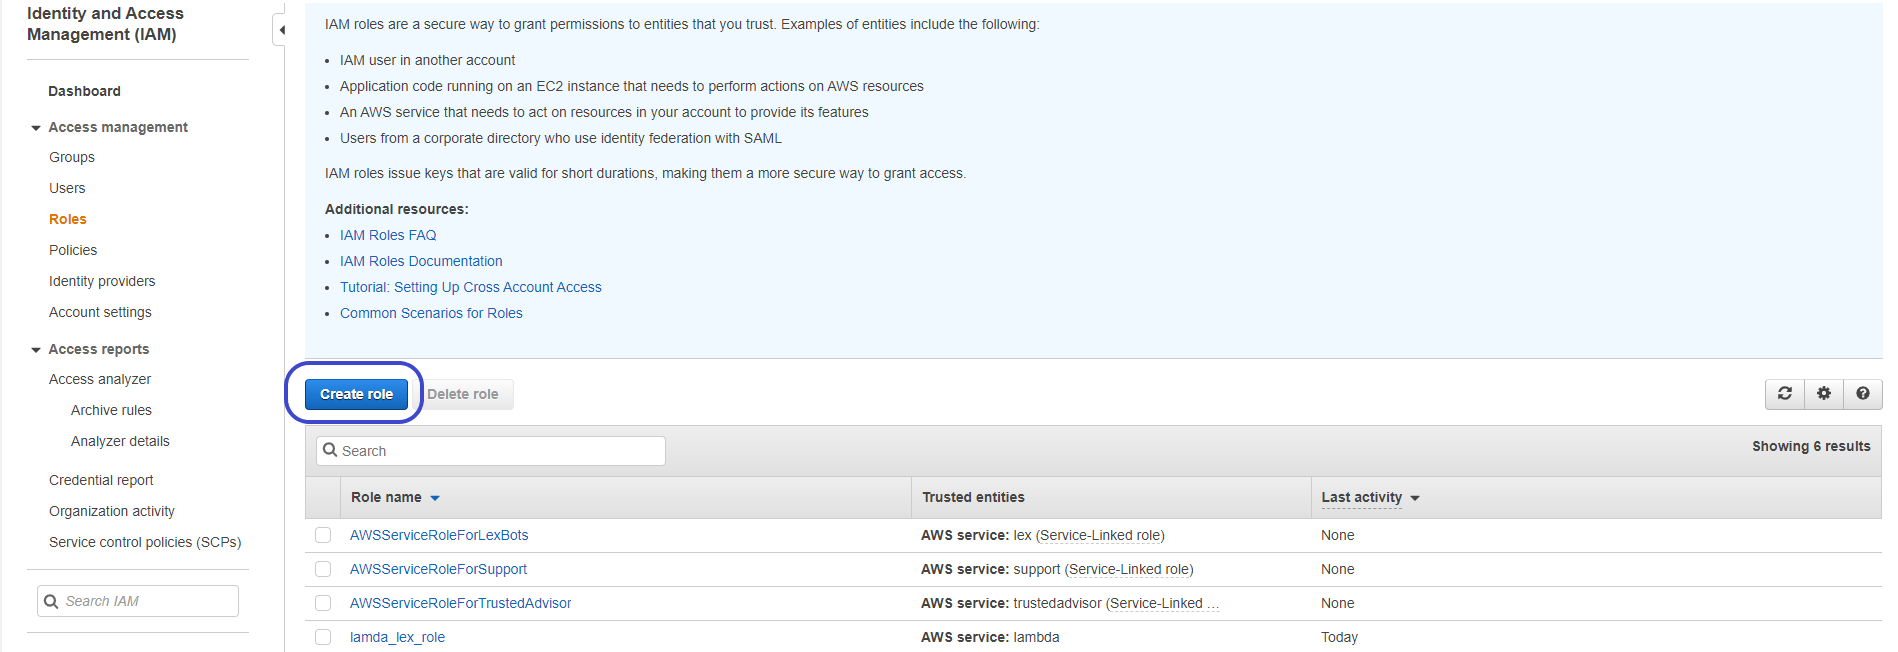
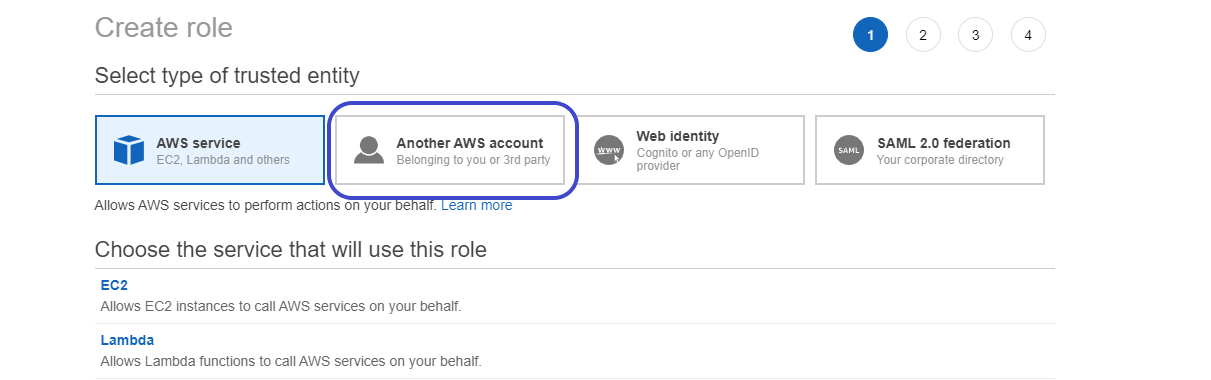
- Click Create Role.
- Select the type of trusted entity as Another AWS account.
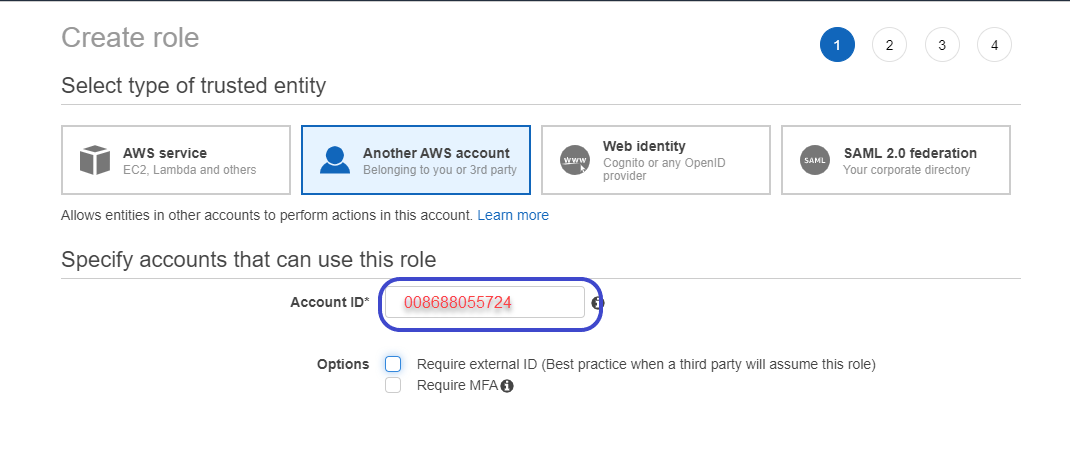
- Enter the AWS Account ID portion of the Five9 Inference Studio ARN which is 008688055724
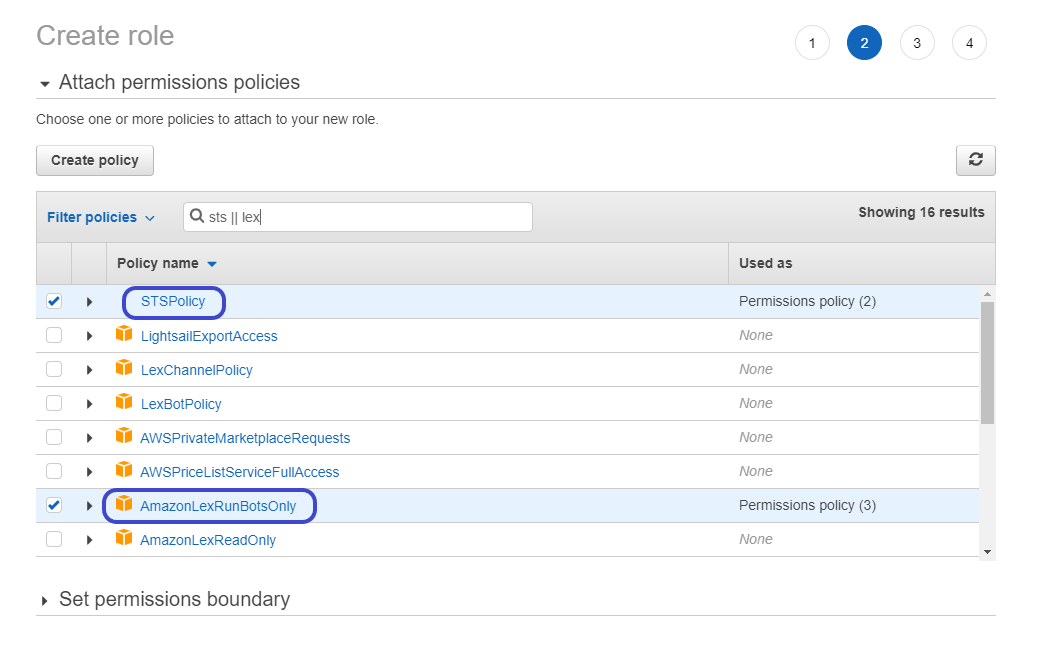
- Select the AWS policies STSPolicy and AmazonLexRunBotsOnly.
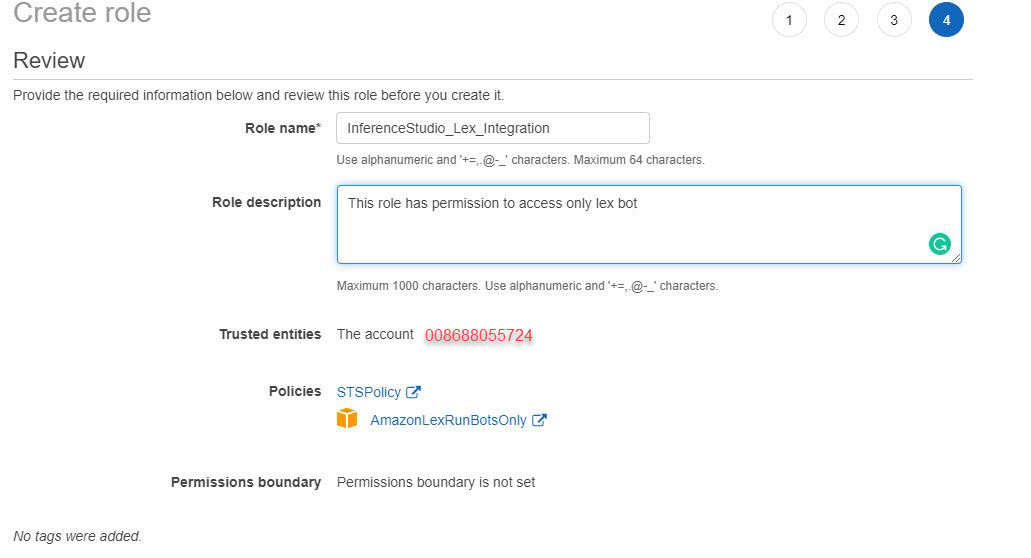
- Give the role a name. The following screenshots use the name InferenceStudio_Lex_Integration. Optionally give the role a description. Create the role.
- Click on the role in the list.

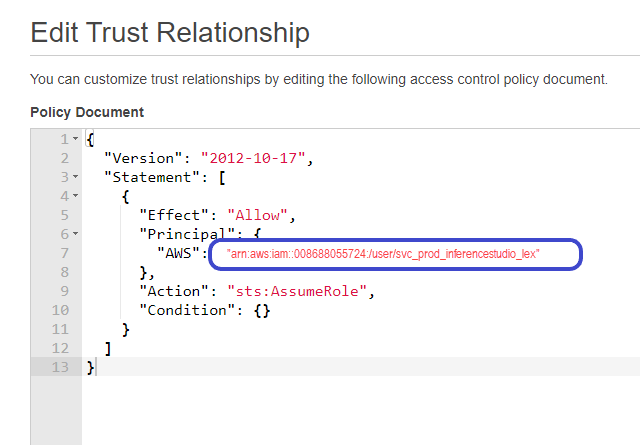
- Click Edit trust relationship.
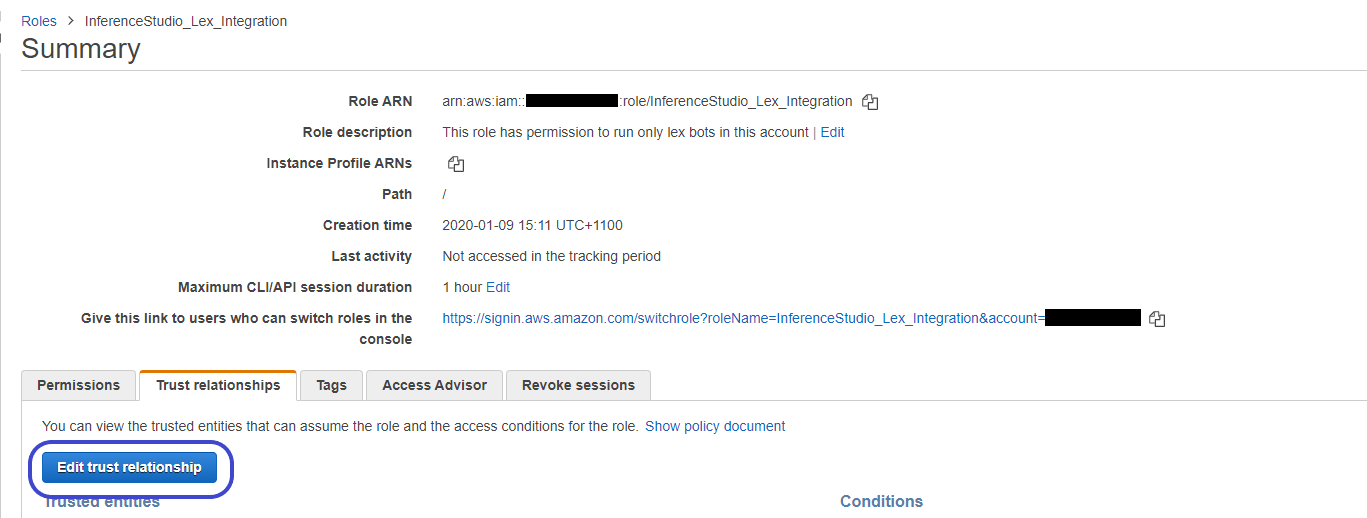
- Enter the Five9 Inference Studio ARN which is arn:aws:iam::008688055724:user/svc_prod_inferencestudio_lex
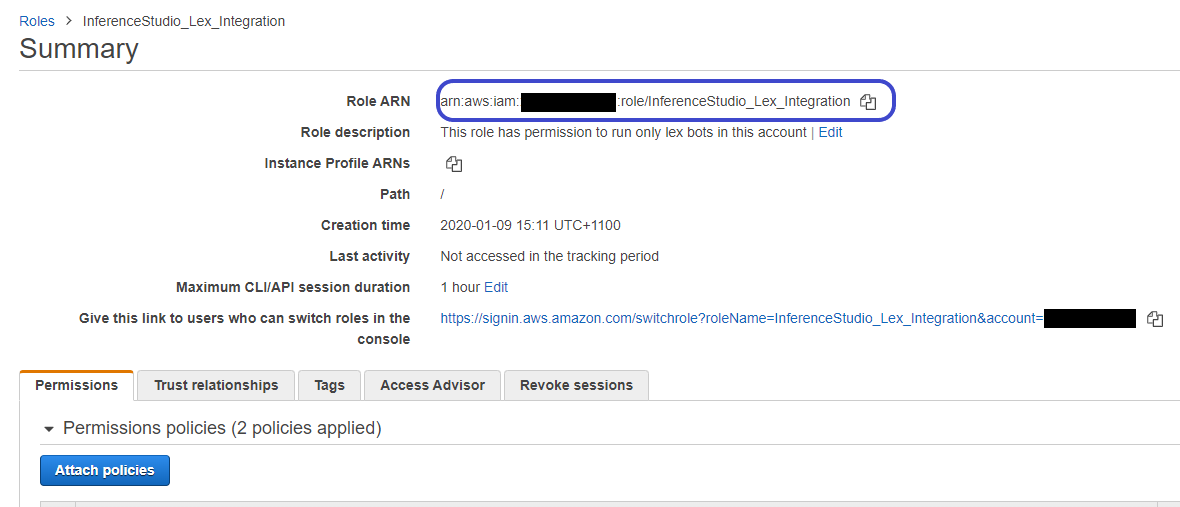
- Make a note of the Role ARN. You will use the Role ARN later to configure the Open Form Type. Verify the role has permissions to STS and AwsRunOnlyLexBot.
Create an Amazon Lex V2 bot
Before following these instructions, make sure to integrate Amazon Lex with Studio as described above.
Select an AWS region on the right side of the top bar.
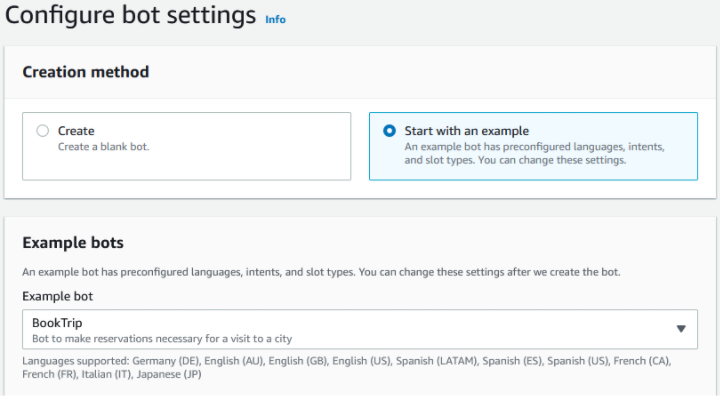
Click Create bot

- Select Start with an example. Select an example bot. We have selected BookTrip for this exercise.
Give a name to the bot.
Complete other sections based on your requirements. Click Next.
Select a language. Click Done.
- Build the bot.

The bot id, bot alias id, and AWS region are used to identify an Amazon Lex V2 bot programmatically.
- Take note of the bot id.

- Take note of the bot alias id.

Create a Studio Open Form Type for the Amazon Lex V2 bot
To use the Open Form node you need to first make an Open Form Type.
Sign in to Studio.
Select Global from the top menu and the Open Form Types + icon, to create an Open Form Type.
- Fill in the required fields.
| Field | Description |
|---|---|
| Type Name | Give the open form type a name. |
| Description | Enter a description for the open form type. |
| NLP Engine | Select Amazon Lex. |
| Bot Name ID | Specify the Amazon Lex Bot ID. Refer to when you created the Amazon Lex2 Bot, step 9. |
| Bot Alias ID | Specify the Amazon Lex Bot Alias ID. Refer to when you created the Amazon Lex2 Bot, step 10. |
| Role ARN | Specify the Role ARN. Refer to when you integrated Amazon Lex with Studio, step 13. |
| Region | Specify the Amazon Lex Bot region. Refer to when you created the Amazon Lex2 Bot, step 2. |
| Test Language | Select the language the bot supports. Refer to when you created the Amazon Lex2 Bot, step 7. |
| Test Query Text | Type a brief typical response you would expect to receive. For example, "book a room". |
- Click Preivew Text XML
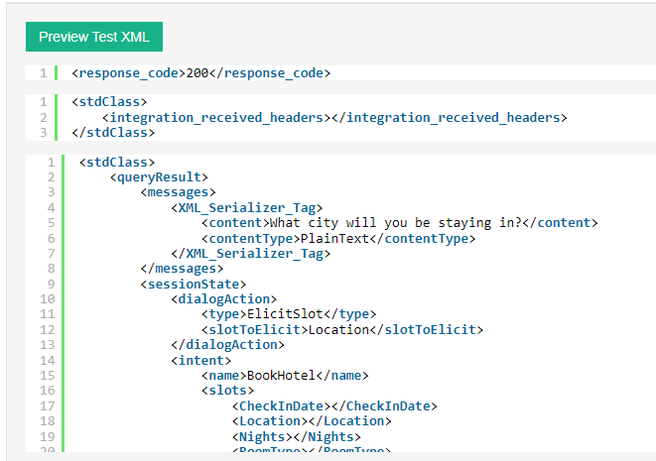
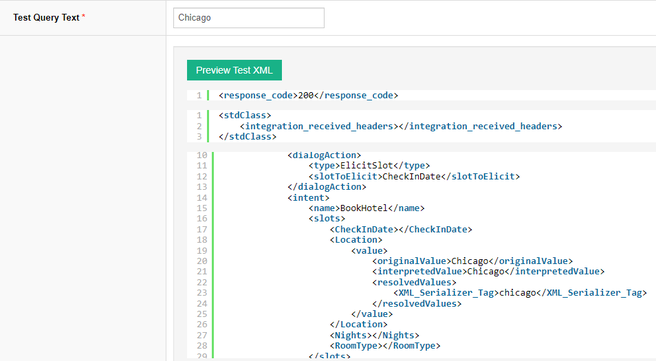
Update the returned XML. For example, enter "Chicago" as a response to the text field "What city will you be staying in?". Click Preview Test XML again.
In the Location path, OriginalValue contains what was sent and InterpretedValue contains how what was sent was interpreted at the bot level. For example, the Chicago text might be interpreted as "Chicago,USA" in the bot.
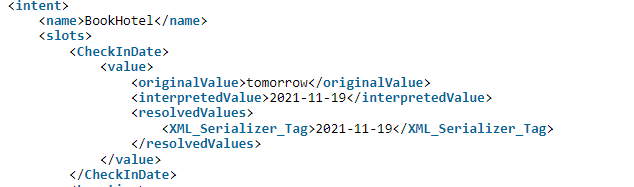
Update the returned XML again. Enter "tomorrow" as a response to the text field "What day do you want to check in?". Click Preview Test XML again.
In the CheckIn path, OriginalValue is now tomorrow and InterpretedValue is tomorrow's date formatted according to specifications for the Amazon Lex bot.
TIP
The Preview Test XML session state is retained for one hour. Try different scenarios. Check the response to entered values. Ensure the correct response path in return values.
- Add return values. The process is similar as for the above tutorial, Create an Open Form Type using Google Dialogflow.
Using the Open Form Node
Now that we have our form type setup we can go ahead and actually use it inside the Open Form node inside our task. The process is similar as for the above tutorial, Using the Open Form Node.
Studio Chatbot Client Development Guide
First step is to create a chatbot task
- Create a Chatbot task in Studio by following the instructions here.
- Once you have created a chatbot task, click Actions and select API Document.
The API Document page shows the following information -
- API URL: The API endpoint URL.
- Task Key: A unique key assigned to the task.
- HTTP Method: Which should always be POST.
- Content Type: Parameters format which should be a JSON object.
Parameters List -
- api_key: Unique key assigned to an account user.
- task_key: Unique task key mentioned earlier.
- session_id: Unique session key assigned to each conversation.
- text: Text typed or sent by the user.
- message_json: Should contain a valid JSON object which is available in the chatbot task as an array variable called
LAST_MESSAGE_JSON. Learn more. - user_key: An optional parameter used to identify a user or any other information.
How to use the Chatbot API
To start a chat conversation, an HTTP POST request needs to be sent to API URL at https://<studio-host>/chatbot/index.php
Header must set “Content-Type” as “application/json”. Parameters must be sent in the body as raw JSON.
Use empty session id to initialize chat session
“session_id” parameter for the first message must always be an empty text. This indicates that it is a start of conversation and the API will return back a unique session id in response.
{
  "api_key": "re51itj458rhjvd565cu205931aldjr098df",
  "task_key": "CHAT000003a5qc",
  "session_id": "",
  "text": "",
  "user_key": "123456"
}
This will respond back with the first message along with a unique session id which remains valid only for the current chat session and expires at the defined timeout for the task.
{
    "status": 200,
    "session_id": "c45ff7def52641b88d8aaa2bcd7abbd8",
    "message": "Hi, how can I help you?"
}
Use session id to continue with conversation
Use this session id in each subsequent request to continue with the conversation.
{
  api_key: "re51itj458rhjvd565cu205931aldjr098df",
  task_key: "CHAT000003a5qc",
  session_id: "c45ff7def52641b88d8aaa2bcd7abbd8",
  text: "I need to make an appointment",
  user_key: "123456"
}
Final response from Studio (end task) does not include a session id
The final response from the chatbot will have an empty session id with a status code of 204.
{
    status: 204,
    session_id: "",
    message: "Thanks and Good Bye."
}
jQuery code sample
Here is a code snippet where the API is used in jQuery.
const params = {
  api_key: "re51itj458rhjvd565cu205931aldjr098df",
  task_key: "CHAT000003a5qc",
  session_id: "c45ff7def52641b88d8aaa2bcd7abbd8",
  text: "I need to make an appointment",
  user_key: "123456"
};

var api_url: "https://studio.inferencecommunications.com/chatbot/index.php";

$.post(api_url, JSON.stringify(params), function (data) {

          if (data.status == "200") {
              session_id = data.session_id;
              message = data.message;
          }

          if (data.status != "200") {
              session_id = "";
          }
});
Sample Code
You can download a sample chatbot client here by visiting this link. The sample chat client along with this document can be used for a very basic implementation of the API.
Configuring Threshold Alerts for IVA Usage
You can receive alerts via email when your account is approaching allocated limits. If you are a service provider, you can receive alerts via email when accounts in your tenancy are approaching their allocated limits.
Log in as either an account level user or a service provider user. Log in as an account level user to configure alerts for your account. Log in as a service provider user to configure alerts for all accounts in your tenancy. The user interface and instructions are the same.
From the Portal Management System, click Home.
From the section Session Usage & Report, next to Max Active Sessions Report, click Alerts.

In the Email Alerts field, enter your email address. Alerts are sent to this email address.
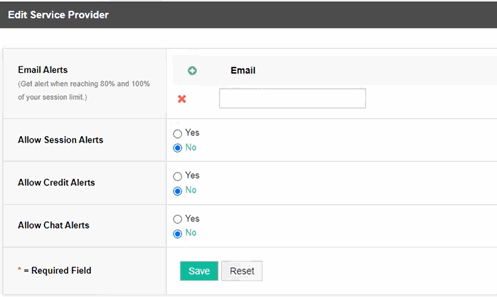
Choose the kinds of alerts to receive. The options are as follows.
Allow Session Alerts
Click Yes to receive session alerts. The thresholds are hard coded to 80% and 100%. The number of sessions that can run in your account is limited by the number of IVAs assigned to your account. At 80% usage you will receive an email alert, and again at 100%. You want to take action at the 80% threshold, because you don't want to loose calls from reaching 100% usage.
Allow Credit Alerts
If you have credits in your account, click Yes. Set the threshold. You will receive an email alert whenever there are fewer than the nominated number of credits in your account. If you enter 5000 in the field, an email is sent to you whenever there are fewer than 5000 credits in your account. If you are a service provider, an email is sent to you whenever an account in your tenancy has fewer than 5000 credits.
Allow Chat Alerts
If you use chatbots, click Yes. Set the threshold. You will receive an email alert whenever there are fewer than the nominated number of messages in your account. If you enter 5000 in the field, an email is sent to you whenever there are fewer than 5000 messages in your account. If you are a service provider, an email is sent to you whenever an account in your tenancy has fewer than 5000 messages.
Click Save.